Installing Boogey Lights® Cut N’ Click™ series on Softail models is a fairly straight forward process. You will first need to order the standard Cut N’ Click™ engine kit that comes with 78 LED lights and a wiring kit. Once you have your lights we can begin!
1. Undo your seat and figure out where you will place your remote control box (if you are installing one). There is not too much room under the seat on these models, but usually you can find a cavity to place the remote control box.
2. Run your ground wire and your hot fuse wire from the battery to the area where the remote control box will be placed. (This is also the place where all of your wires will be connected from your lights.)
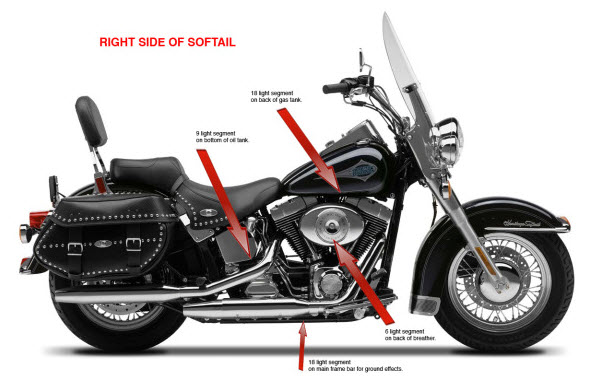
3. Prep your bike by cleaning and promoting. (you can view diagram to see where to clean and promote).
4. Cut your Cut N’ Click™ lights into the various segments that you will need for the bike. Here is the breakdown.
Right side of bike
(1) 18-LED segment (placed on the back of the gas tank with lights shining down)
(1) 6-LED segment (placed behind the breather with lights shining down).

Left side of bike
(1) 21-LED segment (placed on the back of the gas tank with lights shining down).
(1) 6-LED segment (placed behind the horn cover with lights shinning down).
Under Oil Tank
(1) 9-LED segment on bottom of oil tank pointing straight forward.
Ground Effects
(1) 18-LED segment (placed on frame on bottom of bike – bend every-other light to 45 degrees to get best effect). On some models you may need to split the 18 light segment in half and add 9 lights to each side of the bike. This has to be done if the 18 segment wont fit on a single side.
5. Stick your lights to the appropriate location making sure you have your connectors plugged-in BEFORE sticking.
6. Run all of your leads back to the pocket under the seat, adding zip ties to make things neat and hiding the wires.
7. Add your switch to the left side of the bike on the flat black brace going to your coil bracket.
8. Connect your wires with the remote control and return your seat. Please refer to the installation instructions if you need help with this step.
(Installing lights on the swing arms and wheels can also be done on these models. You will need to order the MEGA TNT, 5-Light TNT Series or Step Lights for lighting these areas. Which ones you order will depend on the color you are installing on your bike. Just call the Boogey Lights® office and they will be able to tell you which ones to order. To install these lights you will follow the same prepping instructions as above and simply run the wire leads to the battery for each light. Make sure if you are placing lights in the swing arms that the wire is clear from the belt and wheel. Use some zip ties to fasten your wires. Likewise, Boogey Lights® offers Steel Braid to cover the black wire lead if your front brake lines are chrome. (It looks good.)
Enjoy the new look!
Take a look at the customer photos page to see some final results. There are a lot of images here of Softails models with Boogey Lights® installed. Also, remember each bike may be a little different. You may be able to add more lights / or may have to remove some lights, depending on your bike. The instructions above are a general guide.

