


DRY VAN TRAILER UNDER-GLOW LIGHT KIT | 48' to 53'
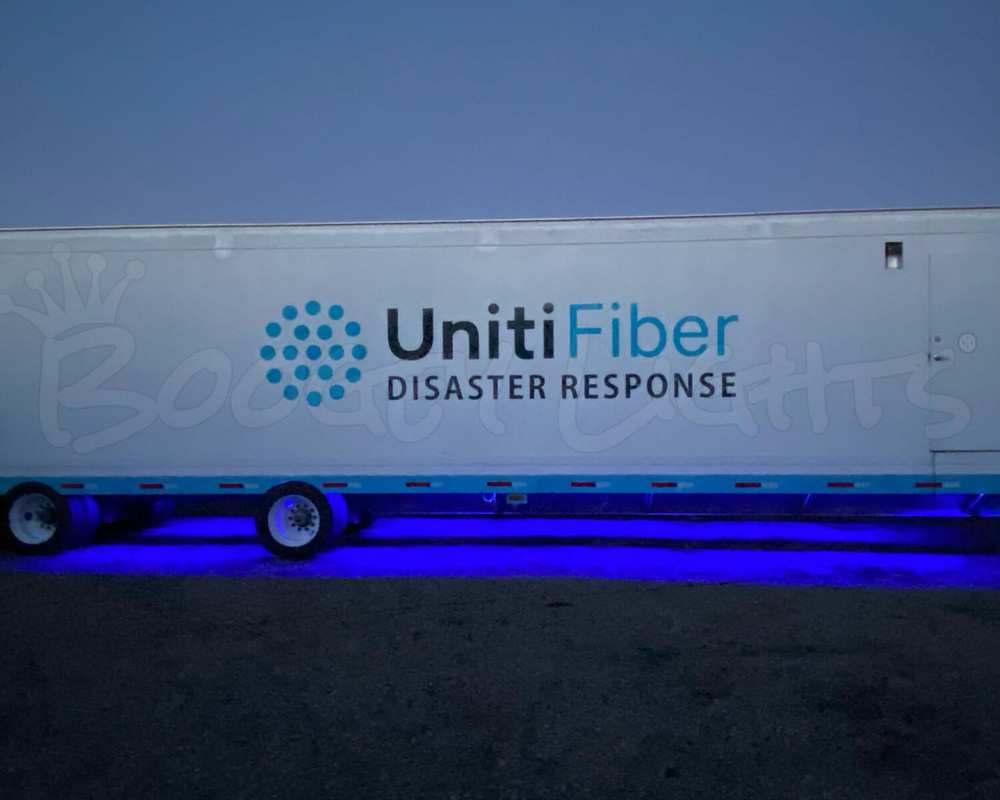
Looking to add under-glow lighting to your dry van or box trailer? Boogey Lights® has a solution. In fact, we have several. Better still, these kits can be customized to fit any number of trailer styles including box/van trailers, flat bed trailers, low boy trailers and drop or step deck 2 or 3 axle trailers. This product is setup to fit a 48' to 53' van trailer. It can be configured a number of ways depending on the style of your trailer.
Regardless of the trailer, you'll need to inspect the bottom of it to see where you have room to mount the LED lights and take some measurements of those locations. For some installations, you'll need to install some aluminum flat bar first to create a suitable mounting surface. You'll notice this under-glow LED light kit offers four layout options. The product photo carousel of this product page has diagrams of each of those four layout options. You can also download the four diagrams in PDF format here. Details about the product, the kit versions, LED color options and switching/control options can be found by scrolling down and reading this product page.
Be sure to scroll down into this product page for important details including FAQs, configuration specifics, product options, specifications, installation docs and more.
READ THIS BEFORE ORDERING!
Successful installation requires reading the written installation directions. While our How-To Videos offer helpful overviews, they do not replace the detailed documentation. Reading the instructions carefully is essential for proper fit, function, and long-term performance. Most support calls and warranty claims we receive stem from customers who don't read this information. Please take our advice and read the directions. We promise, you'll be happy with the results if you do.
KIT CONFIGURATIONS
The KIT CONFIGURATION drop down option offers four Kit Versions. Two for Center Mounted LED strips and two for Edge Mounted LED strips. Each version has it's own layout diagram.
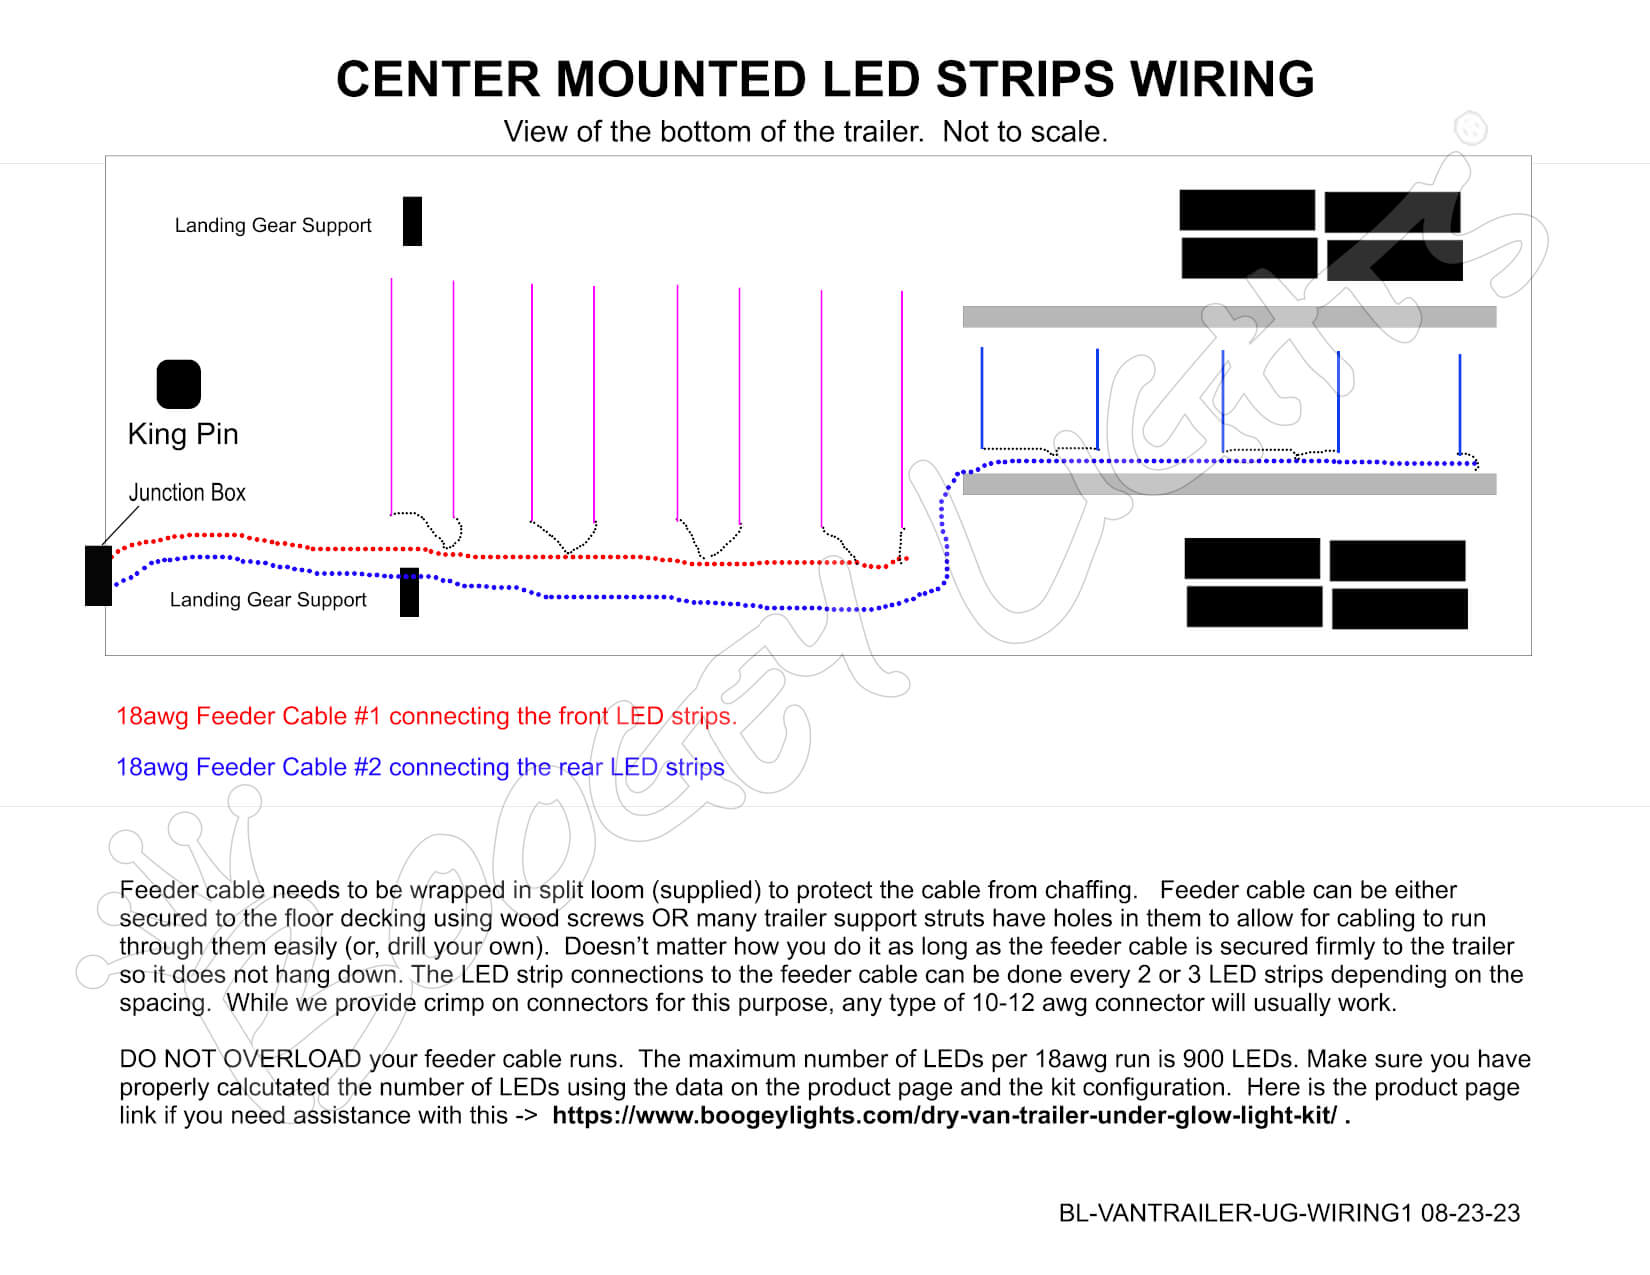
VERSION 1 / Center Mounted: 13 Heavy Duty LED strips mounted in two segments in the center of the trailer. There are a total of 8 LED strips in SEGMENT A and 5 LED strips in SEGMENT B. You can choose the lengths of the LED strips used for Segments A and B. For a typical 53' van trailer, this option has an LED strip mounted to every third cross brace strut going down the center of the trailer. The default configuration for this option has 900 LEDs. Download the PDF layout diagram.
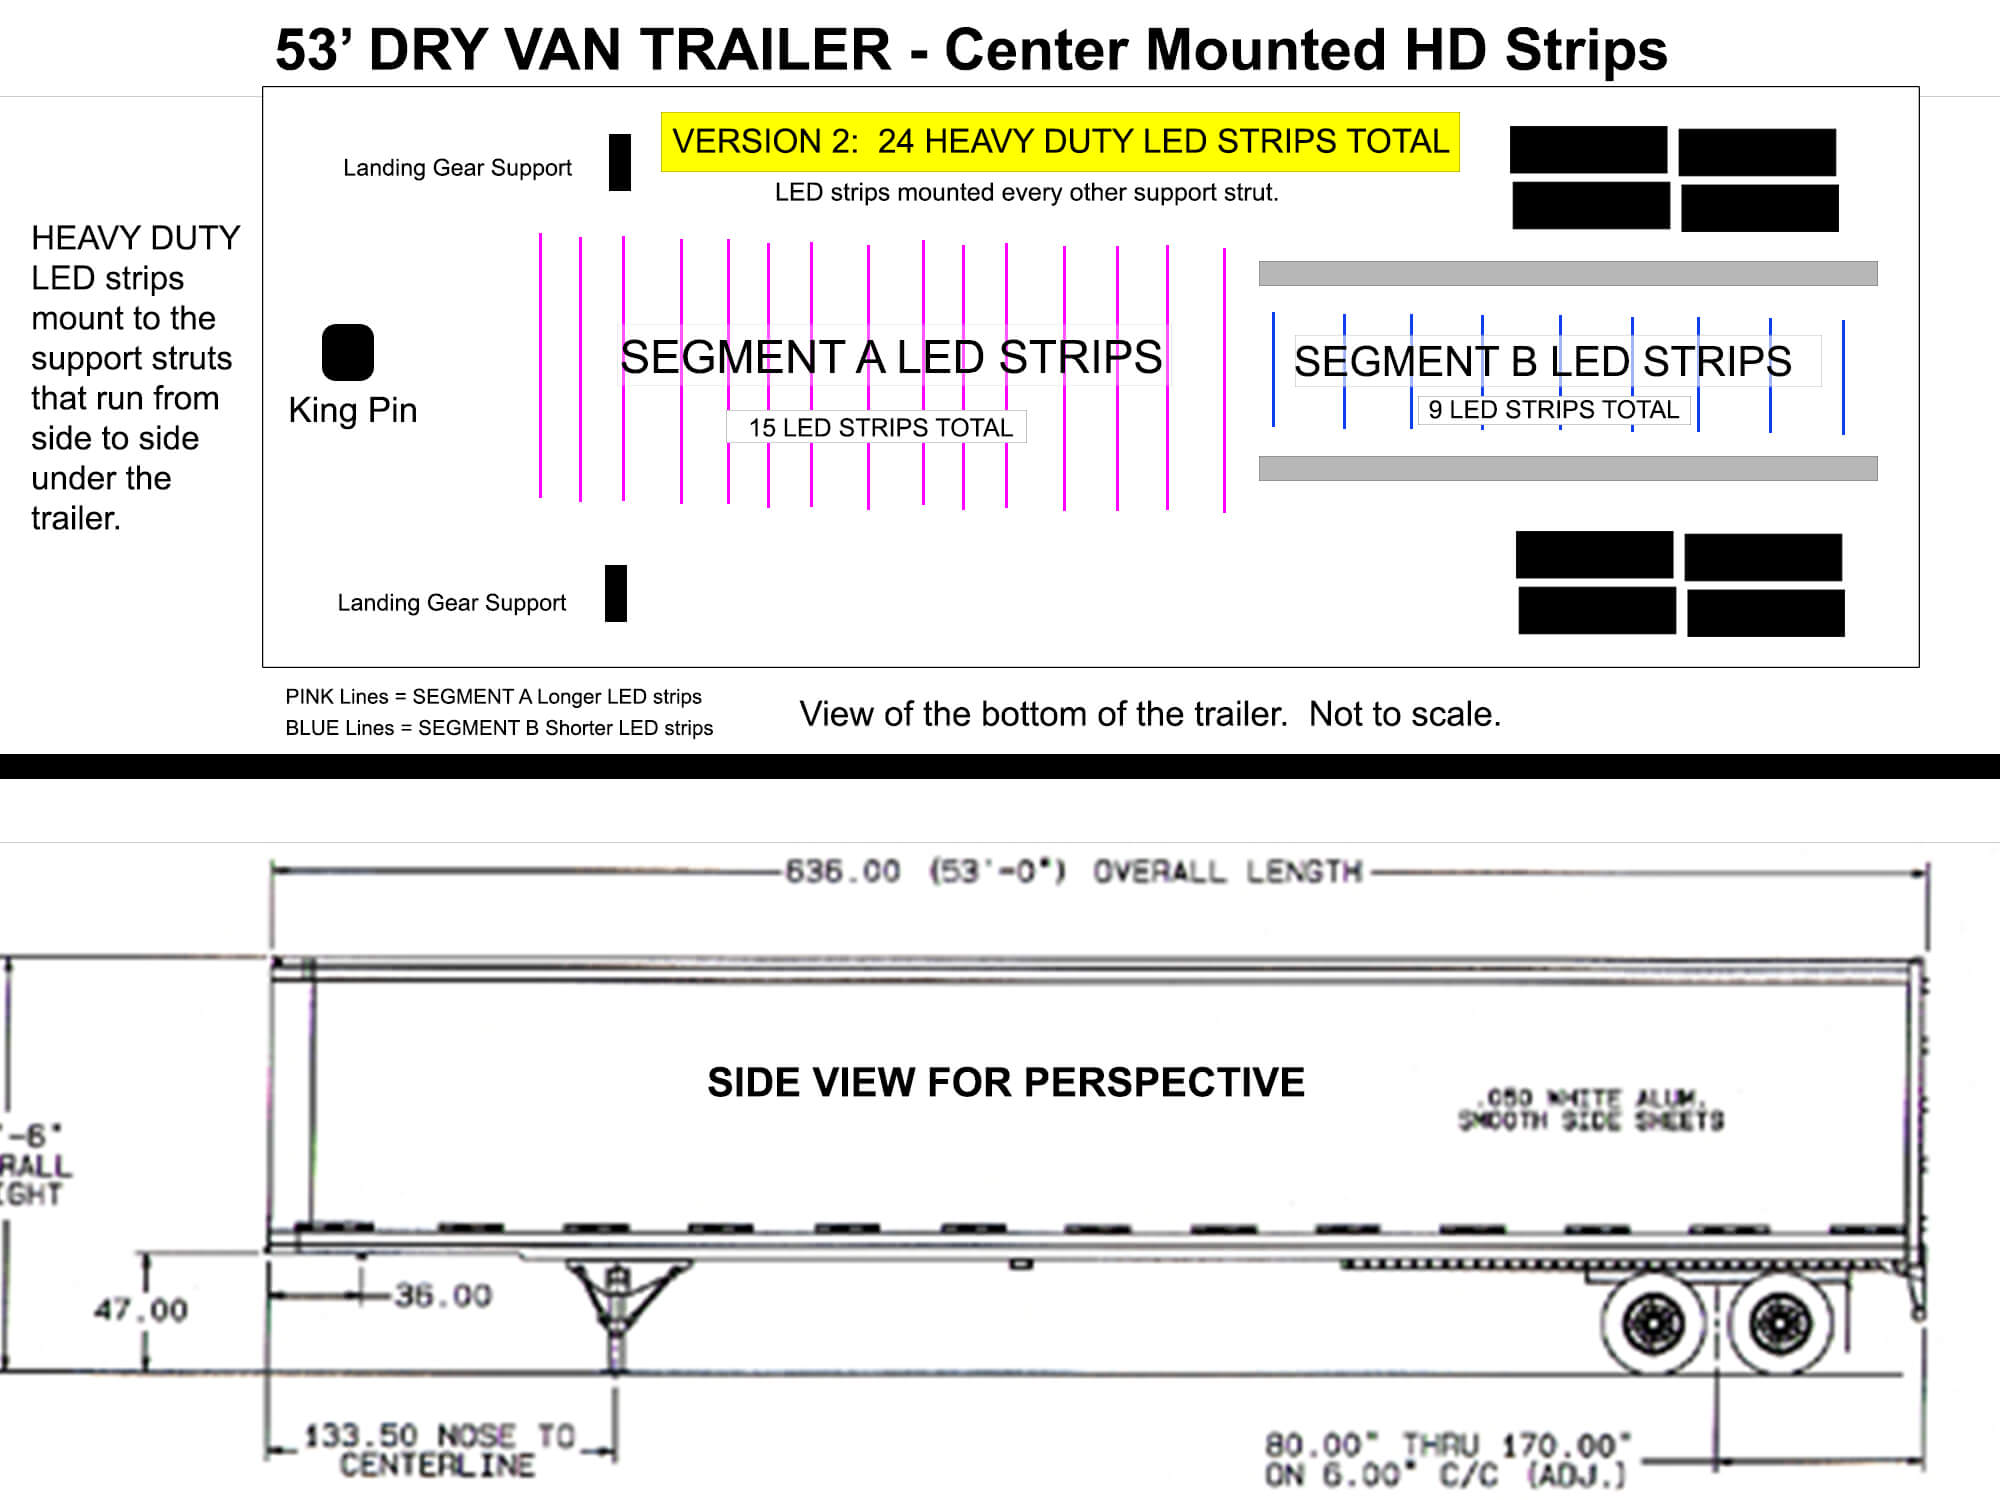
VERSION 2 / Center Mounted: 24 Heavy Duty LED strips mounted in two segments in the center of the trailer. There are a total of 15 LED strips in SEGMENT A and 9 LED strips in SEGMENT B. You can choose the lengths of the LED strips used for Segments A and B. For a typical 53' van trailer, this option has an LED strip mounted to every other cross brace strut going down the center of the trailer. The default configuration for this option has 1665 LEDs. Download the PDF layout diagram.
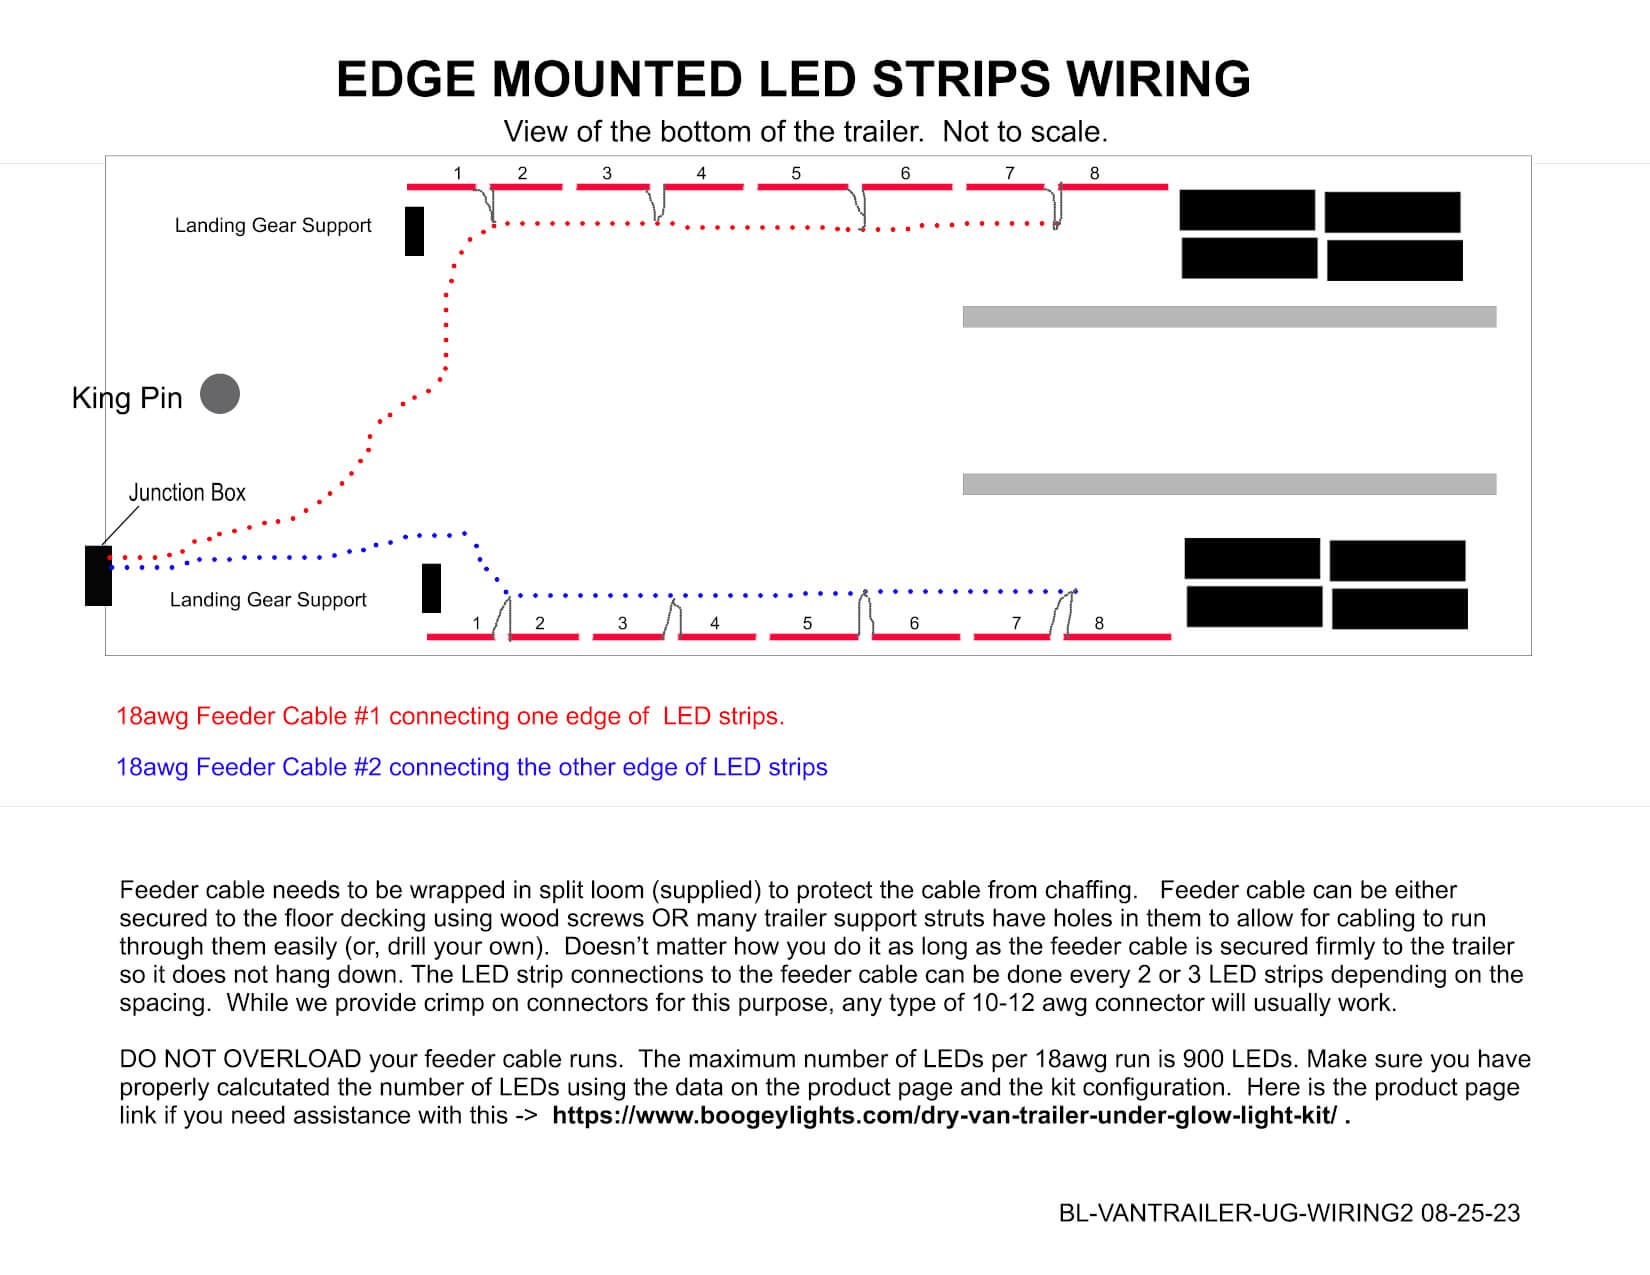
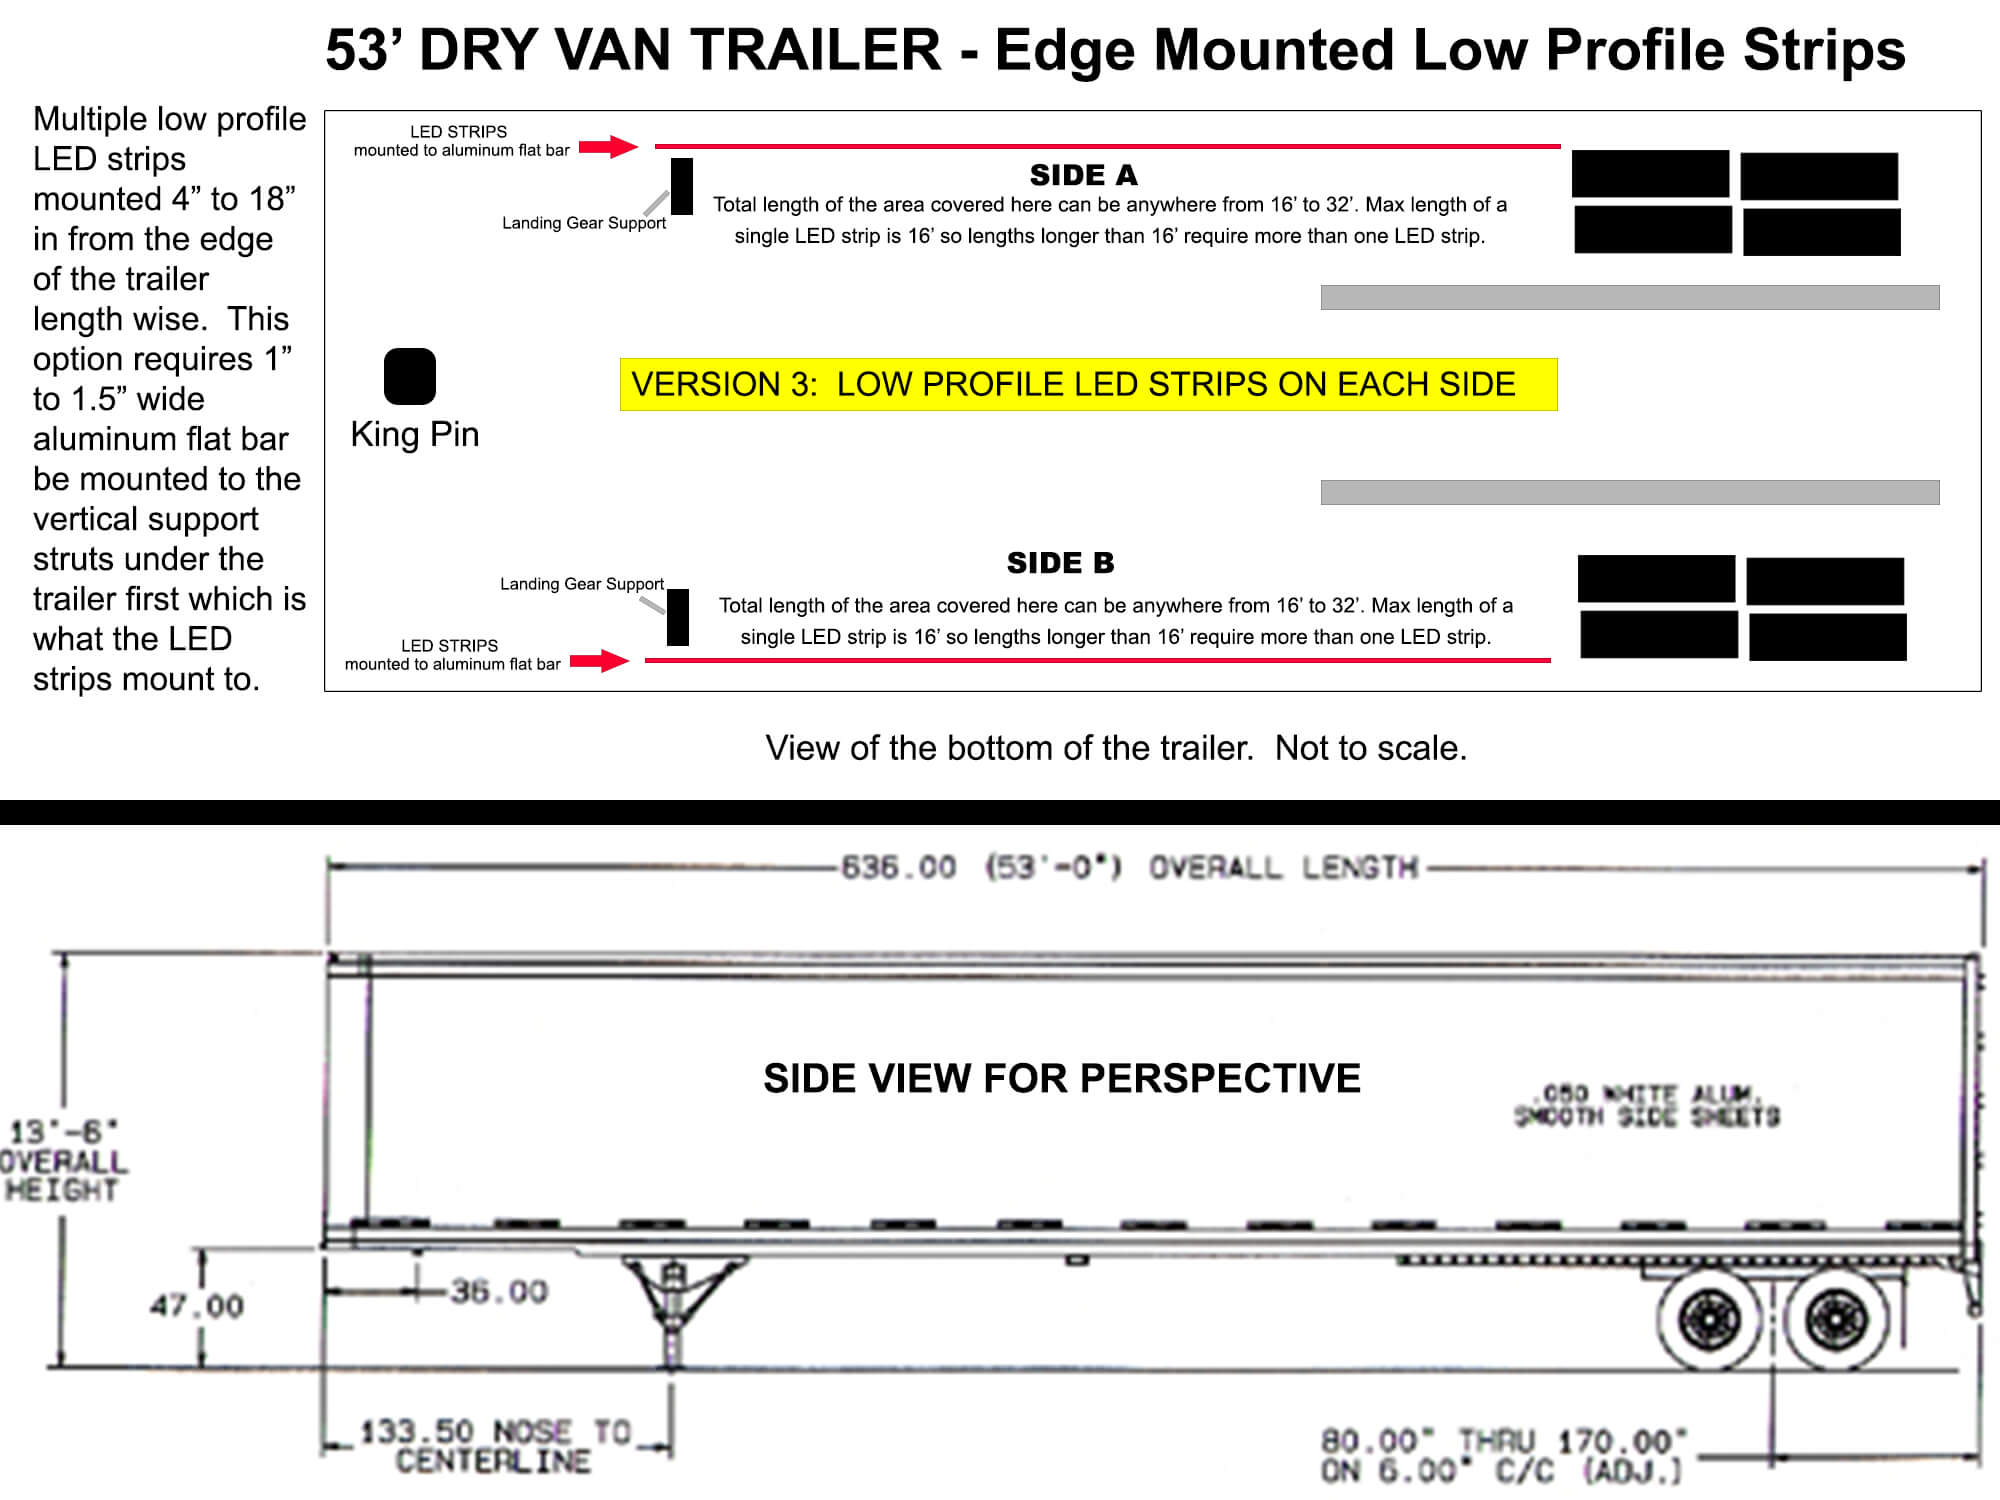
VERSION 3 / Edge Mounted: One or two Low Profile LED strips mounted near the edge of the trailer on each side (labeled SIDE A and SIDE B). For each side you can choose the total length of LED strips needed. This option requires the mounting of aluminum flat bar to the trailer and then mounting the LED strips to that flat bar. The default configuration has 948 LEDs. Download the PDF layout diagram.
VERSION 4 / Edge Mounted: Up to 8 Heavy Duty LED strips mounted near the edge of the trailer on each side (labeled SIDE A and SIDE B). For each side you select the lengths of each Heavy Duty LED strip with a maximum of 8 per side. Note that this option requires the mounting of aluminum flat bar to the trailer and then mounting the LED strips to that flat bar. The default configuration has 960 LEDs. Download the PDF layout diagram
IMPORTANT! If you adjust any of the LED strip lengths from the default configuration for the kit version you're purchasing, be sure to re-calculate the number of LEDs you have in the circuit. This is particularly important if you're using Multi-Color LEDs (e.g. RGB, RGBA) which requires an LED Controller. The LED Controllers are rated based on the total number of LEDs they'll support. Do not overload the LED controller with too many LEDs.
For Tractor-Trailer Wiring information, click the INSTALL INFO navigation tab on this product page.
Scroll down for more details about the advantages/disadvantages of Center Mounting vs Edge Mounting. There's also more details about the differences between Heavy Duty LED strips and Low Profile LED strips.
MOUNTING LOCATIONS: CENTER VS EDGE
The KIT CONFIGURATIONs offer both CENTER and EDGE mounting options. An explanation of the PROs AND CONs of each are below.
Center Mounted
PRO:
1. We think the look is better with the glow coming from the center of the trailer. The diodes of center mounted LED strips can't be seen by drivers on either side of the trailer; only the glow from those diodes can be seen which is the goal.
2. Tthe installation tends to be easier since the LED strips are mounted either to the cross member support struts themselves or, to the flooring in-between those struts. These surfaces are generally smooth and flat making them ideal for mounting.
3. By mounting the LED strips in the center of the trailer, the LED strips are less likely to be damaged when mounted that far under the trailer (even more so if mounted in between the struts). The LED strips can even be mounted over the rear axles.
4. We only offer the center mounted LED strips using our HEAVY DUTY LED strips which are the most durable LED strips on the market. More detail on this particular difference is discussed in the 'Heavy Duty vs Low Profile' section of this product page so scroll down. It's an important consideration to review carefully.
CON:
1. Center mounted LEDs are more expensive because a) you'll need more LED strips to provide coverage and b) center mounted LED strips are only offered in our Heavy Duty LED strip format.
2. If your trailer has tool/storage boxes or ramp racks hanging on the bottom of the trailer OR aero-dynamic trailer skirts, all of these will block some of the light coming from the center mounted LED strips. In these cases, edge mounted LEDs will provide more light.
Edge Mounted
PRO:
1. Some people feel that the lighting effect looks better if the LED strip runs length wise with the trailer itself vs on the cross braces width wise underneath. For trailers that have tool boxes, storage boxes, ramp racks or trailer skirts, you'll get fewer shadows for sure with edge mounted LED strips assuming the edge mounted strips are in front of those boxes / racks.
2. The overall cost is less as you don't need as many LED strips to cover front to rear; although you won't get near as much light.
CON:
1. The biggest downside for edge mounted LED strips is on most van/box trailers, there isn't an easy to use mounting surface that runs the length of the trailer. You'll likely need to build out a mounting surface if you want to go with edge mounted LEDs. We recommend using 1.5" aluminum flat bar that gets bolted or secured to the bottom of the trailer in some way. Once that flat bar is mounted, the LED strips will mount to that surface.
2. Mounting the LED strips closer to the endge increases the likelihood that the LED strip itself will be damaged particularly if you're using the Low Profile version of the edge mounted solution. LED strips that are mounted close to the trailer's edge will always have a higher probability of failing due to damage from objects. Mounting them on the edge of the trailer over the tires isn't advised either as the LED strips will likely get destroyed there quickly. So the under-glow lighting has to stop before the axles.
3. Tthe diodes from edge mounted LED strips are more likely to be viewable by drivers on both sides of the trailer.
We have some diagrams of these installation locations below which help illustrate the two mounting locations.

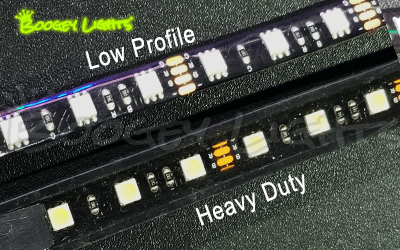
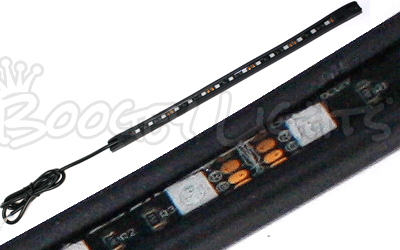
HEAVY DUTY VS LOW PROFILE
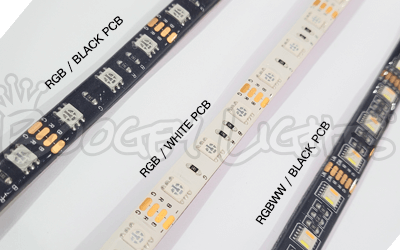
This product offers two types of LED Strips. LOW PROFILE and HEAVY DUTY. Both styles use the same custom made, 2 oz copper PCB, clear poly-urethane UV resistant coating and super-bright tri-chip 5050 LED components with more LEDs per foot than any other product on the market. The difference is the HEAVY DUTY LED strips are encased in an industrial grade black flexible PVC which make them ideal for tough outdoor and commercial applications where the light strip might be subjected to direct impact or corosive road chemicals. The flexible PVC used on the Heavy Duty LED strips provides an extra, dual layer of protection above and beyond our already tough low profile led strips. For commercial trailers, we suggest going with the HEAVY DUTY LED STRIP. For non-commercial trailers, the LOW PROFILE strip can be used. Note that we do not provide warranty support for low profile LED strips when used on a commercial trailer. Only Heavy Duty LED strips should be used on commercial trailers.
COLOR OPTIONS & CONSIDERATIONS
This light kit is offered in eight single color options, two multi-color configurations: RGB, RGBA (RGB + amber) and seven DUAL-COLOR options. For the single color options the LEDs are usually connected to a simple on/off switch or wireless on/off. The wireless on/off gives you the ability to turn the LEDs on/off as well as dim, flash, strobe and breath (and change the speed at which those features work). For DUAL-COLOR, switching options include a 3 way ON/OFF/ON switch or two independent switches. For multi-color configurations, an LED controller is required which give you the ability to change/adjust/tweak the colors you want to display. With the included RF wireless remote you can change between 7 pre-set colors (Red, Green, Blue, White, Light Blue, Lime Green/Yellow, Hot Pink/Purple) and functions of on/off, blending, strobing, breathing, flashing, fading and dimming. You can also use your Bluetooth enabled smart phone to create a custom look. The Bluetooth APP allows you to program the RGB diodes of any of our RGB or RGBA strips with over 16 million different color combinations plus three pre-sets. Also, the Bluetooth APP offers 2 and 3 color rotation programming along with two timer features. Click the BLUETOOTH APP navigation tab on this product page for significantly more information on both the Bluetooth capabilities and APP functionality (including a video showing how the Bluetooth APP works).
What is RGB?
RGB stands for RED, GREEN, BLUE. Each LED chip on the strip contiains three diodes: One Red. One Green. One Blue. When paired with an LED controller, the mixing of those three primary colors can create up to 16 million different color combinations. For example, equal parts RED + GREEN + BLUE = WHITE (bright white, 6000 Kelvin temp). RGB leds are the most common leds due to their versatility in creating so many different color combinations.
What is RGB + AMBER (RGBA)?
RGBA is a new type of LED strip we designed. It includes our core RGB tri-chip technology with the addition of a fourth diode that is AMBER. Designed primarily for motor vehicle applications, that fourth AMBER diode can be wired to a separate switch on the dash that allows you to quickly and easily turn on just the AMBER leds which meets DOT compliance regulations. Then, for those who want the flexibility to also be able to display up to 16 million other color combinations using our RGB LED Controller, they can do that too. RGB + A provides the best of both worlds. Note that due to the addition of that fourth diode, the RGBA LED strip is wider than our standard tri-chip LED strips. They're 11/16" wide (vs 1/2" for the tri-chip strips). For additional information including product specs, click the SPECS navigation tab on this product page.
WHAT IS DUAL COLOR?
The Dual Color LED configuration uses our RGBA LED strip but instead of pairing that LED strip with an RGB LED controller (to mix up to 16 million different color combinations), we hard wire a combination of one, two or all three of the RGB diodes (red, green or blue) along with the AMBER diode to two on/off switches. One switch operates the primary color diode(s). The other switch operates the amber diode. There are a total of seven Dual Color configuration options: RED+AMBER, GREEN+AMBER, BLUE+AMBER, MAGENTA+AMBER, YELLOW+AMBER, CYAN+AMBER, WHITE+AMBER. With a Dual Color configuration you don't need an LED Controller. Instead, you only need two switches (and relays); one to control each color. The primary color is chosen from the available dual color drop down list. The secondary color is always amber.
OTHER ITEMS YOU MAY NEED
No two installation scenarios are the same. Not everyone shares the same installation quality goals. Some folks are OK with twisting wires together, others want to solder them. Some folks are OK with running wires where they may be seen or unprotected to save money/time, others want a tidy, clean install without any wires showing. Some folks are OK with mounting their LED strips to whatever surface they can find, others want to take the time necessary to build out appropriate mounting surfaces to provide the best lighting effect on their vehicle. The point is it's not possible to provide all the materials necessary for all installation scenarios and quality goals. Our light kits provide the essential components needed for a high-quality, functioning lighting system. Installation of our light kit to your specific vehicle may however require additional items to make it look and fit the way you want. This is particularly the case with electrical wiring and mounting of LED strips. Before proceeding with your installation we suggest you consider THESE OTHER ITEMS.
WARRANTY INFORMATION
Boogey Lights® HEAVY DUTY LED strips have a one year warranty when mounted and used on a commercial vehicle. Boogey Lights® LOW PROFILE LED STRIPS have a ninety (90) day warranty when mounted and used on a commercial vehicle. Both types of LED strips must be mounted to a single continuous smooth, clean, flat, straight surface. Detailed mounting instructions are included with all kits. View the complete limited product Warranty Terms & Conditions here.
INSTALLATION DOCUMENTATION
We provide extensive installation documentation with this product all of which can be downloaded directly from our website. We urge customers to take the time to review this documentation in advance to make sure they understand what is required to get the best fit. Be sure to scroll down and expand each of the sections below for detailed diagrams and information on how to install this product. You can also download these PDF documents:
- Installation Instructions
- ALL installation diagrams (zip file format - 4 pdfs)
- LED Layout Diagrams (all four kit versions)
- Truck-Trailer Wiring Diagrams (single color, dual color, multi-color)
- Center Mounted LED Wiring Diagrams (Kit Versions 1 and 2)
- Edge Mounted LED Wiring Diagrams (Kit Versions 3 and 4)
- GEN2 LED Controller Wiring & Operating Info (Quick-Switch, Single and Dual Zone, Multi-Color RGB or RGBA)
- Wiring DUAL-COLOR (Multi-Color RGBA)
SWITCHING & WIRING
There are a lot of ways you can wire and control your under-glow light kit. Below are some common ways however it's ultimately it's up to you to determine what works best for your configuration and lighting goals. The key is making sure you determine the system's amperage draw and then size all components accordingly. Amperage data is included below. The default configuratons for this product have the following number of LEDs which can be used to determine approximate total amperage draw based on the LED color strip purchased:
- Kit Version 1: 13 Center Mounted Heavy Duty LED Strips - 900 LEDs for the default configuration.
- Kit Version 2: 24 Center Mounted Heavy Duty LED Strips - 1665 LEDs for the default configuration.
- Kit Version 3: 4 - 13' Edge Mounted Low Profile LED Strips - 948 LEDs for the default configuration.
- Kit Version 4: 18 Edge Mounted Heavy Duty LED Strips - 960 LEDs for the default configuration.
IMPORTANT! If you adjust any of the LED strip lengths from the default configuration for the kit version you're purchasing, be sure to re-calculate the number of LEDs you have in the circuit. This is particularly important if you're using Multi-Color LEDs (e.g. RGB, RGBA) which requires an LED Controller. The LED Controllers are rated based on the total number of LEDs they'll support. Do not overload the LED controller with too many LEDs.
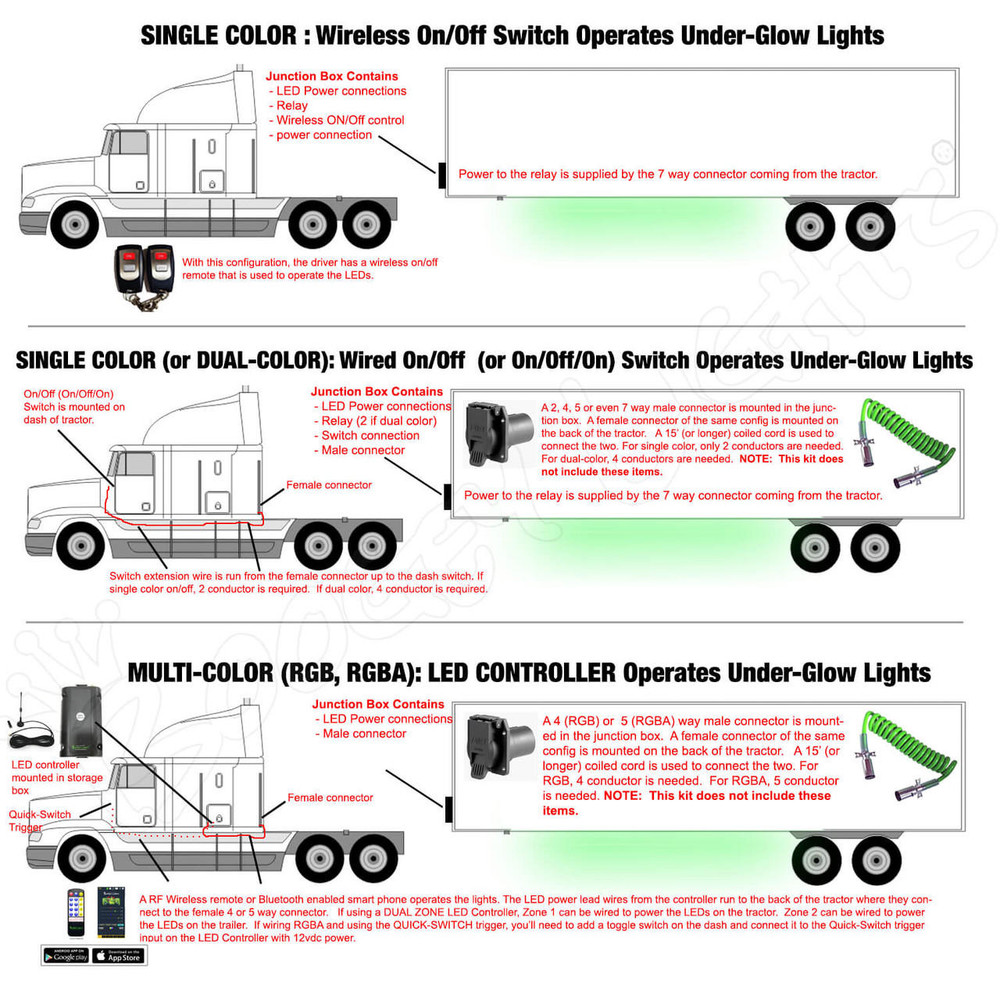
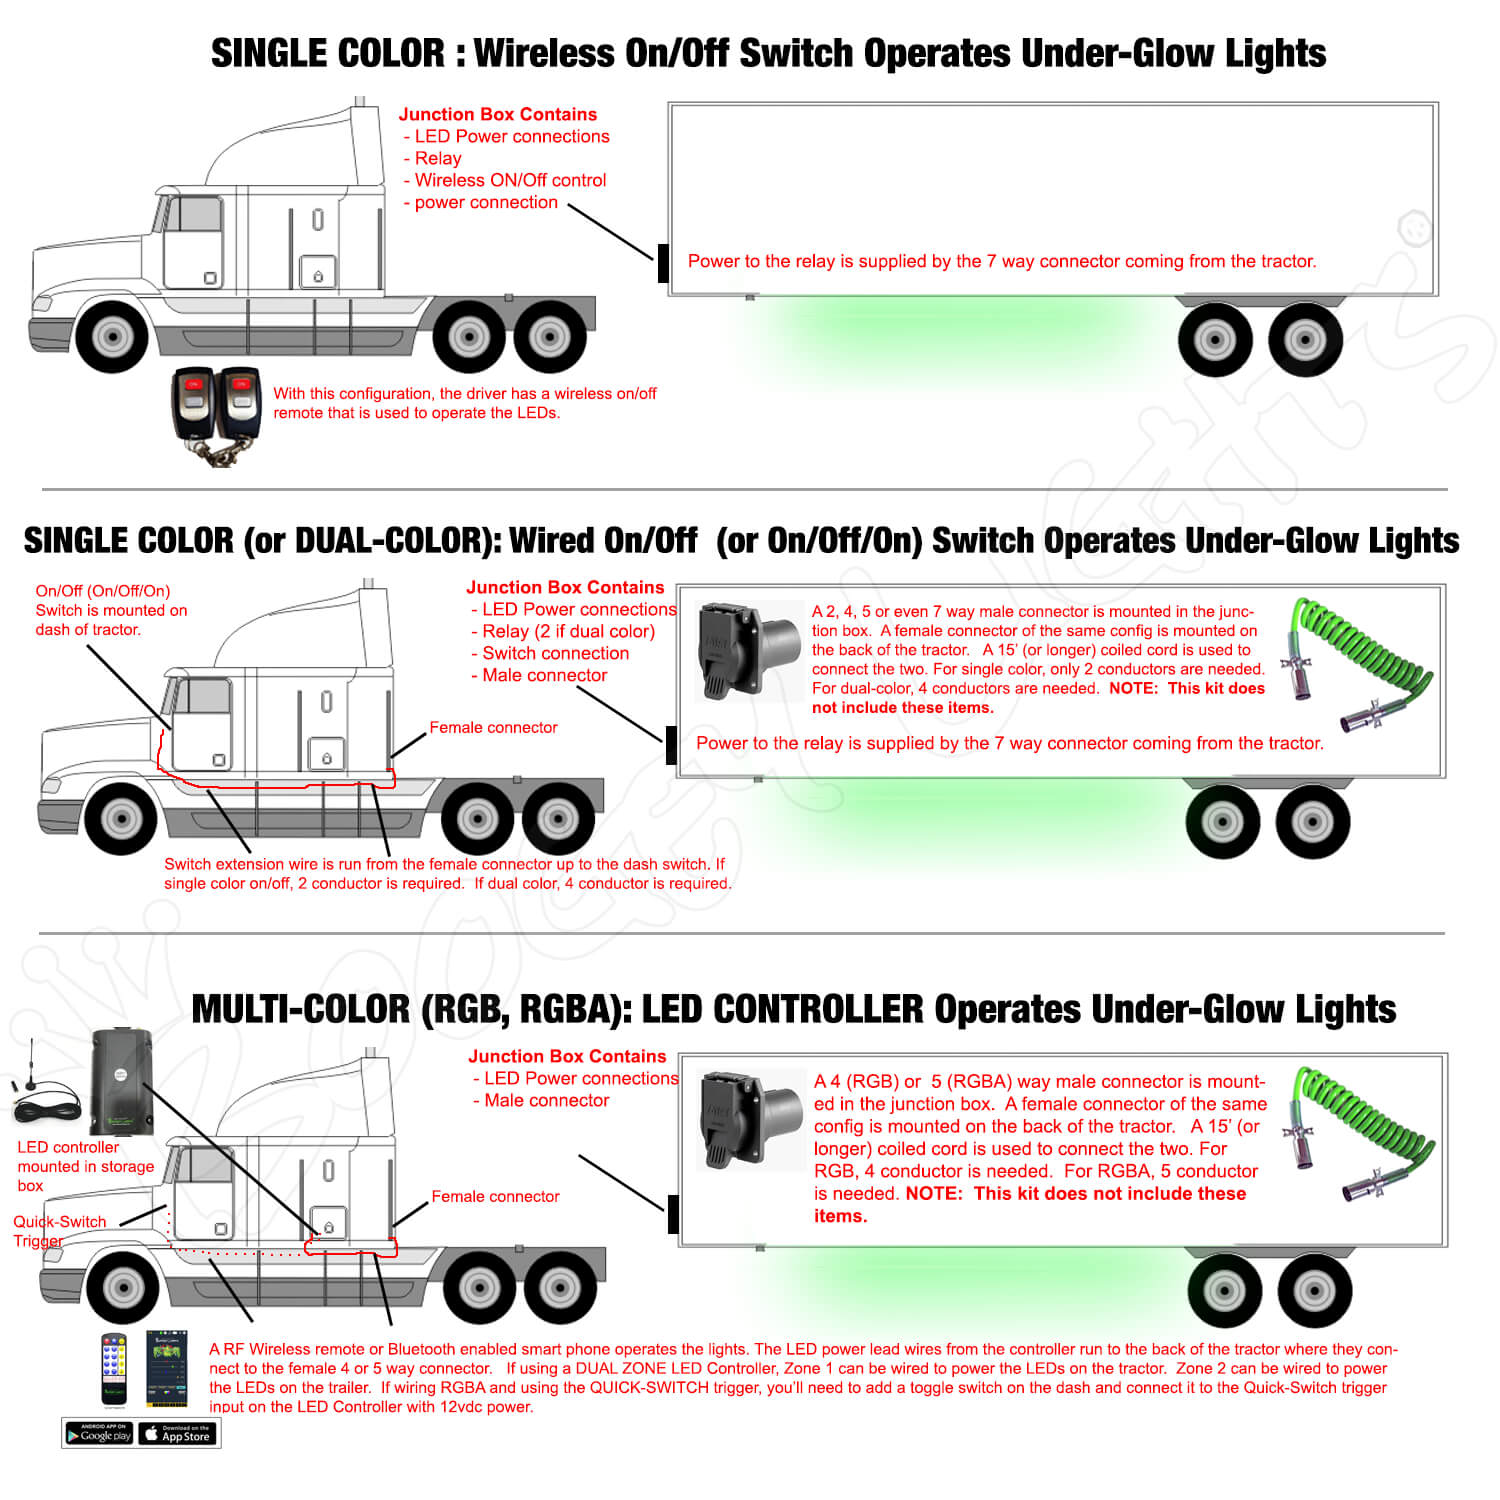
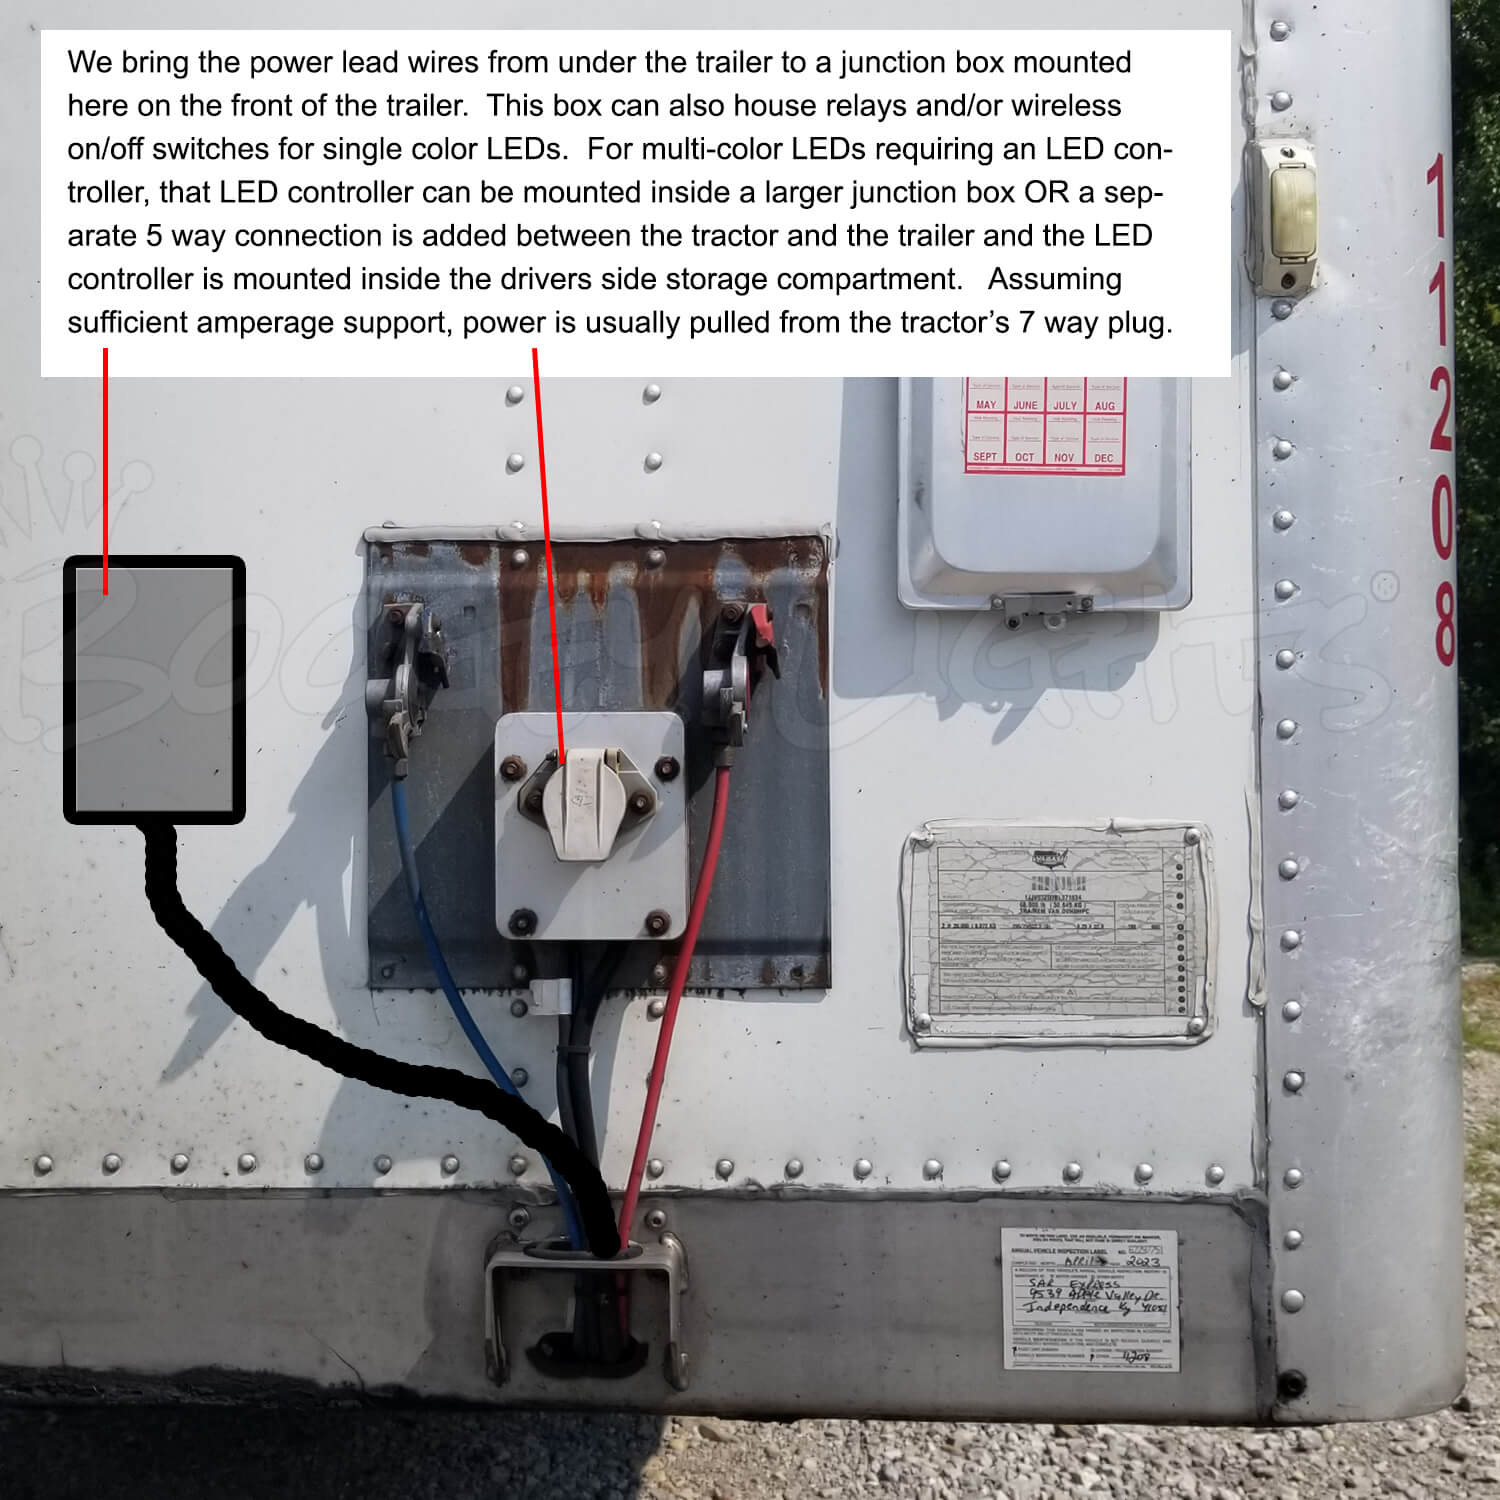
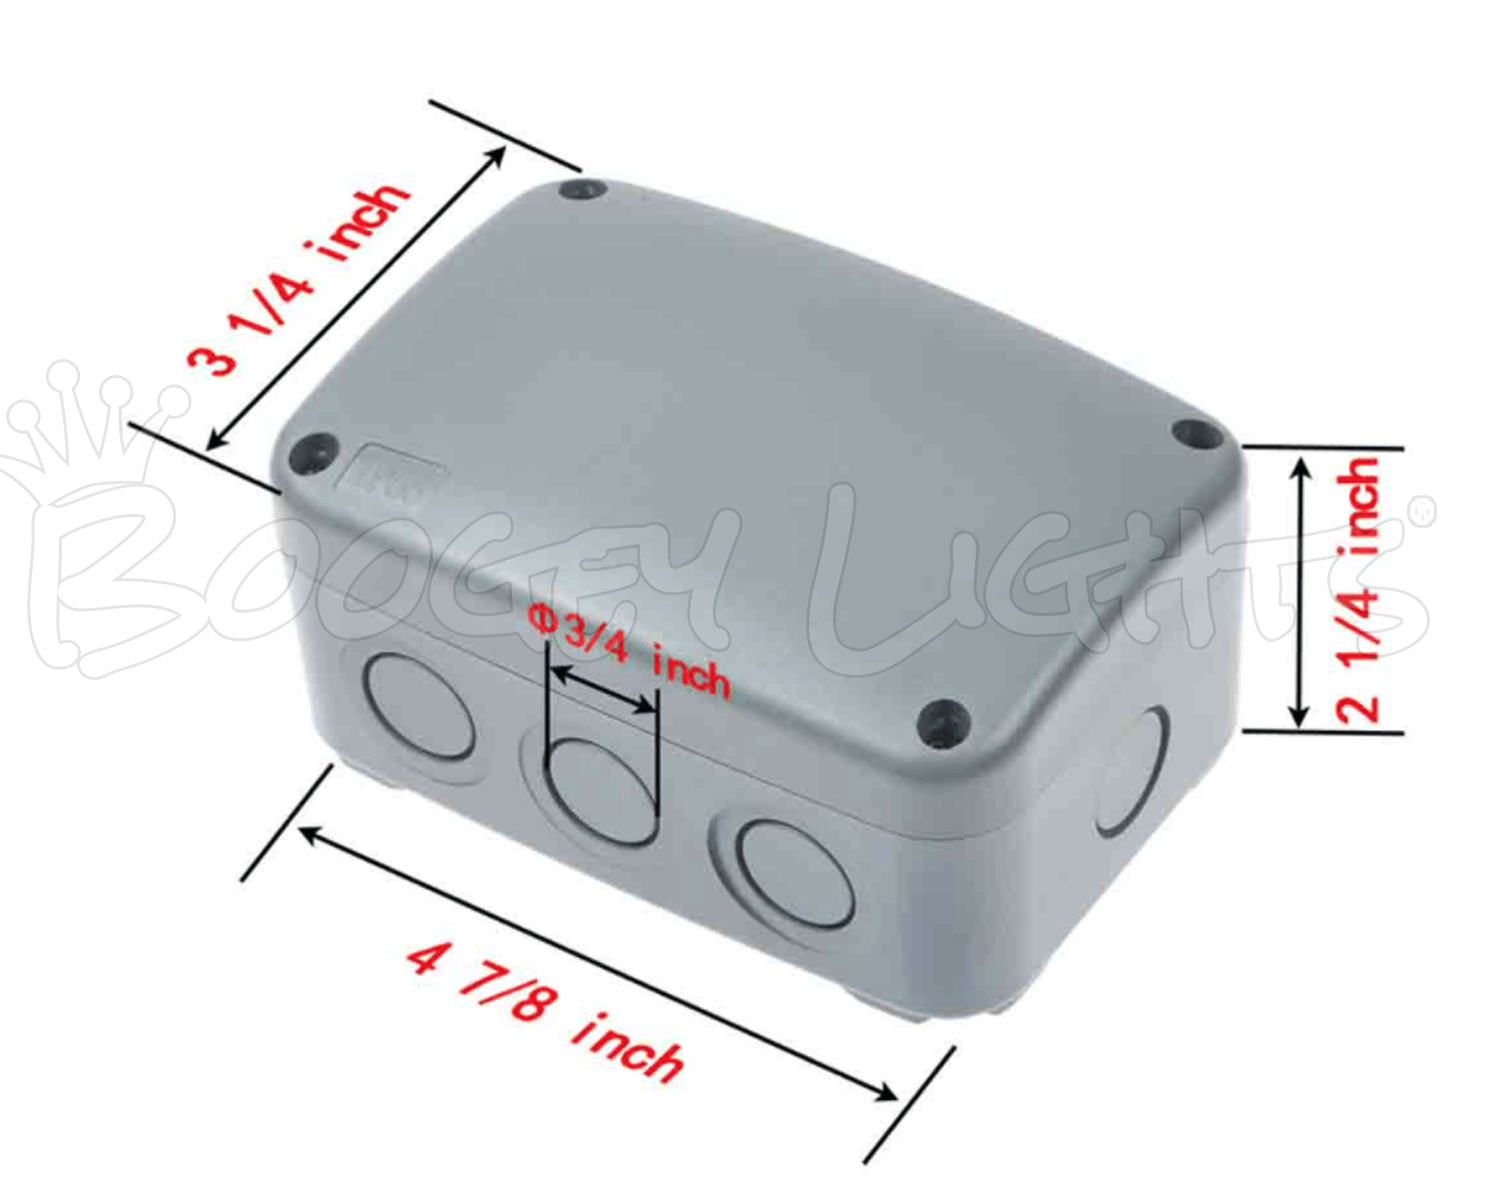
Single Color or Dual-Color Installations. The most common switching and wiring method is to use a heavy duty relay mounted in a junction box on the front of the trailer (see image below). That relay can then be triggered either by the trailer's existing running lights or another switch of some type. That additional switch can be either a wireless on/off switch or a wired switch which is mounted in the cab of the tractor that's pulling the trailer. For wireless on/off, the wireless controller can usually be mounted inside the same junction box. A hand held wireless remote is then used to turn the lights on/off. For wired switching, you'll need to add at least a dedicated 2 way plug on the trailer along with a coiled cable that connects the tractor to the trailer. That harness will then connect to a simple ON/OFF switch (or ON/OFF/ON switch in the case of a Dual Color system) on the dash which triggers the relay to activate the lights. We include a diagram of both the wireless and wired options under the Tractor-Trailer Wiring Diagrams tab on this product page. Just scroll down.
Multi-Color Installations. Multi-Color installations are more challenging simply because there is an LED controller required to be in the circuit which operates the under-glow lights. That LED controller is rather large: as much as 10" x 5" x 4" is needed. In addition, many customers who want a multi-color system do so because their tractor is also lit up and they want the LED controller to operate both the tractor and trailer lights. Example: Zone 1 = tractor lights. Zone 2 = trailer under-glow lights. It's all doable but it does take some planning. In the vast majority of multi-color installations we install a 5 way plug on the front of the trailer using a junction box. All of the LED strips mounted to the trailer join up there. We then use a standard 15' (or longer) coiled cable that connects the trailer to the tractor (this is separate and apart from the coiled cable that connects the trailer lights to the tractor for ABS, tail, turn and brake lighting on the trailer.) The LED CONTROLLER (usually our dual zone heavy duty version) is mounted in the driver's side storage compartment (where it then gets its power from the truck's batteries). We include a diagram of this option under the Tractor-Trailer Wiring Diagrams tab on this product page. Just scroll down.
WIRING THE LED STRIPS
Below are the two wiring diagrams for each mounting configuration: CENTER MOUNTED LED STRIPS and EDGE MOUNTED LED STRIPS.
TRACTOR - TRAILER WIRING DIAGRAMS
JUNCTION BOX DIAGRAM
AMPERAGE DATA
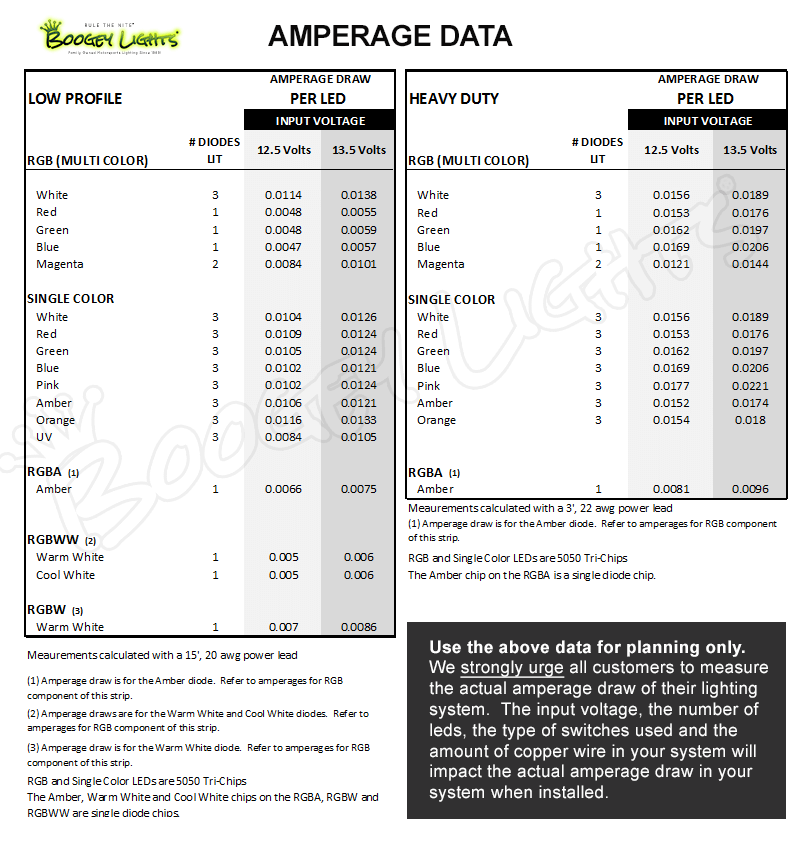
Appropriately sizing the components in your lighting system is critical. Making sure your lighting system doesn't exceed the amperage ratings of each individual component is essential. Scroll down for our amperage data chart that details amperage draw per led for both our low profile and heavy duty led light series. We list amperage draws on two input voltages: 12.5vdc and 13.5vdc. If you're wiring your lights to a vehicle that has a charging mechanism (e.g. alternator), that input voltage will likely increase particularly as RPMs increase. It's not unusual for an alternator to charge the battery at a rate of 14 vdc depending upon the vehicle. Increasing the input voltage to the LED Controller/LEDs will also increase the amperage draw of those LEDs. We always suggest measuring actual amperage drawn for your particular installation to make sure it's fused and wired appropriately. If you are not familiar with DC electricity and how to measure both voltage and amperage draw, we urge you to seek the assistance of someone who does. Improperly sized circuits can cause fires and/or damage other electrical systems in your vehicle.
NUMBER OF LEDS PER FOOT

WIRING DUAL COLOR LEDS
The Dual Color LED configuration uses our RGBA LED strip but instead of pairing that LED strip with an RGB LED controller, we hard wire a combination of one, two or all three of the RGB diodes (red, green or blue) along with the AMBER diode to one three position switch (on-off-on) or two on/off switches. One switch operates the primary color diode(s). The other switch operates the amber diode. There are a total of seven Dual Color configuration options: RED+AMBER, GREEN+AMBER, BLUE+AMBER, MAGENTA+AMBER, YELLOW+AMBER, CYAN+AMBER, WHITE+AMBER. With a Dual Color configuration you don't need an LED Controller. Instead, you only need two switches (and relays); one to control each color. Here's a link to the wiring diagram for DUAL COLOR leds. You can also find it on many of our product pages.
LAYOUT DIAGRAMS
Here are four diagrams showing where the LED strips are typically mounted to the bottom of the van trailer. You might have to vary your layout slightly depending on the construction of your trailer. You can also download the four diagrams in PDF format here as well.
KIT VERSION 1 LAYOUT DIAGRAM

KIT VERSION 2 LAYOUT DIAGRAM
KIT VERSION 3 LAYOUT DIAGRAM
KIT VERSION 4 LAYOUT DIAGRAM

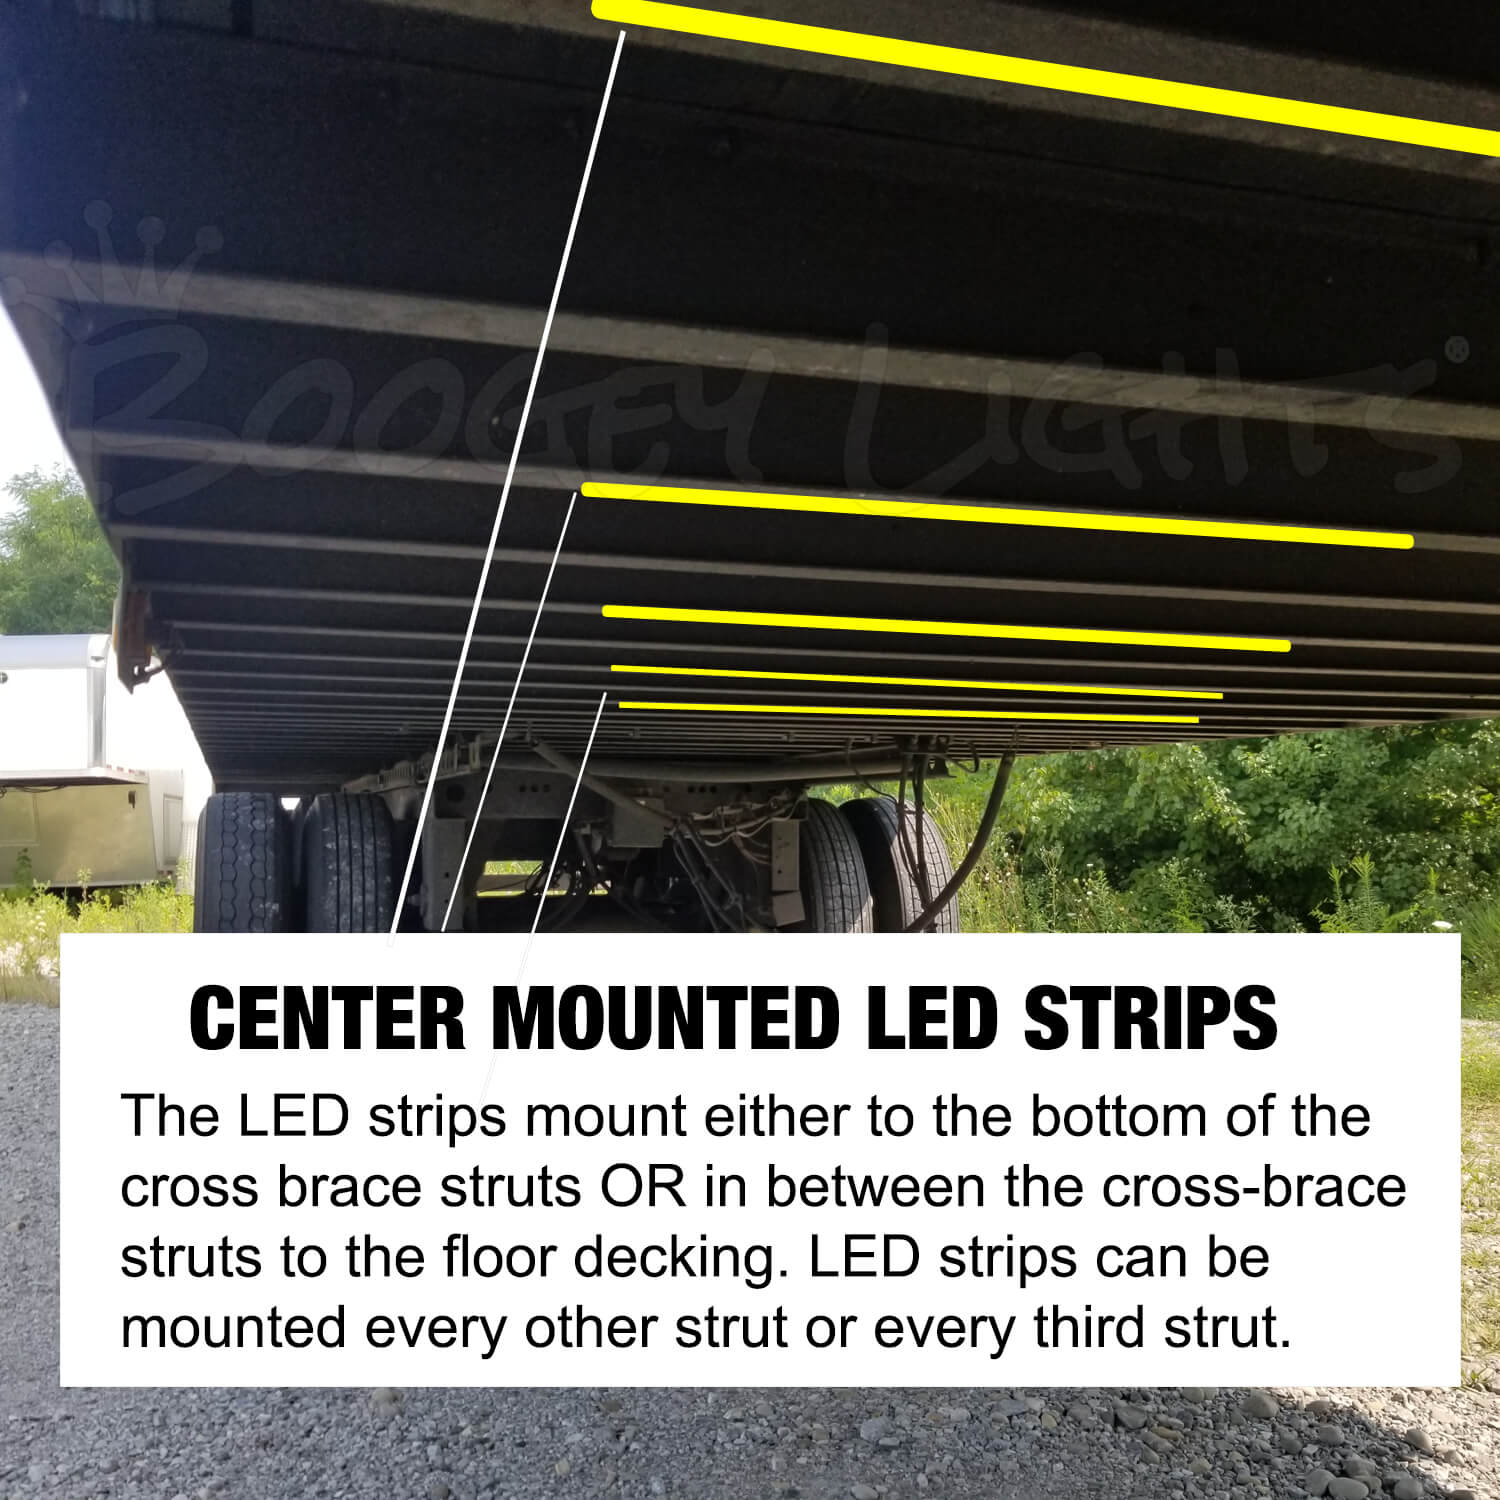
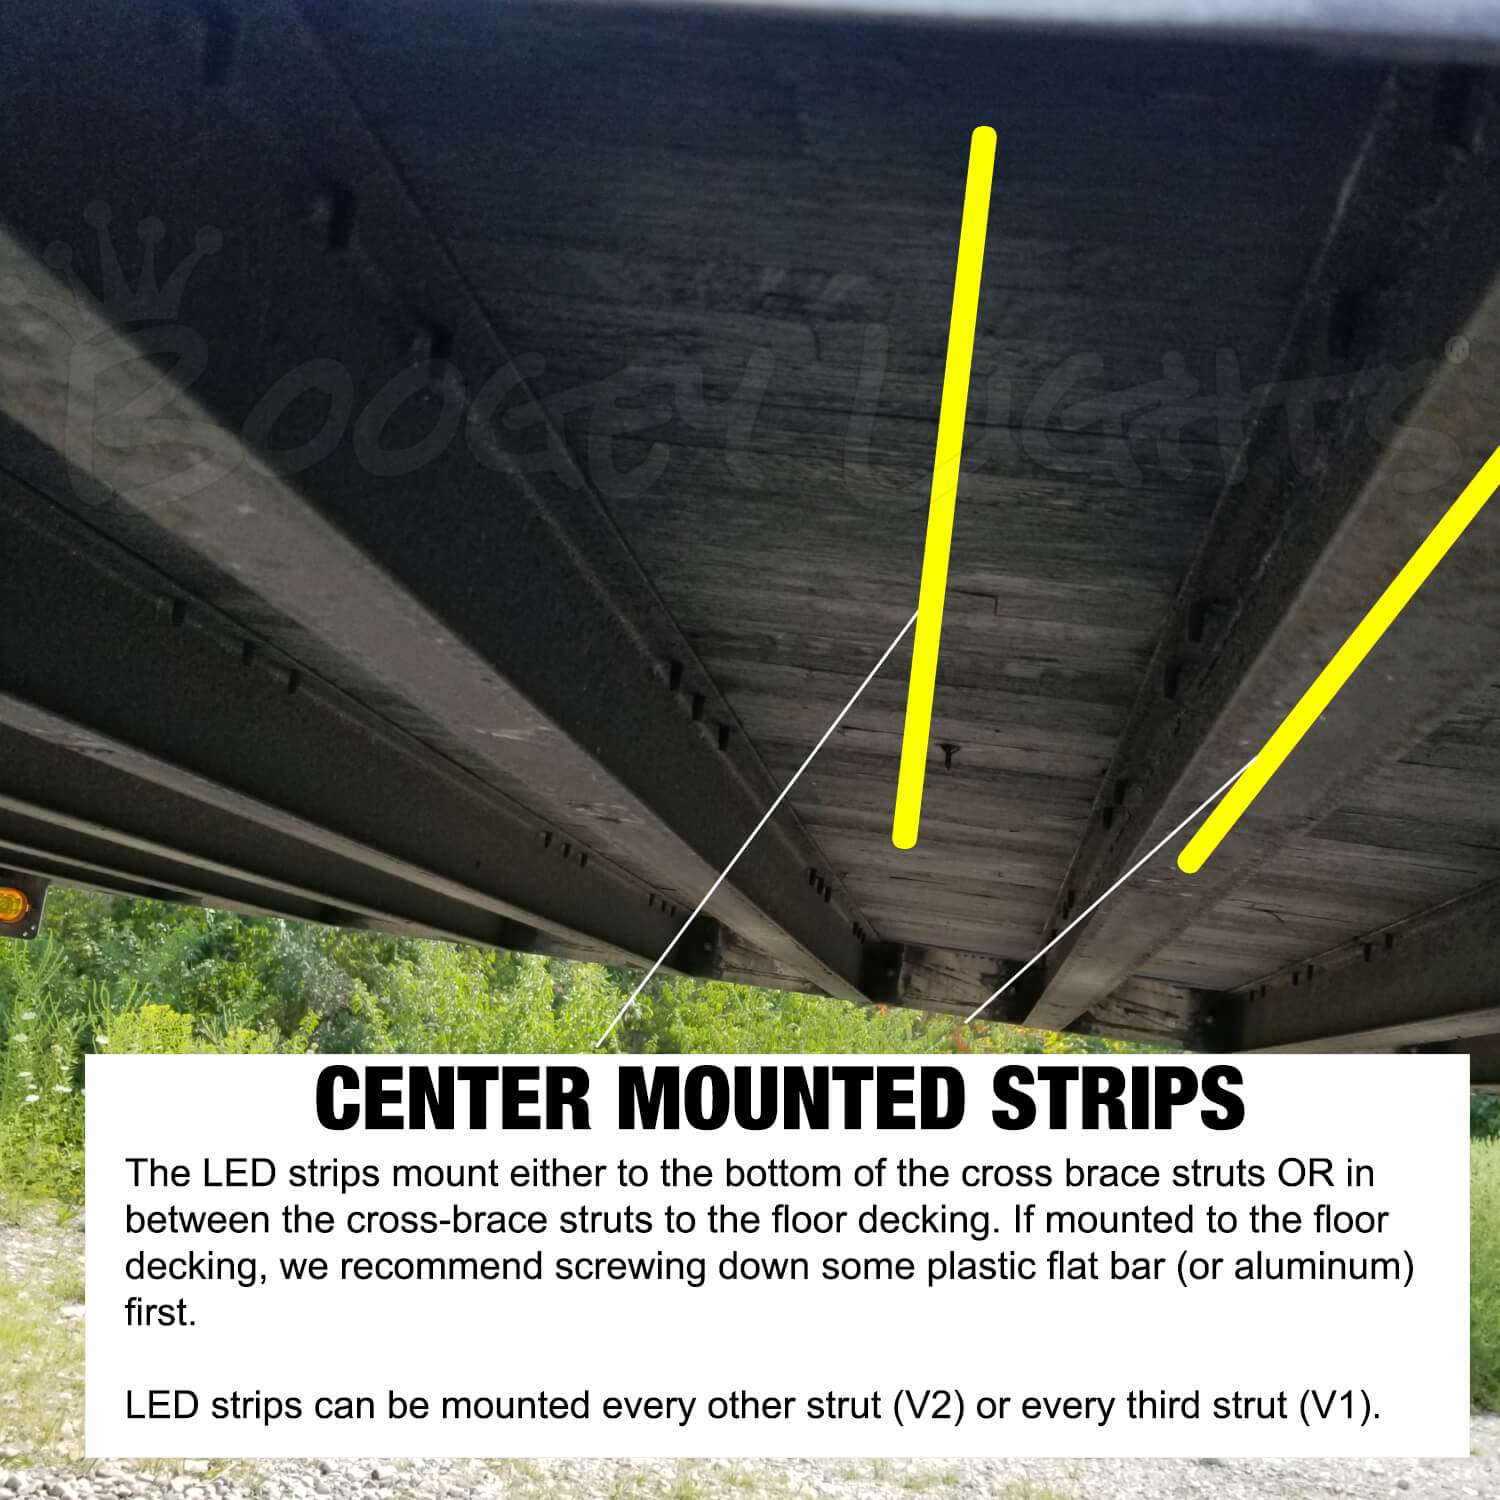
MOUNTING LOCATION DIAGRAMS
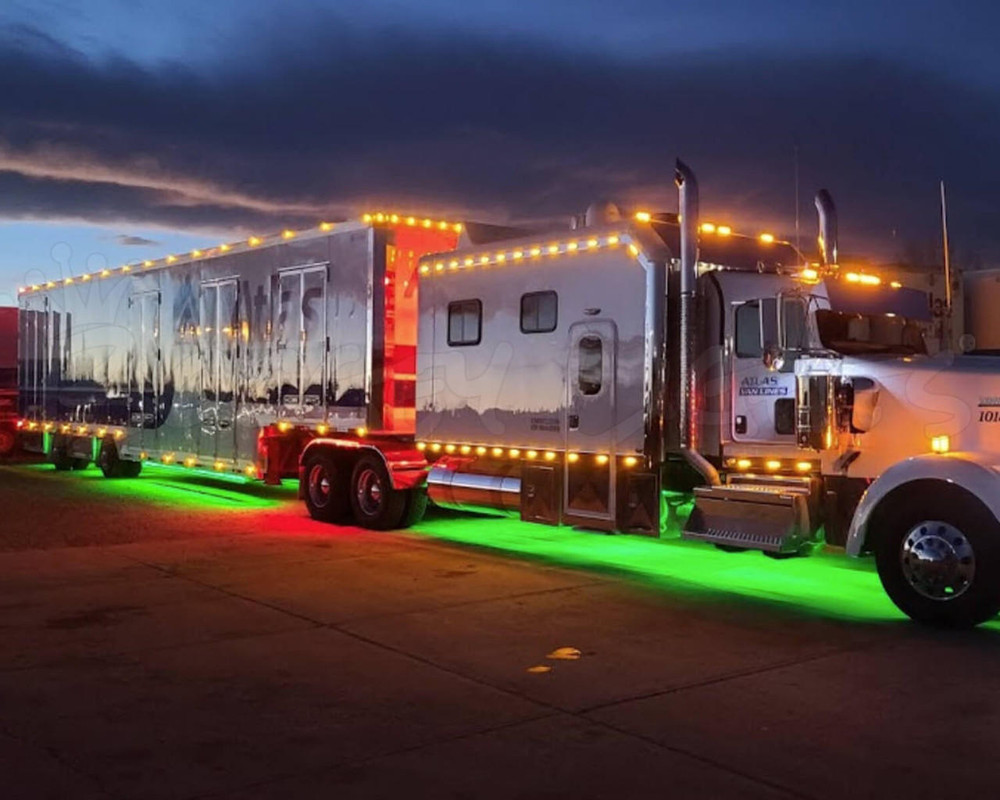
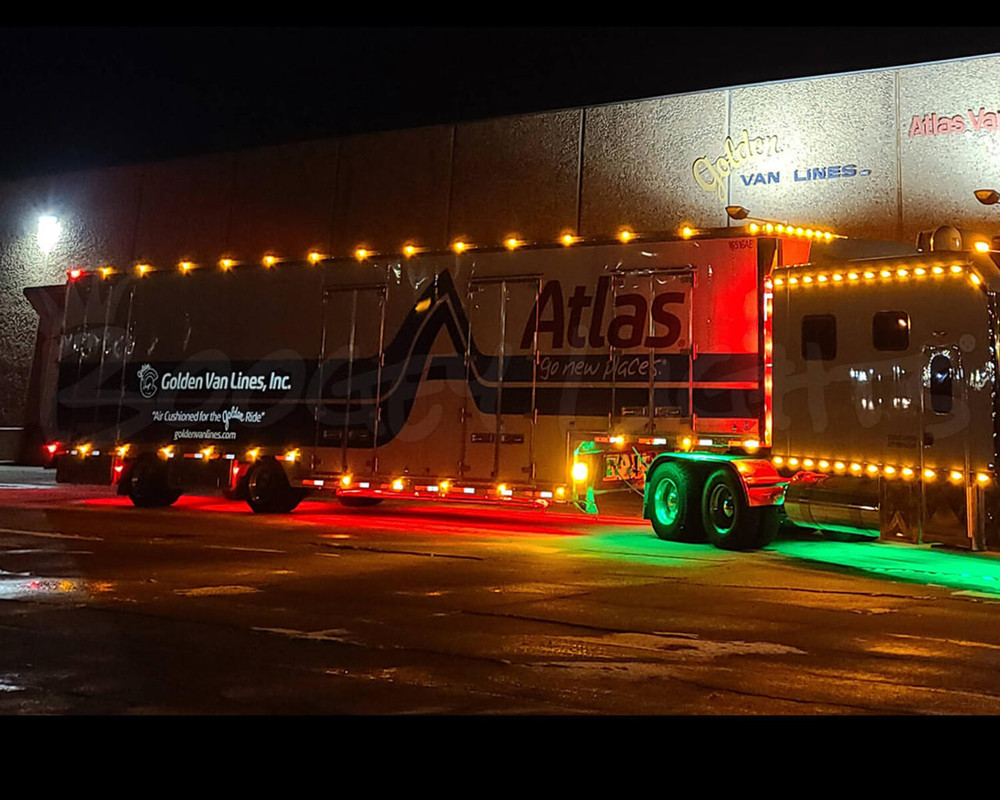
Here are three pictures showing the differences between CENTER MOUNTED LED STRIPS and EDGE MOUNTED LED STRIPS.
CENTER MOUNTED DIAGRAMS
EDGE MOUNTED DIAGRAM