
- Bluetooth related issues? FAQs #9 through #20 below address the most common Bluetooth APP command / control issues and how to resolve them. If Google Play Store is telling you the APP is not available for your phone, or in your country or is too old for your phone, see FAQ #17.
- How to Pair your RF Remote? If you're looking for information on how to pair (or unpair) your RF remote or need to know which RF remote matches your LED Controller, FAQs #21-24 below address these questions.
- Being asked for a Password? If your Bluetooth APP is asking for a password and you don't know what it is, see FAQ #25.
- Not sure how to bench test? Download this PDF. It outlines the process of how to bench test your Boogey Lights® LED Light System. We also have a video How to Bench Test LED Strips
- Purchase a Used Vehicle with Boogey Lights® on it? If you're looking for information on how to identify the lighting system you have, CLICK HERE. This page provides links to resources to assist you in figuring out what exactly you have and where to find information related to that system.
QUICK-START STEPS
We realize there is a lot of information on this page. Yes, we know it can be over-whelming. We know too most folks don't like to read. We wish it was easier too but there are some situations where it's important to read the directions. This is one of those situations. The details on this page matter if you want to find and fix the problem. You must follow a process though. It can't be random or hap hazard. And, you can't make assumptions about a component without actually testing it. In the vast majority of cases, there is nothing wrong with the LED controller or the LEDs themselves. It's almost always a misunderstanding of how the system works, a power issue, a wireless control pairing issue or a wiring issue that isn't immediately obvious (e.g. can't be seen). We've been doing this for 30 years. We have some experience with trouble shooting these lighting systems in all kinds of operating environments. The good news is that Boogey Lights® LED lighting systems are simple devices. They're easy to trouble shoot and fix if you're willing to take the time to isolate and methodically test each component one at a time. It's a process of elimination. There is no other way to do it.
If your Boogey Lights® system isn't working, here are the three component areas to focus on:
ONE: Your Power Source & Controller
TWO: Wireless Control Pairing
THREE: Power Lead Wiring
Stepping through the above processes will tell you where the problem is and thus, what the next step is.
We offer technical support during business hours M-F, 9-5 eastern. 800.847.1359. Don't be surprised when we ask you what the outcome of your testing was for the above three steps though. It's the only way to determine where the problem is and it has to be done by someone onsite. We can't do it for you over the phone.
HOW TO TROUBLESHOOT: AN OVERVIEW
All Boogey Lights® components are burned in for at least five hours and tested during three separate quality control steps before shipping. While it's possible the LED strip or LED controller is defective even after these quality control tests, our experience has been that in the vast majority of situations if the lights aren't working as expected the reason can be traced back to a problem with how the system was installed and/or the power source being used. This isn't to say there couldn't be a problem with the product you received - it is possible - just not probable. In fact, it's highly unlikely. If you are unable to get your lights to work as expected we urge you to take the time to review the trouble shooting steps outlined on this page. These are the same steps our technical team will ask you to perform when calling us for assistance.
If you are unable to get your lighting configuration to work we suggest deploying basic trouble-shooting techniques by eliminating as many variables as possible to isolate what specifically is causing the problem. The fewer variables you have in the mix, the easier it is to determine where the problem is. For new installs, this is why we strongly suggest BENCH TESTING your lighting configuration in advance of installing. That way you know all of the components are working. Going through that bench testing process will also give you a good understanding of how everything works. If you're troubleshooting an existing installation, the same principle applies except you'll have to do the testing on the vehicle. Start from your battery, test one component of your system at a time -- including the power source itself. Use a volt meter to confirm you have a known good 12vdc power source, that the power source is capable of handling the load you're adding to it (e.g. has sufficient amperage to power the load) and you have identified the wire colors for 12vdc positive and 12vdc negative at your power source. This is probably the most common error people make. They make assumptions about the wire colors they're working with and end up connecting either incorrect power types or applying 12vdc + power to the ground wire side of the controller. Reversing polarity of your power source will absolutely damage the controller beyond repair. It only takes a split-second too. Electricity can be very unforgiving in that way so it's important to pay close attention to the wiring details. For existing installations, we suggest disconnecting the LED strips from the LED Controller. The goal is to remove as many variables as possible. Then, go through the system and test each component one at a time. As you confirm one component works, move on to the next until you find the source of the problem. Boogey Lights® LED lighting systems are simple 12vdc systems. There's nothing high-tech or complicated about them. They aren't difficult to trouble-shoot if you methodically isolate and test each component of your configuration one at a time. Ultimately if you can't figure it out, you may want to consult with a professional - someone who may have more experience with 12volt circuits and related components.
DOCUMENTATION, WIRING DIAGRAMS, SPECS, HOW-TO
Our website contains ALL PRODUCT DOCUMENTATION including installation information, specifications, how-tos, tips, suggetions, recommendations and wiring diagrams. For most products - especially our light kits - our documentation is quite extensive. You can download this information directly from our website in pdf form at any time. If you're looking for information about a specific product, the first place to look is the product page itself. If you're using a mobile phone, be sure to SCROLL DOWN into the product page and expand the text groups presented in the product details. You'll find details, links and document downloads for instructions, specs, wiring relevant to that product on the product page. It's all there and in most cases, it's quite detailed. While we realize most folks don't like to read, in this case we strongly suggest taking the time to read the documentation. It's important, especially when working with electricity to follow the directions. Do not make assumptions. We've spent a considerable amount of time putting this information together to make sure customers have the information they need.
Below are some links to some of the most popular documents customers look for:
- Installation Documentation for ALL products
- How-To Videos
- Other Items You May Need to Complete Your Installation
- Understanding the Electricity in your RV (or other 12vdc vehicle)
- DOWNLOAD the GEN2 LED Controller Operating Manual & Wiring Diagrams
- DOWNLOAD the GEN2 Bluetooth Operating Manual
- DOWNLOAD the GEN2 Bluetooth Quick-Start Guide
- DOWNLOAD the GEN2 M7 RF Wireless Remote Operating Information
- VIEW the GEN2 LED Controller Series Product Page
- VIEW the GEN2 BLUETOOTH APP Information Page
- DOWNLOAD Amperage Data
FREQUENTLY ASKED QUESTIONS
1. My wireless remote won't operate my lights. What can I do?
We make two different types of RF Wireless remotes: M7 style and KEY FOB style. Trouble Shooting instructions are different depending on the style of wireless remote you have. Photos of each and instructions on how to trouble shoot are below.
M7 STYLE

KEY FOB STYLE

2. My BOOGEY LIGHTS used to work fine but now I'm not able to get certain colors to display (or, not all LED strips are displaying the same color). What can I do?
You almost certainly have a wiring problem. If some of the colors are missing or have dropped out or are different hues than before or one LED strip is showing a different color than the others it's because one or more of the power leads are touching each other and/or have come un-done somewhere in the circuit. The solution is to deploy basic trouble shooting techniques by removing as many variables as possible. You do this by testing each power lead connection to each LED strip one by one. It's the only way to locate where the problem is. Yes, we know it's not what most folks like to hear because it takes time but trust us when we tell you it's the only way to effectively trouble shoot these types of situations. These are simple devices. Don't over-think it. If the controller was bad, it wouldn't work at all. If the LED strips were bad, they wouldn't work at all. The fact that the LEDs are lighting means the controller is working and the LEDs are working. What's not working correctly is the color association. Somewhere in the wiring you have RGB wires crossed and/or touching/disconnected which is causing the problem. The good news is that once you find the problem it's usually a simple fix.
3. I have an LED strip that has stopped working in the middle of the strip (or the colors aren't the same mid-strip). What can I do?
If you have an LED light strip that has stopped working in the middle of the strip (or is displaying different colors mid-strip), the issue is likely the strip itself. This is not an issue that can be fixed in the field. You will most likely need to replace the LED strip. If the strip stopped working/failed at a solder joint, it's an indication the LED strip was installed under tension and/or the mounting surface is flexing too much which is what caused the solder joint to fail. Before reinstalling a new LED strip the same way, we strongly suggest reevaluating the mounting surface you're using as the problem might happen again. Depending on the product, the vehicle type, how it was installed and when it was purchased it may be covered under warranty. Follow the instructions found in FAQ #35 below on what information we need and which photos to send us so we can evaluate the LED strip for possible replacement under warranty.
4. My lights aren’t working. What can I do to troubleshoot?
Our experience has been that most problems of this nature relate to either a misunderstanding of how the controller is to be connected to the power source OR making assumptions about the power source itself that later turn out to be incorrect. Hopefully you’ve taken our advice to first bench test your configuration before installing. Doing so makes it much easier to troubleshoot. If not, you can still troubleshoot, it’s just not as easy. If you're doing your trouble shooting with the controller already installed in the vehicle, be sure to isolate just the controller in your testing. This includes disconnecting the controller from the LED strips on the output side. If there's a wiring issue with the led strips, the controller will be impacted too.
With every kit we include a wiring diagram that provides a visual drawing of the wiring. You can also find that diagram here on our website. Be sure to select the diagram that applies to the Boogey Lights® product you purchased. If you haven’t already reviewed the wiring diagram for your Boogey Lights® product, we urge you do to so now. You might find you have your controller wired incorrectly. Unfortunately depending upon what was wired incorrectly, the controller may be damaged beyond use and will need to be replaced. If however you’ve reviewed the wiring diagram and have been unable to identify any problems with the wiring, here are some things you can do to troubleshoot your installation:
NOTE: If you have an LED light strip that has stopped working in the middle of the strip (or is displaying different colors mid-strip), see FAQ 3 above.
Make sure your LED light strip(s) is/are getting enough power and functioning.
The easiest way to confirm that the LED light strip is working is to connect it directly to a known good 12vdc power source, bypassing the LED controller completely. You can do this easiest in a bench test scenario, however it can also be done if your LEDs are already installed. Simply connect the power lead coming from the LED strip to any known good 12vdc power source such as a car battery or other 12vdc power supply. It's super important to confirm the power source you're testing with here is known to be good. Probably 98% of the folks contacting us about a problem with their lights make the assumption that their power source is "good" when in fact it isn't. We urge customers to take the extra time to bench test their lighting configuration using a known good 12vdc power source first. Volt meters are inexpensive to purchase and save a lot of time and aggravation. They're a quick and easy way to check voltage levels. The power source needs to be capable of putting out at least 12.3 vdc and be able to sustain that voltage level under a load; including meeting the amperage requirements. If at any time the voltage drops below 12vdc under a load and/or the amperage draw of the lights exceeds the power sources amperage capacity, the power source will not work for powering Boogey Lights (or for that matter, many other 12vdc devices in their vehicle/rig.)
To test the LED strip, connect the BLACK wire of the LED power lead to ground (12vdc - ) and then each of the remaining power leads (red, green and blue – assuming you’re installing multi-color RGB lights) connects to 12vdc +. Each of the LEDs in the strip should light up in full intensity mode because the controller is bypassed. For an RGB strip, when the power is connected only to the RED power lead, only the RED diode on each LED will light. When the power is connected to the GREEN power lead, only the GREEN diode on each LED will light. Etc. Repeat this process for each LED strip in your lighting configuration. Confirming that your LEDs are working correctly rules out the lights themselves or any of the solder connections being the problem. For additional assistance, download this PDF that outlines the process of how to BENCH TEST your Boogey Lights® LED Light System.
Some common symptoms of an insufficient power source include:
1) The lights are dim or dim quickly after being turned on (or after a few minutes of being turned on). In this scenario your power source might initially be able to produce 12vdc output but when under a load, it quickly drops below 12vdc which causes the dimming.
2) You're only able to get the color RED from an RGB strip. The RED diode in each LED consumes the least amount of power and thus will light up with less than 12vdc power.
3) You're unable to get the color white from an RGB strip. The color white is created by mixing equal parts red + green + blue. Because all three RGB diodes need to be lit, white consumes the most power. If you're unable to get white, it usually means your power source is not sufficient.
4) The LEDs of an RGB strip light up very dimly. This is an indication that your power source is declining; or going bad.
All of these symptoms are power source related. They have nothing to do with the Boogey Lights LED strip(s) and/or LED controller.
Diagram: Charging Rate too Low for Amperage Draw
Make sure you have your controller hooked up properly to a 12vdc power source.
For most customer installations the controller is the heart of the system. It’s what is used to power the LEDs and make them function. If the controller isn’t powered up, the lights won’t work. This is where the vast majority of problems are found; in the wiring of the controller.
All Boogey Lights® products are 12vdc. Our controllers are positively switched with the LEDs themselves sharing a common ground (aka common cathode LEDs). The controller requires 12vdc positive (+) voltage to be connected to the fused side of the controller. Depending upon the controller you purchased the 12vdc positive (+) power lead will be either a WHITE wire or a RED wire coming out of the controller case. In all instances the positive lead will have an inline fuse attached to it. That inline fuse wire is the positive side of the controller. It is what should be connected to the 12vdc positive power coming from your battery. And yes, whenever possible we recommend connecting the controller directly to the 12vdc battery of your vehicle or house batteries on an RV. Boogey Lights LED Controllers manufactured since 2017 will have a green power indicator button on the face of the controller. That power indicator button will light up green if the controller has 12vdc power. If the light isn't lit, it's an indication that a) you don't have power (or sufficient power) OR b) there is a short in your system not allowing the controller to power on. When trouble shooting it's important to eliminate as many variables as possible so when checking the controller, we suggest disconnecting the controller output power to the led strips (and making sure they don't touch each other when doing your testing). That way you know for certain that the wiring to the LED strips isn't causing the problem. The goal is to isolate the controller by itself to see if it is powering up.
If you are attempting to connect your Boogey Lights® to a power source other than directly to the battery of your vehicle or house battery of your RV (such as an interior circuit of an RV), we strongly suggest testing the circuit first with a volt meter to confirm you are indeed tying into 12vdc power and you know the polarity of the wires in the RV. We mention this because RVs and motorhomes will typically have a mixture of 120/110vac and 12vdc running throughout the unit. It is typical too for the color of the wires used inside an RV or motorhome to be the same as residential interior wiring which use a black wire for positive (often 120/110vac) and a white wire for negative (neutral). This is the opposite of 12vdc power wire colors. In a 12vdc environment, black is always ground (negative). If you reverse the hook-up of these wires and instead apply 12vdc positive power (often a black wire in an RV) to the negative side of the controller (also a black wire in a 12vdc device), the controller will be damaged. Similarly, if you connect your 12vdc controller to 110vac power, the controller will be damaged. In either of these cases the fuse will not protect the controller even if only connected for a split-second. Your controller will need to be replaced. It cannot be repaired.
NOTE: If you're installing in a vehicle that has multiple batteries (e.g. RV, golf cart, semi truck, etc) make sure you're connecting the controller to a 12vdc power source. For example, it's not unusual for an RV to use 6vdc batteries in series to create 12vdc power. Golf Carts too can often have batteries that are not 12vdc power (e.g. 48v, 72v). The point is to make sure you're connecting to 12vdc power. Do not make assumptions when it comes to power connections.
If you’ve confirmed your controller is connected correctly to a 12vdc power source (and you didn’t, even for a second, reverse the wires) the next thing to do is to confirm that your 12vdc power source is actually on and working. To do this we suggest using a volt meter to make sure the circuit is powered.
Make sure your wireless remote control device (RF Key Fobs, RF M7 Remote or Bluetooth smartphone) is communicating with the controller.
Whether you’re using the RF wireless KEY FOBs, RF wireless M7 Remote or a Bluetooth smartphone to control your lights, the device has to be able to communicate with your LED controller. Here is more detail on how to make sure your RF or Bluetooth device is correctly configured to communicate with the controller:
RF Wireless (M7 or KEY FOBs): The RF Wireless KEY FOBs or M7 remote should arrive already paired with the controller. If however you accidentally press the PAIRING button and do not complete the pairing process with a KEY FOB you will erase the pairing completely in which case the KEY FOBs will not communicate with the controller. You need to pair the remote (KEY FOBS or M7) to your controller. It's a simple process with detailed instructions contained in our online documentation. In the past three years we have significantly expanded and upgraded our controller models so be sure to select the pairing instructions for the controller you have. If your controller has a 'PAIRING' button on the controller box, here are the instructions on how to reset/pair your controller and KEY FOBs and here are the instructions on how to reset/pair your controller and M7 remote. All other controller type pairing instructions can be found here. If you’re not able to pair the controller with your remote by following the pairing instructions, it’s likely the controller isn’t powered up or the controller is damaged. We suggest carefully reviewing the wiring of your controller or contacting technical support.
VIDEO: How to Pair Your M7 Remote to the Controller
Bluetooth Wireless: The Boogey Lights® Bluetooth APP can be downloaded for FREE from the Android Play Store or the Apple Store. Once downloaded and installed on your Bluetooth enabled smartphone, you’ll need to launch the APP and connect to the LED controller. Details on using the APP can be found on our website here. The technology used in the Boogey Lights® controller is based on the Bluetooth 4.0 BLE specification. The "BLE" stands for "Bluetooth Low Energy" which simply means it is an 'always off' technology designed to save battery power. What makes BLE different is that unlike traditional Bluetooth devices, you DO NOT "pair" the controller with your smartphone. Instead, when you want to use it you will connect to the controller with the APP running on your BLE equipped smartphone. When finished, you'll disconnect. If after launching the APP you’re not able to find the controller when searching for it using the APP on your smartphone, something else is going on. Either the controller isn’t powered up (or damaged) or there is an issue with the Bluetooth functionality of your phone. We suggest carefully reviewing the wiring of your controller or contacting technical support.
Reset the LED Controller. If you have a Boogey Lights® COMBO BLUETOOTH + RF LED controller that has the RESET/PAIRING button on the face of the controller, you can also try resetting the controller. You do this by pressing and holding the RESET/PAIRING button on the face of the LED controller for at least 7 seconds. You'll see the light on the face of the controller flash quickly. Doing so will erase any password and/or nickname settings. Note too that performing this reset will also erase the pairing with all RF hand held remotes. You'll have to re-pair your RF hand held remotes to the controller too (See FAQ #23 for info on how to re-pair your RF remotes back to the LED Controller.
5. I am bench testing my lights as suggested in your installation instructions. Can I use a 12v battery charger as my bench testing power source?
The short answer is maybe. If your battery charger is capable of quick charging a battery by putting out at least 10amps, it should work as a bench test power source. If however your battery charger is a typical "trickle charger", then it will not work. Not enough amperage. One option for an alternative 12v power source to bench test is to use your automotive car battery with jumper cables. Just pay attention to the polarity.
6. My lights work fine for a few minutes but then they start to fade. What's going on?
When installed properly and connected to a sufficiently sized power source, Boogey Lights will be very bright on full power. In fact, you'll likely need to dim them when used in a campground at night. If your Boogey Lights are dimming, there are four possibilities:
- Assuming you have multi-color RGB lights (vs single color) and you are attempting to power more LEDs than what the LED controller is capable of handling, the lights attached to the controller will dim quickly and the controller will get hot. Do not over-load your controller with more LEDs than what it is rated to handle.
- Assuming you're using an LED controller, make sure the controller is mounted in an area with proper ventilation. If the controller is mounted in an enclosed area without ventilation it will over-heat and shut down. Make sure the controller is mounted in an area that has some ventilation. Do not for example mount the controller inside a wall, inside a small confined area that doesn't have air flowing through it or near another device that is exhausting heat directly only the controller (e.g. refrigerator).
- Another possibility is you have an intermittent short in the wiring somewhere. An intermittent short will increase the load on the controller similar to having too many LEDs causing the controller to shut down or dim. Double check your wiring to make sure you didn't damage or crimp the LED strip or mount it in a way that causes any portion of the PCB to come in contact with metal. Also, check your power lead wires that run from the controller to the LED strip to make sure those wires are secure.
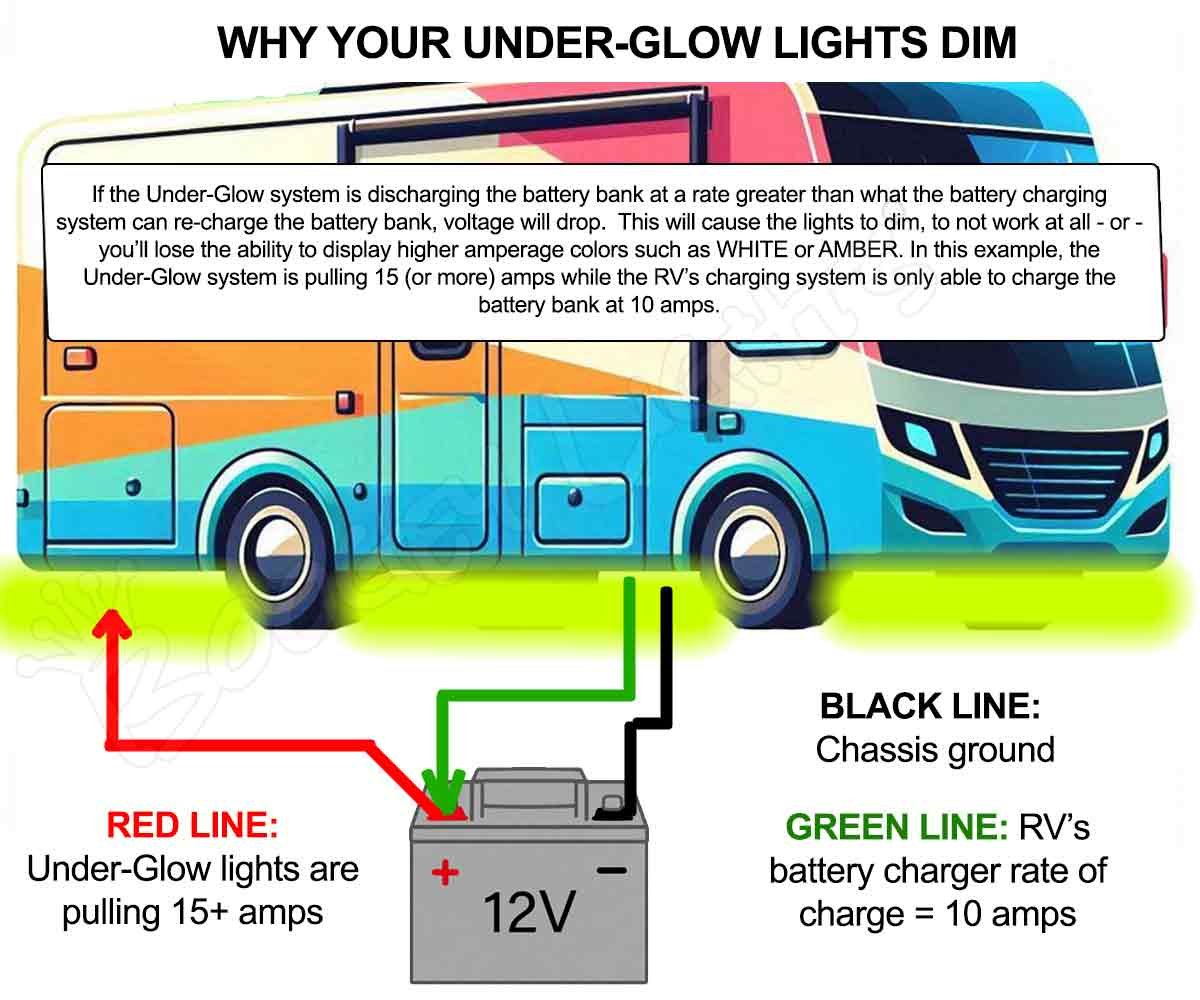
- Whether you have single color LEDs or multi-color RGB LEDs, if your Boogey Lights are fading after a few minutes of use the problem is most likely an issue with your 12v power source (for our purposes here, the term "power source" = battery + battery charger). Your power source is putting out less than 12v and/or the on-board battery charger in the RV (aka "converter") isn't capable of charging the battery at a rate greater than what the LEDs are discharging. This condition is by far the most common problem we see with customers whose lights are dimming and it's also most common with RVs that only have a single 12vdc battery (vs a bank of batteries) for their house battery. The Boogey Lights® LED controllers (and LED lights strips) require 12vdc power to power the controller and the LED lights attached to the controller. The voltage can fluctuate a little, but if it drops below 12v or if the amperage isn't sufficient, the lights will fade. In this situation the battery charger (or the 12v converter) in your RV may not be capable of charging your house batteries fast enough to support the voltage draw when using your Boogey Lights®. This is more commonly the case in RVs that typically have only one 12vdc house battery (and many only have a single-stage battery charger). A Single-Stage charger slowly charges the battery which can take hours to recharge the battery to the point at which it is capable of powering your lights. On full power (white), a single 300 RGB LED strip will draw about 3.5 amps. If you have multiple 300 LED strips, that amperage draw increases by that same number. Your Boogey lights may be draining your house battery faster than what the battery charger on that battery is capable of supporting. Another possibility is that the amperage draw from your Boogey Lights exceeds the available amps in your power source. To determine what the problem is, use a multi-meter to test the output of your 12v power source (see note below about volt meter readings and testing batteries under a load).
Diagram: Charging Rate too Low for Amperage Draw
If you're confused about the 12vdc power in your RV (or other 12vdc based vehicle), please read this article: Understanding 12vdc Electricity .
If the input voltage is low and/or your power source isn't capable of meeting the amperage draw, here are three options:
- Tap into an existing 12vdc circuit instead of going to the battery directly. Doing so usually solves this issue by using the RV's power converter instead of relying on the battery. This converter, installed in most every RV, takes 120vac current coming from shore power (or generator) and converts it to 12vdc for use in powering the RVs 12vdc appliances and fixtures. If you are going this route make sure you are tapping into a 12v circuit that is capable of supporting the additional amperage draw. One caveat - this solution assumes the power converter in your RV is large enough to handle the additional load introduced by adding your Boogey Lights onto the system. In some situations the power converter may not be sufficiently sized to handle the additional draw.
- Add a multi-stage battery charger to your existing system. There are number of multi-stage chargers on the market that will work and they're easy to add. Our experience has been that the multi-stage charger needs to be capable of charging the house battery at a rate of at least 15 amps. We've had good results with this VMAX Multi-Stage Smart Charger which can be purchased relatively inexpensively. It can be used on any 12 Volt AGM, Gel, or SLA battery. If your RV has a single 12vdc house battery, you might also consider buying a second house battery and installing it in parallel with your existing 12vdc battery. This will effectively double your amperage capacity.
- Install our optional 120/110vac to 12vdc power adapter. This adapter will power your Boogey Lights® directly from 110vac without using your RV/Camper's 12v power source. This option of course requires that you have a 110vac power outlet nearby. We offer them in 5amp, 10amp and 20amp versions. Be sure to buy the size that matches your installation.
Diagram: Vehicle Charging? As RPMs go up, so does voltage which increases amperage. Size your circuit accordingly!
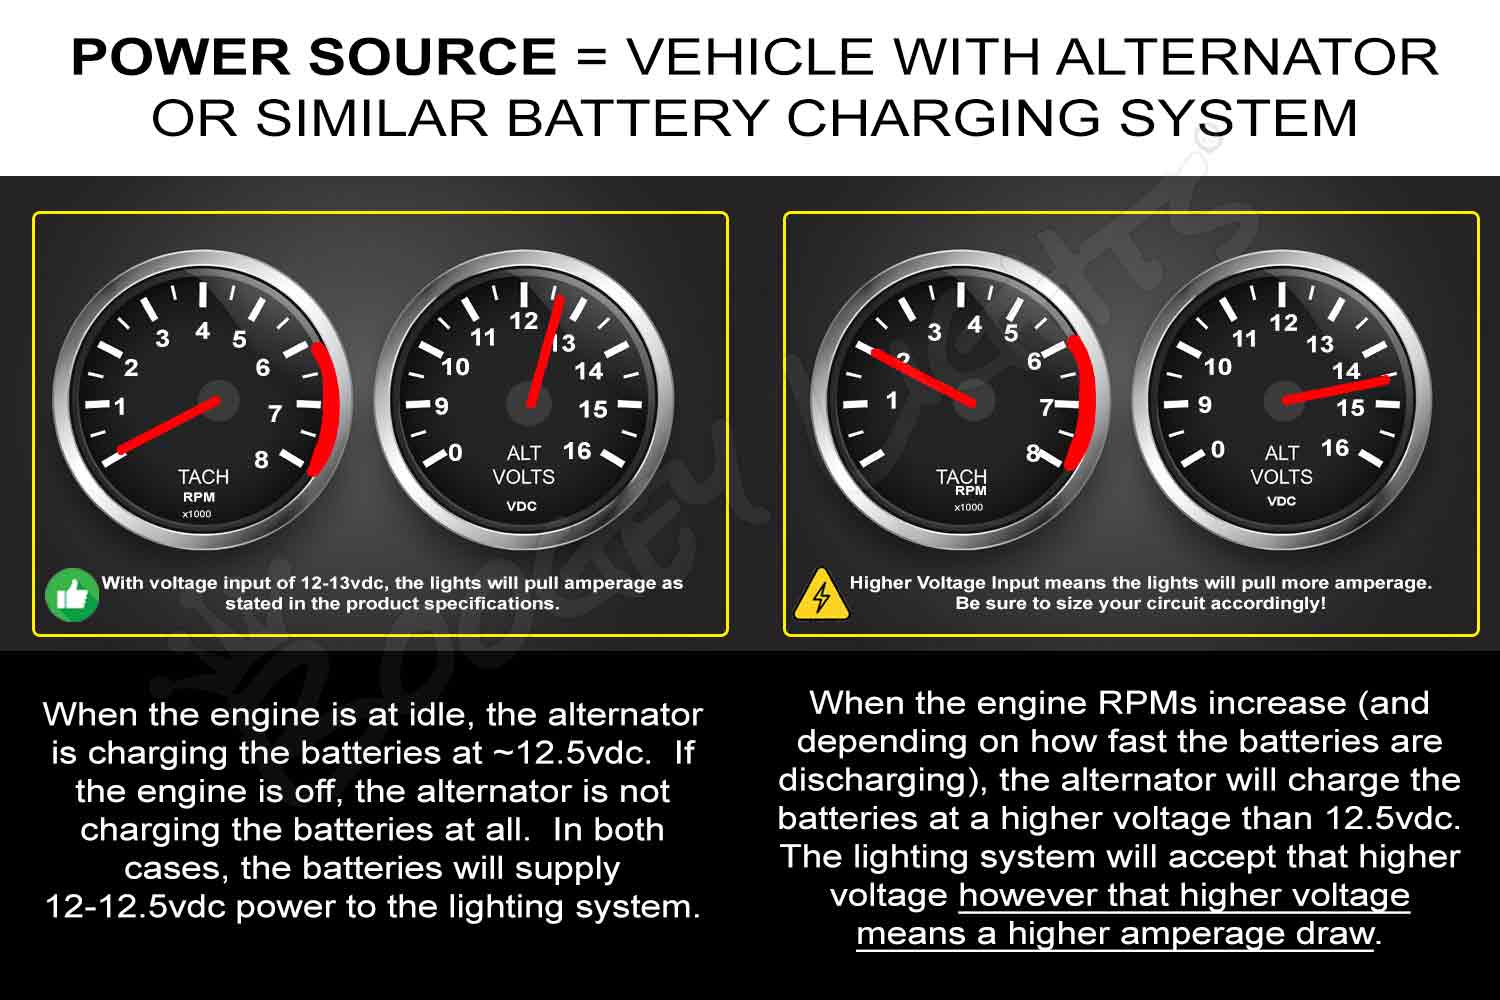
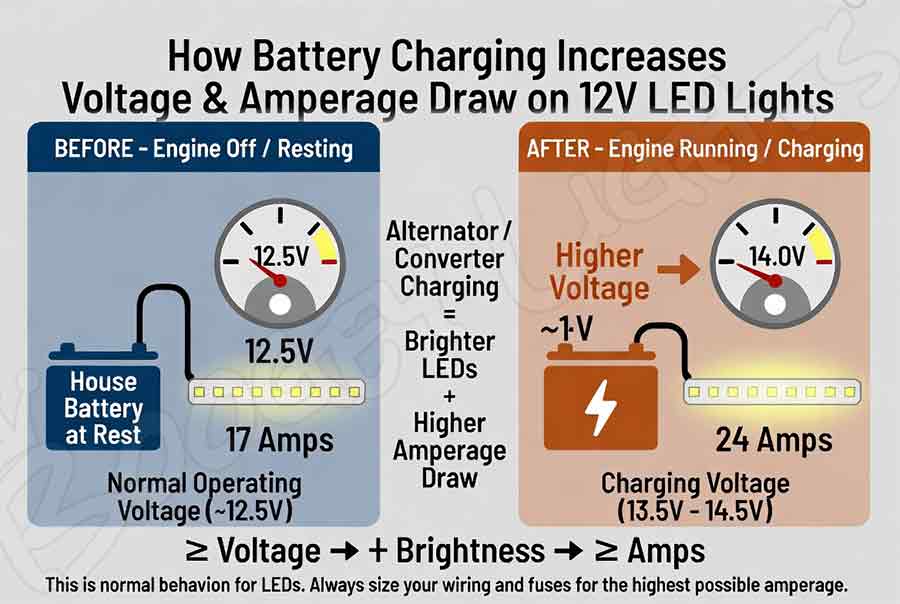
Note On Battery Voltage: Keep in mind that just because you're seeing 12vdc power on a volt meter doesn't mean your power source is capable of maintaining that 12vdc power under a load. A volt meter only measures the voltage, it does not measure the load carrying capability of the power source. If you've tried everything else to resolve the dimming issue and they haven't worked we suggest using an automotive battery tester to confirm your 12v power source battery is capable of maintaining 12vdc power under a load. On full power our standard multi-color awning kit (displaying white) will draw about 3.5 amps. A typical under-glow light kit will probably draw three times that -- close to 10amps. Your power source (battery + battery charger) must be capable of sustaining that amperage draw. An automotive battery tester is a quick and easy way to simulate a load on the battery. If you don't have an automotive battery tester handy, another option is try a completely different 12vdc power source such as a known good car battery (e.g. 50 or more cold cranking amps - CCA). To do this you would need to get 12vdc power to the controller from the car battery that is not part of your RV circuitry. The goal here is to bypass your RVs 12vdc power source completely thus eliminating it as one of the possible causes.
7. My lights aren't very bright. They look dim. What's going on?
When installed properly and connected to a sufficiently sized power source, Boogey Lights will be very bright on full power. In fact, you'll likely need to dim them when used in a campground at night. If your lights aren't very bright and look dim, this condition is the same as the lights fading. See the prior FAQ.
8. I have RGB lights but I'm only able to get the color RED. Every other color is very dim or doesn't work at all. What's going on?
You almost certainly have a power issue. And, if you're installing on an RV motorhome that has multiple batteries and we had to guess, you probably hooked up the controller to the wrong battery terminals such that you're only getting 6vdc power to your Boogey Lights controller. Boogey Lights require 12vdc. Anything less won't work. The color RED consumes the least amount of power which is why RED works. All of the other colors require 12vdc power. Double check how you wired the controller to your battery. Chances are very high that you have it wired wrong (or, your power source itself needs replacing.)
9. I am unable to connect to the controller via my Bluetooth smartphone. What do you suggest?
The first thing you need to do is confirm your Boogey Lights® controller is indeed Bluetooth enabled. Not all controllers we offer are Bluetooth capable. Most Boogey Lights® Bluetooth controllers will have a button on the front that says, "RESET PAIRING" or just "RESET". We have a more extensive FAQ (#15) on this page that provides more detail - with photos - on how to tell what type of LED controller you have. Assuming you have confirmed your controller is Bluetooth enabled AND the controller has power (is powered on), the next thing to confirm is that you are trying to connect to the controller via the Boogey Lights® APP and not your phone's Bluetooth settings. This is important. Connecting to the controller must be done via the free Boogey Lights® APP (IOS or Android). The technology used in the Boogey Lights® GEN 1 LED controllers are based on the Bluetooth 4.0 BLE specification. Our GEN 2 LED controllers are based on Bluetooth 5.0 BLE. The "BLE" stands for "Bluetooth Low Energy" which simply means it is an 'always off' technology designed to save battery power. What makes BLE different is that unlike traditional Bluetooth devices, you DO NOT "pair" the controller with your smartphone. Instead, when you want to use it you will connect to the controller with the APP running on your BLE equipped smartphone. When finished, you'll disconnect. Also, before launching the Boogey Lights APP, make sure you have BOTH bluetooth and location services (aka GPS) Enabled/ON. If you haven't reviewed the documentation on using our APP, we suggest taking a moment to do so.
As of June 2023 we have two different BLUETOOTH APPs. One for our GEN1 LED Controllers (out of production as of June 2023) and one for our GEN2 LED Controllers. Make sure you are using the correct APP version to match your LED Controller. See FAQ #20 in this guide if you don't know which controller you have. You can find the latest OPERATING INSTRUCTIONS for each APP with these links: GEN1 APP Operating Info and GEN2 APP Operating Info. For those who don't like to read instructions, we also offer a Quick Start Guide for each APP as follows: GEN1 APP QUICK START Guide and GEN2 APP QUICK START Guide. Other things to check include making sure the controller is powered on. There is a green power on light on most of our controllers that can quickly let you know if the controller is receiving power or not. If you've tried all of the above, you might want to power off (A cold boot; NOT a restart) your phone and then power it back on. Do the same with the LED controller (pull the inline fuse, wait 10 seconds and re-insert the inline fuse). Also, uninstall and then reinstall the APP on your phone. We offer additional Bluetooth troubleshooting steps further along in this guide which you may wish to check out. Bluetooth technologies can be somewhat temperamental particularly with the constant flow of new smartphone hardware, operating systems and APPs. If after trying all of these options you are still unable to connect, we suggest connecting with a second Bluetooth smartphone to see if it works. If it does, the issue is with first phone. If it doesn't, there may be an issue with the LED controller itself - or - environmental.
One final note about Bluetooth: If you have one of our GEN1 Conmbo (Bluetooth + RF) LED Controllers OR a GEN2 LED Controller (all of our G2 controllers are combo controllers), we strongly suggest doing all testing with the RF wireless remote first. Why? Because if the RF wireless remote can operate the LED controller, then the controller is working correctly. Bluetooth operating issues are often unrelated to the controller itself. More often than not, Bluetooth problems are related to the phone, another APP or process running on the phone or human error (misunderstanding how the technology works.) Testing with the RF wireless remote initially will confirm the LED controller is working correctly. Once that's been established, you can then dig into the Bluetooth issues which may have nothing to do with the controller itself.
10. My Bluetooth smartphone connects to the controller but I am unable to control or adjust my lights. What do you suggest?
Bluetooth / APP Controller Issues:
The Boogey Lights® APP and controller have been extensively tested to work on iOS and Android devices with Bluetooth 4.0 and 5.0. iPhones running iOS 5 and newer as well as Android phones running 4.3 or newer work. Bluetooth communications issues however can be some of the most difficult issues to trouble shoot because much of what is going on is dependent on the operating system of the smartphone. Bluetooth depends on both hardware and software to work properly. The problem is further complicated by the fact that smartphone hardware is constantly changing with operating system updates being done all the time. Do a quick search on Google about Bluetooth communications problems and you'll see hundreds of thousands of results for Android and iOS devices. Bluetooth is a great technology when it works but it can be frustrating when there’s a hang-up pairing the two devices. The Boogey Lights® Bluetooth controller devices use BLE - Bluetooth Low Energy (aka Bluetooth Smart). Bluetooth Low Energy is an "always off" technology and as such, only uses a fraction of the power of Classic Bluetooth. It transmits short packages of data that allow large devices to operate for long periods of time even on small batteries. This process of an "always off" technology can however present problems with pairing, particularly with new devices that have never been paired previously. If you're able to connect to the controller but are unable to control it, here are some things you can try:
Bluetooth Wireless General Issues:
Make sure you are in the correct color mode. The Boogey Lights® APP is designed to work with Boogey Lights® single color and multi-color remote control devices. If you have your APP in single color mode but are trying to operate a multi-color controller, the phone will connect to the controller BUT you will be unable to operate the controller. Make sure you have your APP in the color mode that matches your controller. Details on how to do this can be found in our APP instruction manuals as follows: GEN1 LED Controller APP and GEN2 LED Controller APP. Power both the phone and the controller off and back on. A soft reset sometimes can resolve the issue.
Make sure there is no electromagnetic interference from other devices such as a microwave or cordless telephone. All wireless communication devices, including Bluetooth, that use radio frequencies to connect to each other are vulnerable to electromagnetic interference. Minimize electromagnetic interference by moving other devices away from the area.
General Bluetooth Issues:
No matter how far we have come with technology, there will always be problems -- Bluetooth isn't any different. Truth is, establishing and maintaining a Bluetooth connection between your phone and every possible Bluetooth enabled device out there isn't a simple matter. If you're having difficultly making a Bluetooth connection with the Boogey Lights LED controller (and you're confident your LED controller is Bluetooth capable), here are some general Bluetooth issues to review.
Toggle Airplane Mode: Enable, then disable Airplane Mode. The mode disables all broadcasts and cell reception while it is configured. Make sure it's off. This can help resolve any Bluetooth issues.
Update: Many phones have updates specifically available for Bluetooth issues. Make sure your phone is up-to-date.
Restart All Devices: If you are experiencing problems with your Bluetooth connection, try rebooting (powering off, powering on) both your phone and the LED controller you are connecting to. Although it seems far too simple and ubiquitous, it's a must for troubleshooting this and many other problems.
Clear App & Phone Cache: Clearing the APP and your Phone's cache can help resolve problems withe Bluetooth connectivity.
Turn OFF Bluetooth: Turn off your phone's Bluetooth and allow the Boogey Lights APP to prompt you to turn it on when you launch the APP.
For GEN2 LED Controllers | Step through the Following:
1. Read the Operating Instructions. You would be surprised how many people don't want to take the time to read the instructions. Our documentation is quite extensive. Yeah, we know it's a lot of reading but we've jammed as much tech as we can into this one device. It can do a lot of things. Some of the features are more intuitive than others -- and some find it easier to use than others. If you're struggling with getting the APP to work with your LED Controller, step one is to read the instructions. For the GEN2 LED controller, here is a link to the GEN2 Bluetooth APP Operating Instructions. It's 16 pages and covers all details on how to use the APP. Screen shots included.
2. Familarize yourself with the START UP screen. See page 3 of the APP Operating Guide that includes a screen shot with every feature on that screen labeled.
3. Do not “pair” the controller with your smartphone. Instead, when you want to use it you connect to the controller with the APP running on your smartphone. When finished, you’ll disconnect the APP from the controller (or, simply close the APP). See page 4 of the APP Operating Guide.
4. Make sure the brightness setting on the APP is all the way up. If the brightness dimmer level is all the way down, the LEDs will be effectively off (even though they’re really on). See page 7 of the APP Operating Guide.
5. Make sure you've selected the proper OPERATING MODE (RGB vs X) for your lighting system. See page 6 of the APP Operating Guide
6. Make sure the TIMER isn't engaged. Before you can do anything, you must cancel that timing function. The controller cannot be used until the timing function is cancelled. See page 9 of the APP Operating Guide.
7. If you have a single zone controller, always keep the Zone Control indicator in the ‘1 2’ position. See page 11 of the APP Operating Guide.
Android General Issues:
If you have an Android device that has gone through at least one operating system software update and you've tried all of the above unsuccessfully, there is a known issue with some Android operating system updates and Bluetooth functionality that requires a reset of the device. This is a last resort but in every situation we've encountered, doing a factory data reset has fixed 100% of all Bluetooth issues. It also have improved the overall performance of the device and fixed other problems with the phone.
iPhone General Issues:
If you have an iPhone and are experiencing problems with Bluetooth connections, here are some iPhone specific steps to try:
Check for Software updates: Connect to the Internet with Wi-Fi. Tap Settings > General > Software Update. Tap Download and Install. If a message asks to temporarily remove apps because iOS needs more space for the update, tap Continue.
Reset Network Settings on iPhone: Settings > General > Reset > Reset Network Settings. Now hold down the Sleep/Wake and Home buttons together until you see the Apple logo on your iPhone. Now try setting up the connection from scratch.
If none of the above solve the problem you’ll need to do a Factory Reset of the phone. This wipes the device of any and all personal settings and data you’ve acquired while using the phone. We recommend performing a backup of your information before continuing with this reset. In every situation we've encountered, doing the factory reset has fixed all Bluetooth issues.
11. My phone had a recent software update and now my Boogey Lights APP won't connect to the controller or if it does, I'm unable to control the lights. What do you suggest?
If your phone had a recent update to the phone's operating system and now your Boogey Lights APP and LED Controller aren't working correctly, the issue is with the phone and the operating system update, not the Boogey Lights APP or LED controller. In most cases you can fix the problem by following these steps precisely in this order:
- UNINSTALL the existing Boogey Lights APP on your phone. It needs to be uninstalled completely.
- Power Down the phone completely. It must be turned OFF. Not restarted. Power has to be off.
- Power Down the LED controller conpletely. It must be OFF. You can do this by pulling the fuse.
- Wait 5 seconds and then power UP the LED controller. Make sure the green light on the face of the LED controller is on.
- Power Up the phone. When the phone reboots, do not run any other APPs.
- If the phone is set to automatically connect to other Bluetooth devices (e.g. Bluetooth enabled watch or similiar device), disable that connection.
- Turn OFF Bluetooth.
- Go to the APP Store and install the latest Boogey Lights APP version for your device.
Now, launch the Boogey Lights APP. The APP should prompt you to turn on Bluetooth. If not, make sure your Bluetooth service is ON. Also, make sure your LOCATION SERVICES (aka GPS) is ON. Now, your phone should be able to find your Boogey Lights LED controller, connect to it and control it.
If after doing this you're still unable to get it to it to work, please submit a support ticket with us. We will need to know your phone's hardware make and model. Also, we need info on the Operating System version number and kernel version. We will research.
NOTE: The Boogey Lights Bluetooth APP is certified and approved by both Android and Apple APP stores to operate with the currently supported and in production Bluetooth stacks embedded in both Android and IOS operating systems. Any changes in the operating specifications of the Bluetooth stack which would make any APP currently approved and available in the two APP stores to stop working are communicated to all developers a year or more in advance to give them time to update their APP software systems. The manufacturers wouldn't knowlingly make a change in their OS that instantly made thousands of approved APPs stop functioning without notice. Simply put, an update to your phone's operating system that causes an APP that previously worked to stop working means something with that update and/or the update process is now inteferring with the APPs operation. In some cases you may have to wait until your phone's manufacturer releases an update to their OS to fix the issue. It's not something we can fix for you.
In the meantime if you're running Android and wish to roll back to a previous version - or - you want to manually install the current version you can do so by doing a manual install of the APK file. The current version and the previous version of the Android APK file can be downloaded from the two links below. If you're unfamiliar with how to manually install an APK file, Google the process for your phone OR you can get a general understanding of how to manually install an APK file on your Android device here.
Here are the available Boogey Lights Android APK files for Boogey Lights GEN1 and GEN2 LED Controllers you can download:
GEN1, Version 16 (SDK 28)
GEN1, Version 19 (SDK 33)
GEN2, Release 1
12. Trying to update to the latest Boogey Lights® APP but it crashes when I try to launch it. What do you suggest?
If when trying to update to the latest APP version the APP is crashing when first launched the problem is not the APP itself but rather your phone. There are variables still in memory on your phone that won't allow the APP to launch due to the APP's integration with the Bluetooth stack. Often it's the result of other Bluetooth enabled devices already configured or in use on the phone. To fix this situation follow these steps precisely in this order - pay attention to the details too. You must follow these steps exactly:
- UNINSTALL the existing Boogey Lights APP on your phone. It needs to be uninstalled completely.
- Power Down the phone completely. It must be turned OFF. Not restarted. Power has to be off. A 'cold boot'.
- Power Up the phone. When the phone reboots, do not run any other APPs.
- If the phone is set to automatically connect to other Bluetooth devices (e.g. Bluetooth enabled watch), disable that connection.
- Turn OFF Bluetooth.
- Go to the APP Store and install the latest Boogey Lights APP version for your device. Or, if you're installing the APK file manually (aka 'side loading'), load that APK file at this time.
At this point you should be able to launch the Boogey Lights APP. The APP should prompt you to turn on Bluetooth. If not, make sure your Bluetooth service is ON. Also, make sure your LOCATION SERVICES (aka GPS) is ON. Now, your phone should be able to find your controller.
If after doing this you're still unable to get it to it to work, please submit a support ticket with us. We will need to know your phone's hardware make and model. Also, we need info on the Operating System version number and kernel version. We will research to see what we can find out. In the meantime if you're running Android and wish to roll back to a previous version - or - you want to manually install the current version you can do so by doing a manual install of the APK file. The current version and the previous version of the Android APK file can be downloaded from the two links below. If you're unfamiliar with how to manually install an APK file, Google the process for your phone OR you can get a general understanding of how to manually install an APK file on your Android device here.
Here are the available Boogey Lights Android APK files for Boogey Lights GEN1 and GEN2 LED Controllers you can download:
GEN1, Version 16 (SDK 28) (or copy & paste: https://boogeylights.com/content/boogeylights-app-release-16.apk )
GEN1, Version 19 (SDK 33) (or copy & paste: https://boogeylights.com/content/boogeylights-gen1v19-app.apk )
GEN2, Release 1.0.4 (SDK 33) (or copy & paste: https://boogeylights.com/content/boogeylights-gen2app-release-1.apk )
GEN2, Release 1.0.6 (SDK 35) (or copy & paste: https://boogeylights.com/content/boogeylights-g2-r106.apk )
13. My phone connects to the LED controller briefly but it disconnects after a second or two. What do you suggest?
If you see the LINK icon light up briefly and then turns off, it means the LED Controller needs to be reset. To do this, press and hold the PAIRING/RESET button on the front the controller (while powered on) until the green light flashes quickly (about 2 seconds). When it stops flashing, power off the LED controller, then power back on. At this point you should be able to stay connected to the LED Controller with your phone. Note too that doing this reset will require you to re-pair the RF hand held remote to the LED controller. We discuss this issue in the LED Controller operating manual.
14. I can't get the TIME OF DAY or COUNTDOWN timers to work using the Bluetooth APP. What do you suggest?
First, we strongly suggest reading the Bluetooth APP operating instructions. Yes, we realize people don't like to read but in our experience, 90% (perhaps more) of the issues folks have with using any of the features on the Bluetooth APP are because they did not read the instructions. This is one situation where you really need to read the directions - not just skim - but carefully read them. Seriously. If you're struggling with getting the APP to work, reading the directions in their entirety will in most cases, resolve the problem. We have two documents: Quick-Start Guide (2 pages) and Bluetooth APP Operating Instructions (16 pages). Details on how to use the TIMING functions can be found on pages 9 and 10 of the Operating Instructions. They are quite detailed, even with diagrams of the screen settings. Before doing anything further, read these two pages.
When it comes to setting the timers, the APP must be connected to the LED controller for these timers to work. The controller pulls the time reference from the phone and uses that for all timing functions. The controller doesn’t have a ‘memory’. If power is interrupted to the controller for any reason, the controller will lose it’s time reference and any timers previously set will be disabled. Also, if when you first connect the APP to the controller the TIMER FUNCTION ICON is lit, it’s an indication the controller has an active timing function running. Before you can do anything with the APP, you must cancel that timing function. The controller cannot be used until the timing function is cancelled. The aforementioned Bluetooth APP Operating Instructions has diagrams of the screen settings of what we're referring to here.
If after reading the instructions you're still not able to get the timer function to work (or are having difficulty canceling an active timer), we suggest powering down the LED Controller completely -- a 'cold reboot' as it were. You can do this a couple of ways but probably the easiest is to simply pull the fuse (or fuses if you have a dual zone controller) that feed the power to your controller (green light on the controller will not be lit). Doing so will remove all timer settings from the controller and you can start over fresh.
Attention IOS Users: As of August 2025, on some IOS Apple devices, when you are in the timer screen you may notice the button to 'go back' to the main menu isn't viewable due to the IOS screen layout. Since 2023 we have modified our code set two times to fix this issue on various IOS devices. New IOS releases for new hardware have unfortunately re-introduced the problem twice now. It doesn't impact all IOS devices though. We are aware of the issue and are working on what we hope will be a permanent update so this problem doesn't continue to re-appear. In the meantime, if your IOS device has this issue the workaround is to force the Boogey Lights APP to close. You do this by opening the IOS APP SWITCHER, locate the Boogey Lights APP (swiping left or right) and then swipe up on the app's preview card to force it to close. You can then restart the APP normally. The other option of course is to restart your IOS device.
15. How can I tell if my LED Controller is BLUETOOTH capable?
We make LED controllers that are RF only, Bluetooth only and RF + Bluetooth capable. An RF only LED controller will have a 'PAIRING' button on the front of the controller box. A Bluetooth only LED controller will have a 'RESET' button on the front of the controller box. An RF + BLUETOOTH combo LED controller will have a 'RESET / PAIRING' button on the front of the controller box. Y
Also, if you know the model number of your LED CONTROLLER you can look up the model number on this chart. And if your controller is no longer in production. you can view this list of out-of-production controllers here.
16. My phone loads the APP but when I scan to find the controller, nothing shows up. What do you suggest?
First, make sure your LED CONTROLLER is BLUETOOTH capable (see above FAQ). Next, make sure your LED controller is powered up. For most (but not all) Boogey Lights controllers there is a green LED light on the controller case itself that will light up indicating it has power. Then, before launching the Boogey Lights APP, make sure you have BOTH bluetooth and location services (aka GPS) Enabled/ON your phone. Now, launch the Boogey Lights APP. At this point when you scan to find the controller it should show up in the list. If not, check to confirm the controller is powered up and to make sure it's bluetooth capable too. We sell LED controllers that are not bluetooth capable.
If the problem persists, check these items:
APP Version. Does the APP version you have loaded on your phone match the controller version? There are two different Boogey Lights Bluetooth APP versions: GEN1 and GEN2. The two apps are not interchangable. See documentation that came with your controller that addresses this very issue. If you don't know which version LED controller you have, check out FAQ #20 below. Be sure the APP version you have on your phone matches the controller version.
Restart All Devices. If you are experiencing problems with your phone/APP finding your Controller or other Bluetooth connection issues, try rebooting (powering off, powering on) both your phone and the LED controller you are connecting to. Although it seems far too simple and ubiquitous, it's a must for troubleshooting Bluetooth problems.
Try another phone. Bluetooth issues can be difficult to diagnose as there are literally hundreds of variables unrelated to the APP and the LED controller that can be the cause of the problem. If you've tried all of the above, we suggest trying a different phone to see if it works.
Reset the Controller. If you have a GEN2 LED controller, you can try factory resetting the controller. To do this press and hold the RESET button on the face of the LED controller for at least 7 seconds. You'll see the light on the face of the controller flash quickly. Doing so will erase any password and/or nickname settings. Note too that performing this reset will also erase the pairing with all RF hand held remotes. You'll have to re-pair your RF hand held remotes to the controller too (See FAQ #23 below for info on how to re-pair your RF remotes). You can find these details (along with many other important operating details) in the GEN2 Bluetooth APP Operating Info, the GEN2 LED Controller Operating Info (page 10) and the GEN2 M7 RF Remote Operating Info (page 3). We suggest downloading these documents and reviewing.
Read the Documentation. When all else fails, read the directions to make sure you understand how the APP works with the LED controller. Here are links to documentation for both GEN1 and GEN2 Bluetooth APPs:
GEN1 Bluetooth APP Quick-Start Guide
GEN1 Bluetooth APP Operating Manual
GEN2 Bluetooth APP Quick-Start Guide
GEN2 Bluetooth APP Operating Manual
Still Not Working? If none of the above work, open a SUPPORT TICKET here.
17. Google Play Store tells me the Boogey Lights® APP is not available for my phone, in my country or is too old for my phone. What do you suggest?
If Google Play Store tells you the Boogey Lights® APP is not available for your phone, you can download the APK file directly from our website and 'side load' it to your phone. We have both the GEN1 (for our GEN1 LED Controllers) and the GEN2 (for our GEN2 LED Controllers) Android versions you can download directly from our website and install them that way. As of 1/1/26, the Boogey Lights® GEN2 APP is available in the Google Play Store for SDK versions 35 and under. The GEN1 APP is available for SDK versions 33 and under. Here are links to both GEN1 and GEN2 APP apk files:
GEN1, Version 16 (SDK 28) (or copy & paste: https://boogeylights.com/content/boogeylights-app-release-16.apk )
GEN1, Version 19 (SDK 33) (or copy & paste: https://boogeylights.com/content/boogeylights-gen1v19-app.apk )
GEN2, Release 1.0.4 (SDK 33) (or copy & paste: https://boogeylights.com/content/boogeylights-gen2app-release-1.apk )
GEN2, Release 1.0.6 (SDK 35) (or copy & paste: https://boogeylights.com/content/boogeylights-g2-r106.apk )
If you're not familiar with how to install an APK file other than via the APP Store, do an online search for your phone's hardware. It's easy to do but your browser settings may need adjustment based on the hardware. It's not something we can assist you with. Here's a link to a site that explains the process of loading an APK file which may be helpful to some users.
18. Trying to run the Boogey Lights® APP on my Android phone but it crashes when I try to launch it. What do you suggest?
If when trying to load the APP and it crashes or stops working immediately, there was likley a recent update either to your phone's hardware, software or an update to our APP didn't install completely. Impossible for us to say what happened as there are so many varieties of smart phone hardware on the market today and those manufacturers are constantly updating their phones. What we can tell you is that our APP works on Android versions 5 thru 13 on over 18,000 Android devices including the most popular Google Pixel and Samsung phones. The best advice we can give you is to remove the APP and reinstall it by following these steps precisely in this order:
- UNINSTALL the existing Boogey Lights APP on your phone. It needs to be uninstalled completely.
- Power Down the phone completely. It must be turned OFF. Not restarted. Power has to be off. A 'cold boot'.
- Power Up the phone. When the phone reboots, do not run any other APPs.
- If the phone is set to automatically connect to other Bluetooth devices (e.g. Bluetooth enabled watch), disable that connection.
- Turn OFF Bluetooth.
- Go to the APP Store and install the Boogey Lights APP version for your device. Or, if you're installing the APK file manually, load that APK file at this time.
Note that starting June 1, 2023 we offer a GEN1 and a GEN2 APP which will work with Boogey Lightrs GEN1 and GEN2 LED Controllers respectively. If you purchased your Boogey Lights LED Controller prior to June 1, 2023 you have a GEN1 LED Controller. As such, most of our LED Controllers in the market currently are GEN1 so be sure you're downloading the correct version. They are not interchangeable.
At this point you should be able to launch the Boogey Lights APP. The APP should prompt you to turn on Bluetooth. If not, make sure your Bluetooth service is ON. Also, make sure your LOCATION SERVICES (aka GPS) is ON. Now, your phone should be able to find your controller. If this doesn't work, the solution is to roll back to a previous version by manually installing the APK file. See FAQ 19 for details.
19. Rolling back. Manually install the APK file.
If you have a GEN1 LED Controller you can roll back to a previous version by doing a manual install of the APK file. The current version and the previous version of the Android APK file can be downloaded from the two links below. If you're unfamiliar with how to manually install an APK file, search online the process for your phone OR you can get a general understanding of how to manually install an APK file on your Android device here. Note that if you're having difficulty getting the current version to run, we suggest dropping back to our Version 16 (SDK 28) app which you must download directly. It cannot be downloaded from the APP store. VERSION 16, SDK 28 is the APP that has been in use since 2018. The latest version 21 (SDK 33) is for newer phones that require the higher SDK libraries. Some older phones are not able to handle the new SDK versions. There are NO new features in VERSION 21 vs VERSION 16. It's only an SDK update which Google Play Store is forcing.
Here are the available Boogey Lights Android APK files for Boogey Lights GEN1 LED Controllers you can download:
GEN1, Version 16 (SDK 28) (or copy & paste: https://boogeylights.com/content/boogeylights-app-release-16.apk )
GEN1, Version 19 (SDK 33) (or copy & paste: https://boogeylights.com/content/boogeylights-gen1v19-app.apk )
If you're installing Version 16 (SDK 28), be sure to disable the auto-update feature on your phone for our APP so Google Play Store doesn't automatically download and install Version 21 over top Version 16. There are no new features in VERSION 21. It's only an SDK update which Google Play Store is forcing.
ANDROID OS NOTE: The Boogey Lights APP has been tested to work with Android OS versions 5 thru 13.
IOS OS NOTE: The Boogey Lights APP has been tested to work with IOS version 16.5.
20. How can I tell if I have a GEN1 or a GEN2 Boogey Lights® LED Controller?
Our GENERATION 2 (aka GEN2 or just G2) LED Controllers were released in June of 2023. Previous to this time, all Boogey Lights® LED controllers were GENERATION 1 (aka GEN1) LED controllers. Bluetooth capable GEN1 LED Controllers can only use the GEN1 Controller APP. The new GEN2 LED Controllers can be seen here: https://www.boogeylights.com/gen2-bluetooth-rf-combo-led-controller/. All GEN2 LED Controllers are Bluetooth capable and will only work with the new GEN2 LED Controller APP. The GEN1 and GEN2 APPs are not interchangeable. The way you can tell if you have a GEN2 LED controller is to look at the back of the controller. The MODEL number printed on the back will include a 'G2' designation (see photo examples below). GEN1 LED controllers will not have this designation. 
If you know the model number of your LED CONTROLLER you can look up the model number on this chart. And if your controller is no longer in production. you can download this list of out-of-production LED controllers.
21. How can I unpair a remote from a controller?
You can't 'unpair' an RF remote from an LED Controller per se. You can however pair a new RF remote to the LED Controller such that it will erase the previous pairing. Most people who are looking to unpair a remote from a controller are doing so because they have more than one LED Controller and they accidentialy paired the wrong RF remote to one of them. Example: You have two controllers: one for the awning, one for the under-glow. You mistakently paired the RF remote for the under-glow to the awning such that the same RF remote is now operating both lighting systems at the same time. That's not what you want. What's the solution? Pair the awning RF remote to the awning LED controller 7 times in a row. This will completely remove all previous pairings in the awning's LED Controller such that now, only the one RF remote will operate it. Problem solved.
22. I lost my RF wireless remote. How can I tell which one works with my controller? And, where can I purchase a replacement?
You'll find a chart listing all of our LED Controller model numbers and the corresponding RF remotes below. Match the model number on the back of your controller with the RF remote style. You can purchase replacement M7 and KEYFOB style remotes directly from our website using this search link: https://www.boogeylights.com/search.php?search_query=replacement . You can also use our QUICK-FIND search feature too to locate these parts. 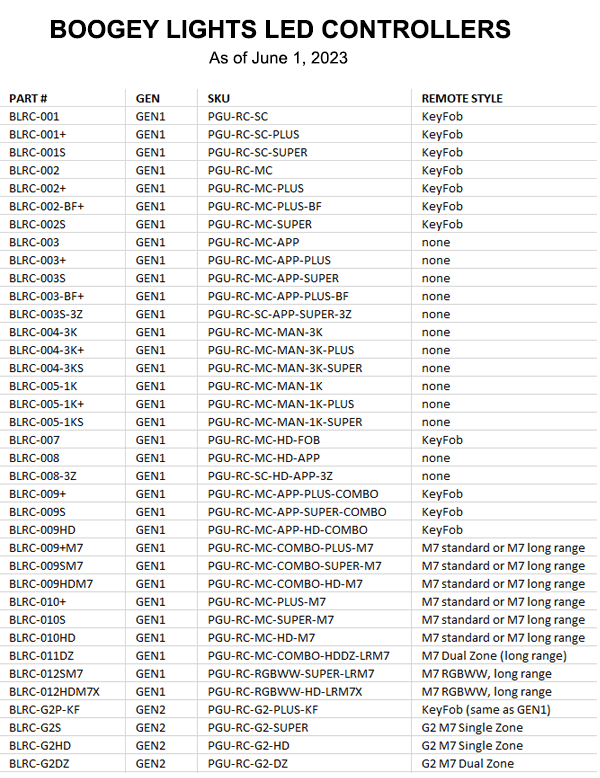
If you know the model number of your LED CONTROLLER you can look up the model number on this chart. And if your controller is no longer in production. you can view this list of out-of-production controllers here.
23. How do I pair my RF wireless remote to the LED Controller?
It depends on which RF remote you have. Over the past 25 years we've produced many LED controllers that use different RF wireless remotes. If you've purchased one of our LED controllers that use an RF wireless remote since 2015, here's the information you need. There's both written instructions and video. Note: This information can also be found in our INSTALLATION RESOURCES section here on our site. We provide all documentation for all products -- installation, product specs, how-to, wiring diagrams, etc -- right here on our website using that link.
GEN2 M7 Style RF Wireless Control
GEN1 M7 Style RF Wireless Control
KEY FOB Style RF Wireless Control
24. I have the GEN2 CONTROLLER but I'm unable to turn it on using either the RF Remote or Bluetooth APP. Suggestions?
Assuming you've confirmed the LED controller has adequate 12v power (green light on) and the LEDs are wired correctly to the controller, the most likely reason is you have the brightness setting on the controller turned all the way down. The controller is on, you just can't see the lights because the last used setting had a brightness level set to 0. Our GEN2 LED Controllers can be operated using either the RF wireless remote that comes with the controller or your Bluetooth capable smartphone and our free GEN2 Smartphone APP. When the controller is first turned on, the LEDs will display in whichever mode/color they were last used. This feature is particularly useful for those who want the lights to work the exact same way every time the controller is turned on. It does not matter how the controller was last used either; the RF wireless remote or Bluetooth APP. One word of caution though: If the last setting used on the controller had the brightness all the way down, when you turn on the controller the next time, it appears as if the controller isn't working when in fact it's merely coming on with your last used setting (which is why you can't see the light). If this happens, simply cycle through the MODE and/or BRIGHTNESS buttons on the RF remote until the lights are visible (or, connect to the controller using the Bluetooth APP and adjust the brightness setting > 0). Details about using the RF handheld remote or the GEN2 Bluetooth APP are in separate documents.
If this doesn't fix the issue and you have a Boogey Lights® COMBO RF + BLUETOOTH LED controller that has the RESET/PAIRING button on the face of the controller, you can also hard reset the controller. You do this by pressing and holding the RESET/PAIRING button on the face of the LED controller for at least 7 seconds. You'll see the light on the face of the controller flash quickly indicating the controller is being reset. Doing so will erase any password and/or nickname settings (Bluetooth APP) and sets the LED controller back to factory default. Note too doing a hard reset will also erase the pairing with all RF hand held wireless remotes. You'll have to re-pair your RF hand held remotes to the controller before you can operate the controller with the remote again. See FAQ #23 for info on how to re-pair your RF wireless remotes back to the LED Controller. This information can also be found in the GEN2 LED Controller Docs (page 10) as well as on the GEN2 RF Wireless Remote Docs (page 3).
25. When trying to connect to my LED controller using the bluetooth APP it's asking me for a password. I don't recall the password (or, you never assigned one to it). How can I reset the controller to gain access to it with the APP?
If you forget the password you assigned to the GEN2 LED controller (or if the controller is asking you for a password on first power up), press and hold the RESET button on the face of the LED controller for at least 7 seconds. You'll see the light on the face of the controller flash quickly. Doing so will erase any password and/or nickname settings. Note too that performing this reset will also erase the pairing with all RF hand held remotes. You'll have to re-pair your RF hand held remotes to the controller too (See FAQ #23 above for info on how to re-pair your RF remotes). You can find these details (along with many other important operating details) in the GEN2 BLUETOOTH APP OPERATING INSTRUCTIONS and the GEN2 LED CONTROLLER OPERATING INFORMATION. We suggest downloading both of these documents and reviewing.
26. I have an iPhone and when I'm in the TIMER SCREEN, the button to 'GO BACK' isn't viewable. How can I get back to the main menu?
As of August 2025, on some IOS Apple devices, when you are in the timer screen you may notice the button to 'go back' to the main menu isn't viewable due to the IOS screen layout. Since 2023 we have modified our code set two times to fix this issue on various IOS devices. New IOS releases for new hardware have unfortunately re-introduced the problem twice now. It doesn't impact all IOS devices though. We are aware of the issue and are working on what we hope will be a permanent update so this problem doesn't continue to re-appear. In the meantime, if your IOS device has this issue the workaround is to force the Boogey Lights APP to close. You do this by opening the IOS APP SWITCHER, locate the Boogey Lights APP (swiping left or right) and then swipe up on the app's preview card to force it to close. You can then restart the APP normally. The other option of course is to restart your IOS device.
27. Where can I find what type of battery works in my RF remote?
If you have one of our M7 style RF remotes, here's a link to the replacement parts that includes the battery specifications: https://www.boogeylights.com/replacement-m7-rf-wireless-remotes/.
If you have the KEY FOB style compact RF remote, here's a link to the replacement parts which includes the battery specifications: https://www.boogeylights.com/replacement-rf-key-fobs/
28. My Boogey Lights® are so dirty they're not as bright as they used to be. What's the best way to clean my Boogey Lights® LED light system?
Download our Boogey Lights CARE & MAINTENANCE document directly from our website. It contains helpful information on caring for your lighting system, including how best to clean the lights.
29. My Boogey Lights® LED Controller has a RESET/PAIRING button on the face. What is that button for?
The RESET/PAIRING button on the face of our Combo RF + Bluetooth wireless LED controller performs two important functions:
1. Pairing the RF handheld wireless remote with the controller. Pressing that button quickly and releasing will put the controller into pairing mode. The light on the face of the controller box will flash slowly. This indicates it's in pairing mode. With the controller in pairing mode, press and release any button on the hand held RF wireless remote. As soon as you do this, the green flashing light on the LED controller should turn solid green. This means the RF remote and the LED controller are now paired. Repeat this process to add additional remotes.
2. Resetting the LED Controller / Erasing all settings. Pressing and holding the RESET/PAIRING button on the face of the LED controller for at least 7 seconds will ERASE ALL SETTINGS. This includes any passwords, nicknames or other presets you may have created. Note too it will remove all RF wireless remote pairings so you'll have to re-pair those remotes again as described above. You'll see the light on the face of the controller flash quickly indicating the controller is being reset. Think of it as a factory reset button.
You can find these details (along with many other important operating details) in the GEN2 LED CONTROLLER OPERATING INFORMATION and the GEN2 BLUETOOTH APP OPERATING INSTRUCTIONS. Both of these documents are included with every LED Controller we ship. If you don't have these documents handy, we suggest downloading them now and keeping them for future reference.
30. I have a GEN1 LED Controller. What is the difference between the GEN1 and the GEN2 and can I upgrade to the GEN2 if I want?
Our first generation (GEN1) of Bluetooth LED Controllers were introduced in 2015. They are no longer in production. We introduced our second generation (GEN2) of Bluetooth LED Controllers in June 2023. Our GEN2 controllers have all the features and capabilities of the GEN1 controllers but with some additional add ons. You can read more about the differences here. It is important to note that the two APPs are NOT inter-changeable. If you have a GEN1 LED controller, you have to use the GEN1 APP. If you have the GEN2 LED controller, you have to use the GEN2 APP. If you're not sure which generation of LED controller you have, see FAQ #20 above.
Yes, you can upgrade to the GEN2 LED controller. Doing so requires purchasing the GEN2 LED CONTROLLER and then installing the GEN2 Bluetooth APP. Details of both are on the GEN2 LED controller product page.
31. I have a GEN2 DUAL-ZONE LED Controller. I can't seem to get Zone 1 and Zone 2 to show the same lighting effects at the same time (e.g. In Sync). Each zone is showing different colors. How can I put both zones back in the same sequence?
First, it's important to understand the BOOGEY LIGHTS® GEN2 Dual Zone LED controller is designed to allow each zone to operate independently. There are lots of reasons why someone may want Zone 1 to display the color RED and Zone 2 to display BLUE. It's by design; intentional. You can create some really cool lighting effects this way. If however the two zones are 'out of sync' and you don't want it that way (you want both zones to behave the exact the same way), there's two ways to put them back 'in sync': Option 1 - Manually change each zone color/mode to the same setting. Option 2 - Hard reset the LED controller. Details of both options are below.
1. Manually Adjust Each Zone: This method changes each zone color/mode to the same setting. At that point you can use the ALL ZONES button to operate the controller and both zones will show the same color/mode. You do this by using the ZONE 1 and ZONE 2 control buttons on the bottom of the GEN7 RF wireless remote. This option assumes your hand held RF remote is paired to the LED Controller (if not, see FAQ #23 above). The key sequences are as follows (diagram below):
- Press and release ZONE 1 button (red/white button in the center bottom of the handheld RF remote). This tells the controller that the next key sequences will only be applied to Zone 1.
- Press and hold the RGB MODE- button for a couple of seconds. Doing so forces the RGB MODE to the steady on color sequence.
- Press and hold the RGB COLOR+ button for a couple of seconds. Doing so forces the RGB Color to bright white.
- Press and hold the RGB BRIGHTNESS+ button all the way up. Doing so forces the RGB Brightness to full brightness.
- Press and release ZONE 2 button (red/white button at the bottom right of the handheld RF remote). This tells the controller that the next key sequences will only be applied to Zone 2.
- Press and hold the RGB MODE- button for a couple of seconds. Doing so forces the RGB MODE to the steady on color sequence.
- Press and hold the RGB COLOR+ button for a couple of seconds. Doing so forces the RGB Color to bright white.
- Press and hold the RGB BRIGHTNESS+ button all the way up. Doing so forces the RGB Brightness to full brightness.
Now, press and release the ALL ZONES button (red/white button on the left, bottom of the handheld RF remote). This tells the controller that all key sequences from this point forward will be applied to both Zones. Any changes you make in the color/mode/brightness settings will be applied to both Zone 1 and Zone 2 effectively keeping them 'in snyc'. You can download the GEN2 M7 RF Wireless Remote Control operating instructions here.


2. Hard Reset: You can hard reset the LED Controller by pressing and holding the RESET/PAIRING button on the face of the LED controller for at least 7 seconds. You'll see the light on the face of the controller flash quickly indicating the controller has been reset. Doing so will erase any password and/or nickname settings (Bluetooth APP) and sets the LED controller back to factory default. Note too doing a hard reset will also erase the pairing with all RF hand held wireless remotes. You'll have to re-pair your RF hand held remotes to the controller before you can operate the controller with the remote again. See FAQ #23 for info on how to re-pair your RF wireless remotes back to the LED Controller. This information can also be found in the GEN2 LED Controller Docs (page 10) as well as on the GEN2 RF Wireless Remote Docs (page 4).
32. I'm having difficulty operating the Bluetooth APP. What resources do you have to assist with understanding this technology?
Our GEN2 LED Controller has a lot of technology jammed into one box. It's what consumers want these days. The downside of all that tech however is some people will struggle using the technology. It's unavoidable. It's one of the reasons why all of our GEN2 LED controllers offer BOTH Bluetooth and RF wireless command/control. The RF wireless remote is simpler to use than the Bluetooth APP. Of course, it can't do nearly as many things as the APP can either. So there are trade-offs. The good news is that at least in our experience after working with several thousand consumers now, if you take the time to actually read the operating instructions, using the Bluetooth APP is straight forward - but you do have to be willing to read the instructions. Note too we also offer a How To video. While the video is helpful for understanding the basic operating commands, using the more advanced features (e.g. time of day on/off.) will for some require reading the instructions. No way around it.
Here are links to the documentation along with a how to video:
GEN2 APP Quick Start Guide (2 pages - just the basics): https://docs.boogeylights.net/?wpdmdl=1167
GEN2 APP Operating Manual (16 pages - details): https://docs.boogeylights.net/?wpdmdl=1169
In this video we demonstrate how to use the BOOGEY LIGHTS® GEN2 (G2) Smart Phone APP for both single zone and dual zone controllers.
33. Why can't RGB LED lights create the color orange?
RGB leds have three color DIODES: RED, GREEN and BLUE. It's the mixing of these three colors together that create other colors.
The color ORANGE is created by mixing RED + YELLOW.
The color YELLOW is created by mixing RED + GREEN.
With an RGB LED, there is only one RED diode so it can only be used once.
So what's the solution? Well, to get something that looks more like orange to the human eye using RGB LEDs you need to mix equal amounts of RED + GREEN (actually just a bit less green since the human eye is more sensitive to green wavelengths). This will give you the color YELLOW. Then, increase the intensity of the RED just a little (or, pull back the green). This will essentially add a little red to the yellow to effectively mix a color that has an orange tint. It's not perfect but it's as close as you can get to the color orange using RGB led lights.
If your application absolutely requires the color ORANGE, you can order just ORANGE (or AMBER) LED strips. They're single color of course so you can't adjust the color.
One Option to Consider: For those who want to create a nice deep orange color and still have the option to display up to 16 million colors using RGB LEDs, we offer an RGBA LED product where the 'A' = Amber. The RGBA led strip includes our core RGB tri-chip technology using a 5050 RGB LED with the addition of a fourth 2835 diode that is AMBER. When AMBER is mixed with RED, you get a very pleasant orange color which is what many people want. This RGBA product is unique to BOOGEY LIGHTS® and is available in both our LOW PROFILE LED and HEAVY DUTY LED strip formats.
34. I need to remove a Boogey Lights LED strip. What's the best way to do this?
Be aware that if the LED strip was installed properly using 3M Adhesion Primer to prepare the surface, you will not be able to remove the strip without permanently damaging the LED strip. The LED strip will not be usable nor will warranty cover damage to it as a result of removing the strip. These LED strips are designed to be permanently mounted. One use only. With that understood, to remove the strip start at one end and pull it up from the surface. It will likely require some force to do so. If you're lucky, only a little bit of 3M tape will remain stuck to the surface. Often though, that's not the case. Regardless, once you've pulled the LED strip from the surface, you can clean the tape residue from the surface using a combination of Goo Gone, WD40, rubbing alcohol and a plastic putty knife or other plastic straight edge tool that will give you some leverage. A hair dryer or heat gun too can be helpful but if using a heat gun, make sure the gun isn't so hot that it damages the painted surface (or decals). We've had good luck using an eraser wheel on a variable speed drill too to remove that residue. The only problem with using an eraser wheel is that if the led strip was installed on top or over a decal, the eraser wheel can damage that decal too so you need to be careful. It takes some time to remove a strip so be patient. We've had to remove LED strips many times and we've never had a problem removing them using this method - nor has there been any damage to the painted surface underneath.
35. How can I submit a warranty claim?
Details on the BOOGEY LIGHTS® warranty process and eligibility can be found here. Before submitting a warranty claim, it's helpful to first confirm whether or not your product is under warranty.
You can make a WARRANTY CLAIM using this form. The warranty specifics varies depending upon the product purchased. Details of the product warranties appear below as well as on the product details listed on our website.
The Process for LED Strips
If you have an LED strip that isn't working properly and you think it might be defective, DO NOT REMOVE OR UNINSTALL THE STRIP. We will need the following photos with the strip(s) installed to determine warranty eligibility:
- Close up photo of the LED strip at the point where the issue is with the lights ON.
- Close up photo of the LED strip at the point where the issue is with the lights OFF.
- Wide angle photo that shows the entire LED strip that has the issue with the lights OFF. Be sure to include the area where the power lead meets the LED strip in this photo.
(These photos can be taken in the day light. Not necessary to take at night.)
The Process for LED Controllers
If you have an LED controller that isn't working and you think it might be defective, we strongly encouarge you to check out our TROUBLE SHOOTING GUIDE before doing anything further. We provide a step-by-step guide on how to trouble shoot the lighting system and in particular the LED controller. In the vast majority of cases the controller isn't defective. There's something else going on that makes you think the controller is the issue when it's not. In almost all cases, if an otherwise working LED controller stops working, it's almost always some external event that caused the controller to stop working; not a defect. Our Trouble Shooting Guide walks you though those steps to determine where the issue is. Note that these are the very same steps our technician will ask you to perform before authorizing a warranty claim.
SUBMITTING A WARRANTY CLAIM
If your purchase was made directly from this website (or via phone), please include the original order number so we can look up the order specifics. If the purchase was made from an authorized Boogey Lights® dealer, we will request that you send us a copy of your original receipt. We will also need to know more about the problem. For example, we may follow-up with a request for photos of the issue as well details of the installation. This is especially true for warranty claims on LED Strips (see above). For LED Controllers and switches we will ask you to go through some trouble shooting steps to narrow down potential other issues causing the problem (see above). Regardless of the product, if you want warranty coverage DO NOT REMOVE OR UNINSTALL THE PRODUCT until after this warranty review process has been completed. If we request photos, you can send them to us USING THIS LINK. Be sure to have your order number handy when calling or include it with your warrant claim communication. If you have already registered your purchase using our online warranty registration us, we can look up and verify your purchase with just your name. We may require that the defective product be returned for inspection and warranty approval prior to replacement. Product that is physically damaged is not eligible for replacement under warranty. Products that have been altered or modified in ways other than those prescribed are ineligible for warranty coverage. In the event a warrantied product is discontinued and no longer available, we may elect to replace the product with the newest equivalent or in some cases, elect to refund the cost of the product at our sole discretion. Regardless, all returns must clearly display an RMA authorization number on the outside of the package.
36. When I turn on my RV's radio I get a high pitched buzzing noise through the speakers when the RGB LED lights are on. Do you have a suggestion on how to reduce this?
Here are some easy solutions:
1. Move the two components further apart. You'll have to do some testing to see how far but usually 6' or so will dramatically reduce the noise. Check the location of the stereo's external antenna (if it has one) relative to the LED controller too which can directly impact the buzzing. Also, separate the power lines of each device (and stereo antenna) as far from each other as you can.
2.Do not share 12vdc power lines. Run a dedicated fused 12V+ and ground directly from the house battery (or a separate fuse block) to the LED controller as suggested in our installation docs. Doing so totally bypasses the shared wiring harness (also minimizes the possibility of ANY interference with your RV's existing electrical systems). This prevents noise from traveling back through the common power bus to the stereo.
3. Add ferrite chokes/beads (photo below) to the 12v+ and 12v- lines of both devices, as close to the devices as possible (sometimes adding 2 of these chokes to each power line is required). Also, add ferrite chokes/beads to each of the red, green and blue output wires coming from the controller to the LED strips.
