


Can-Am Spyder LED Light Kit
Light up your CAN-AM SPYDER RT LIMITED with a Boogey Lights® LED light kit!
Over the past few years we've received numerous requests for Can-Am Spyder light kits. We've candidly resisted because there are already a lot of after-market lighting options available for the Spyder. It wasn't till a customer showed up at our headquarters with his Spyder did we see the opportunity. He had recently purchased a top selling Spyder LED Light Kit and had it installed by a local dealer. The kit had maybe 40 or so miniature 2835 leds scattered throughout the bike in 10 to 12 locations which could barely be seen even in the dark. There was more wire and fancy plastic connectors than there were LEDs. Sure, it was relatively easy to install but wow, the actual lighting effect was quite under-whelming. Pathetic even. We were shocked. He was extremely disappointed. This customer had seen our light kits installed on Indian and Harley motorcycles so he knew our light kits were super bright; they flood the bike with light. He asked if we would take a look at lighting his Spyder. Since he was local we agreed if he would let us have his bike for a week. The end result of that week is the LED light kit you see here.
OVERVIEW
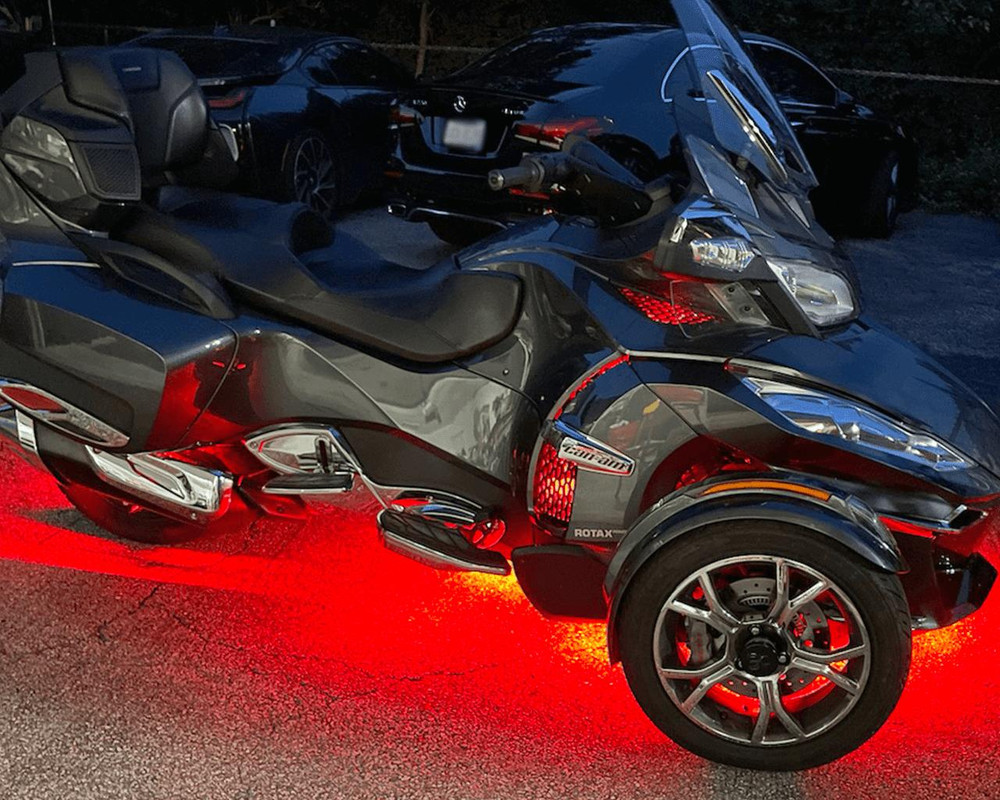
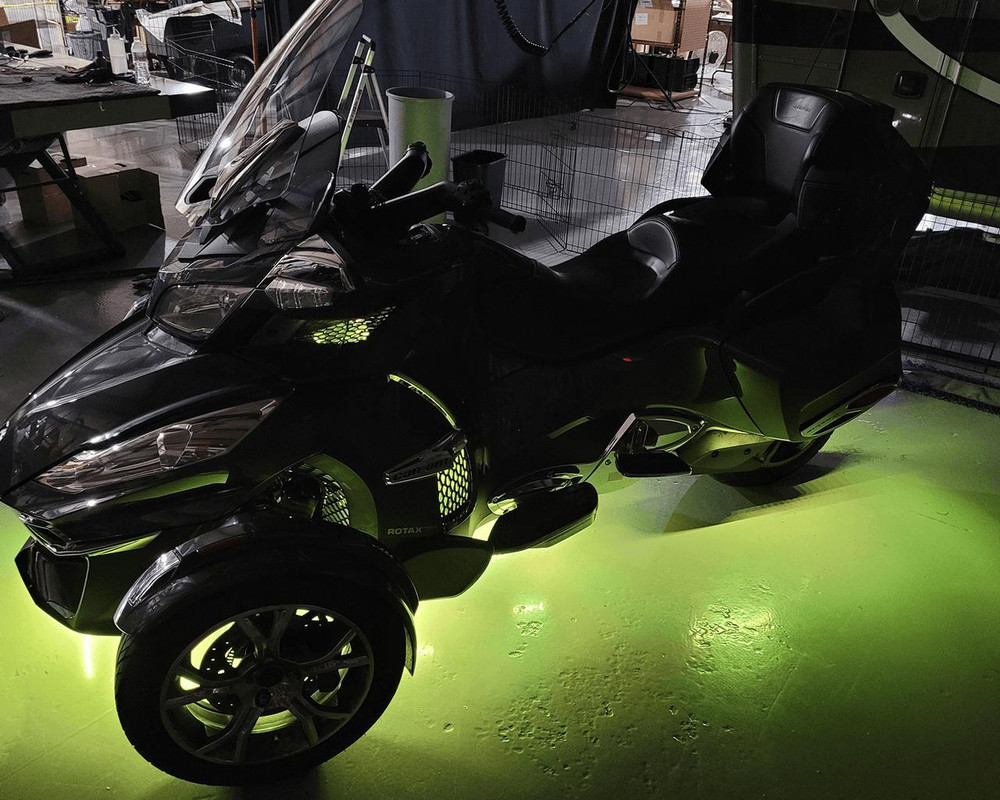
Designed specifically for the Spyder RT Limited, this multi-color RGB LED light kit contains 300 super-bright full sized 5050 LEDs that will absolutely flood the entire bike with light. Of course you can dim it if you want. In addition, we include a BRAKE FLASH feature such that when activated, anytime the brake pedal is pressed, all of the RED leds mounted on the bike light up. This is a popular safety feature that can be switched on/off with the included push button switch. This Spyder light kit has groups of LEDs mounted in 27 different locations on the bike: front, rear, sides, under-neath, air-intakes and in the lower engine case vents (both of which require the installation of quick-disconnects). You can control the LEDs and light up your Spyder with any of seven different pre-set colors and animate them with special effects using the included hand held wireless RF remote control (KEY FOB). In addition, you can use your bluetooth enable smartphone to control the lighting system if you want. Bluetooth significantly expands the capabilities such that you can choose from over 16 million possible color combinations PLUS program your LEDs with a 2 or 3 sequence color rotation function as well as save favorite lighting effects in three different pre-sets. Simply put, we know of no other LED light kit on the market that comes even close to the product specs of this Boogey Lights Spyder LED light kit.
This is a 12vdc system that connects to the Spyder's on-board battery. On full power white, total amperage draw is about 3amps so if you don't already have a battery tender on the bike, you might want to add one. Of course, the amperage draw is significantly less when dimmed or using other colors. Installation time of this kit takes 8-10 hours to do the job correctly. DIYers will need to be familiar with removing the plastics on the bike. You will likely need floor jacks get the bike high enough off the ground to install the under-glow light strips. For the brake light interface, you will need to gain access to the rear brake lights to tap into the brake light circuit. More about the installation process and light strip locations can be found on the INSTALL tab.
GEN2 Bluetooth + RF Wireless LED Controller
Our GEN 2 Bluetooth + RF Combo LED Controller includes our popular Programmable Color Rotation Feature. With any of the Boogey Lights® BLUETOOTH controllers you can control your lights with your Bluetooth enabled Android or IOS smartphone. These high-tech controllers are capable of displaying 16 million different color combinations. In addition, lighting effects on the Smartphone controller are signficantly more controllable in terms of speed and intensity. Each color and lighting effect is controlled by "sliders" or a color square on your smartphone screen so you can adjust the speed and intensity to get the lighting exactly the way you want it. Also, all of our SERIES 2 Bluetooth Combo controllers include an RF remote control allowing for quick on/off of the controller. You can operate this controller with the included RF wireless remote OR you can use your Bluetooth enabled smartphone and our free smartphone APP (Android and IOS).
OTHER ITEMS YOU MAY NEED
No two installation scenarios are the same. Not everyone shares the same installation quality goals. Some folks are OK with twisting wires together, others want to solder them. Some folks are OK with running wires where they may be seen or unprotected to save money/time, others want a tidy, clean install without any wires showing. Some folks are OK with mounting their LED strips to whatever surface they can find, others want to take the time necessary to build out appropriate mounting surfaces to provide the best lighting effect on their vehicle. The point is it's not possible to provide all the materials necessary for all installation scenarios and quality goals. Our light kits provide the essential components needed for a high-quality, functioning lighting system. Installation of our light kit to your specific vehicle may however require additional items to make it look and fit the way you want. This is particularly the case with electrical wiring and mounting of LED strips. Before proceeding with your installation we suggest you consider THESE OTHER ITEMS.
WALK-AROUND VIDEO
Installation
Installation of this led light kit takes 8 to 10 hours to do it properly. You can download the Installation Manual directly from our website to get an idea of what's involved.
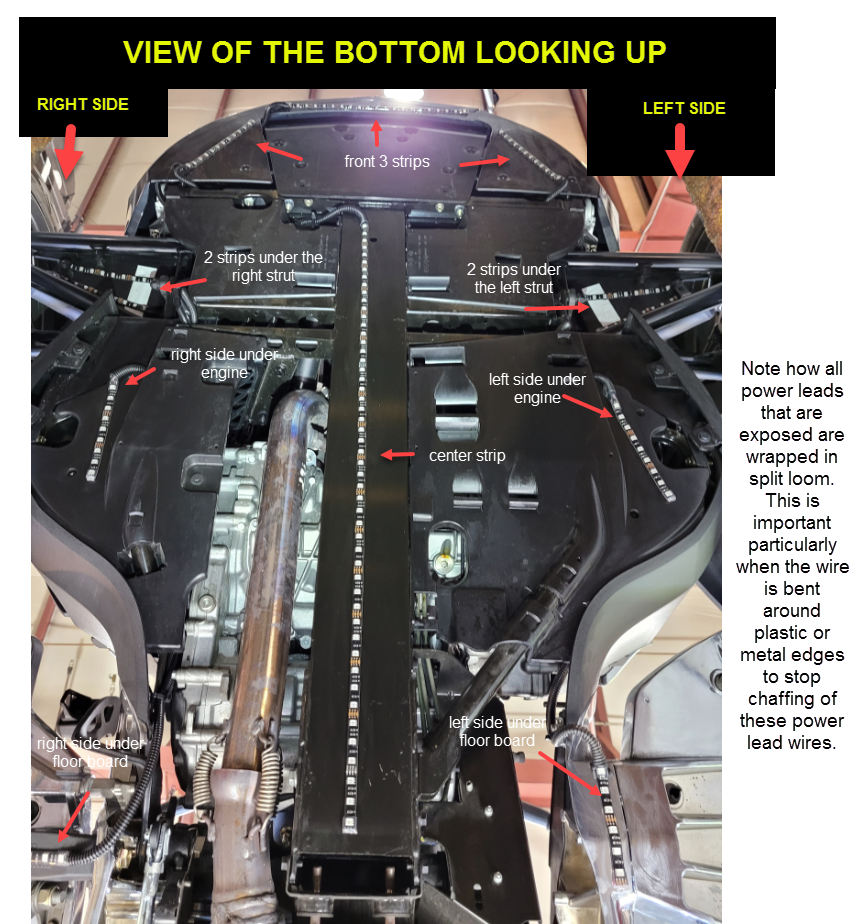
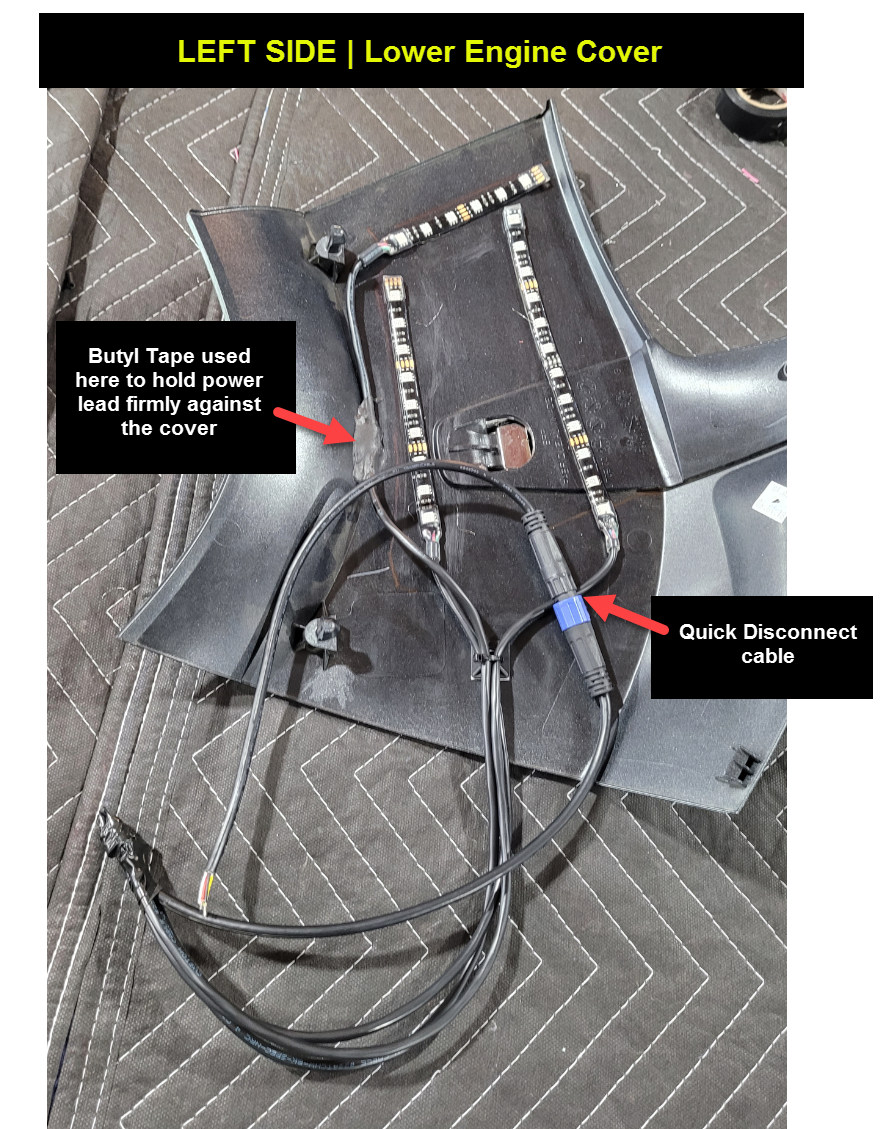
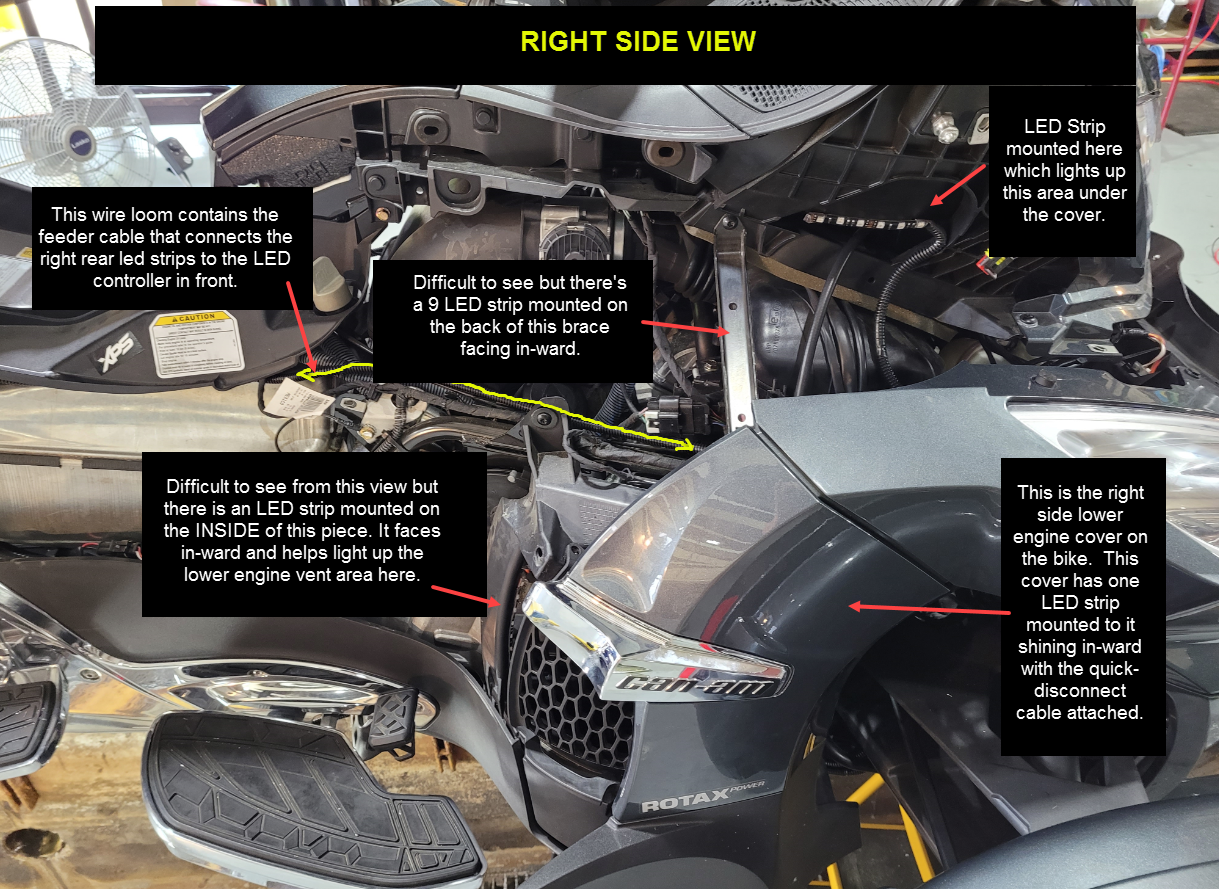
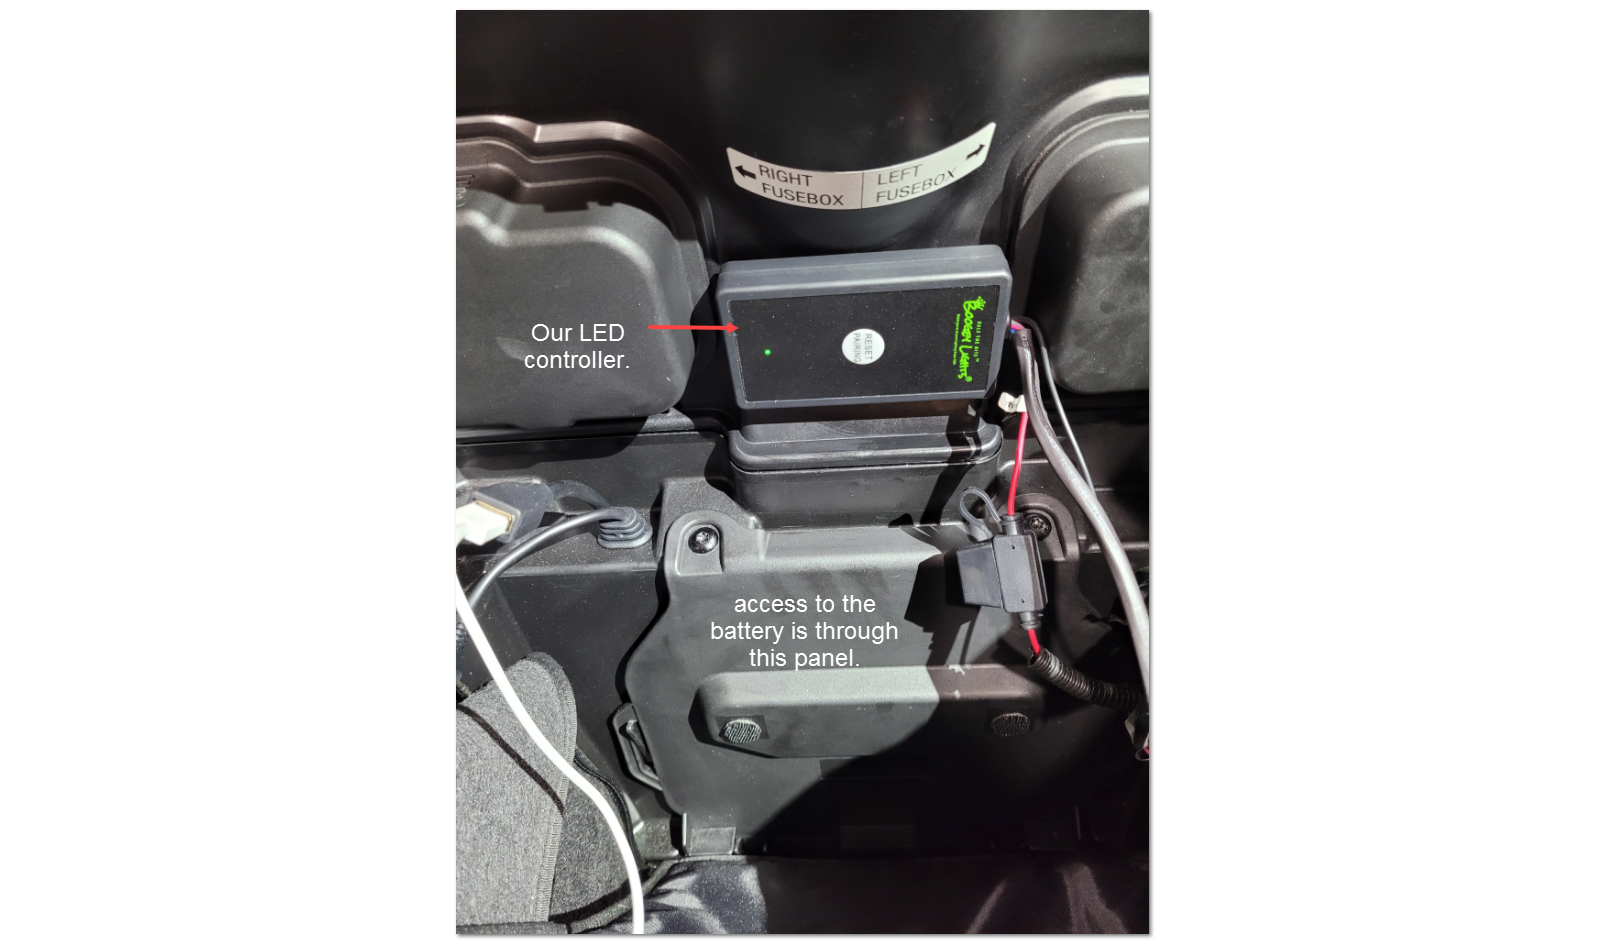
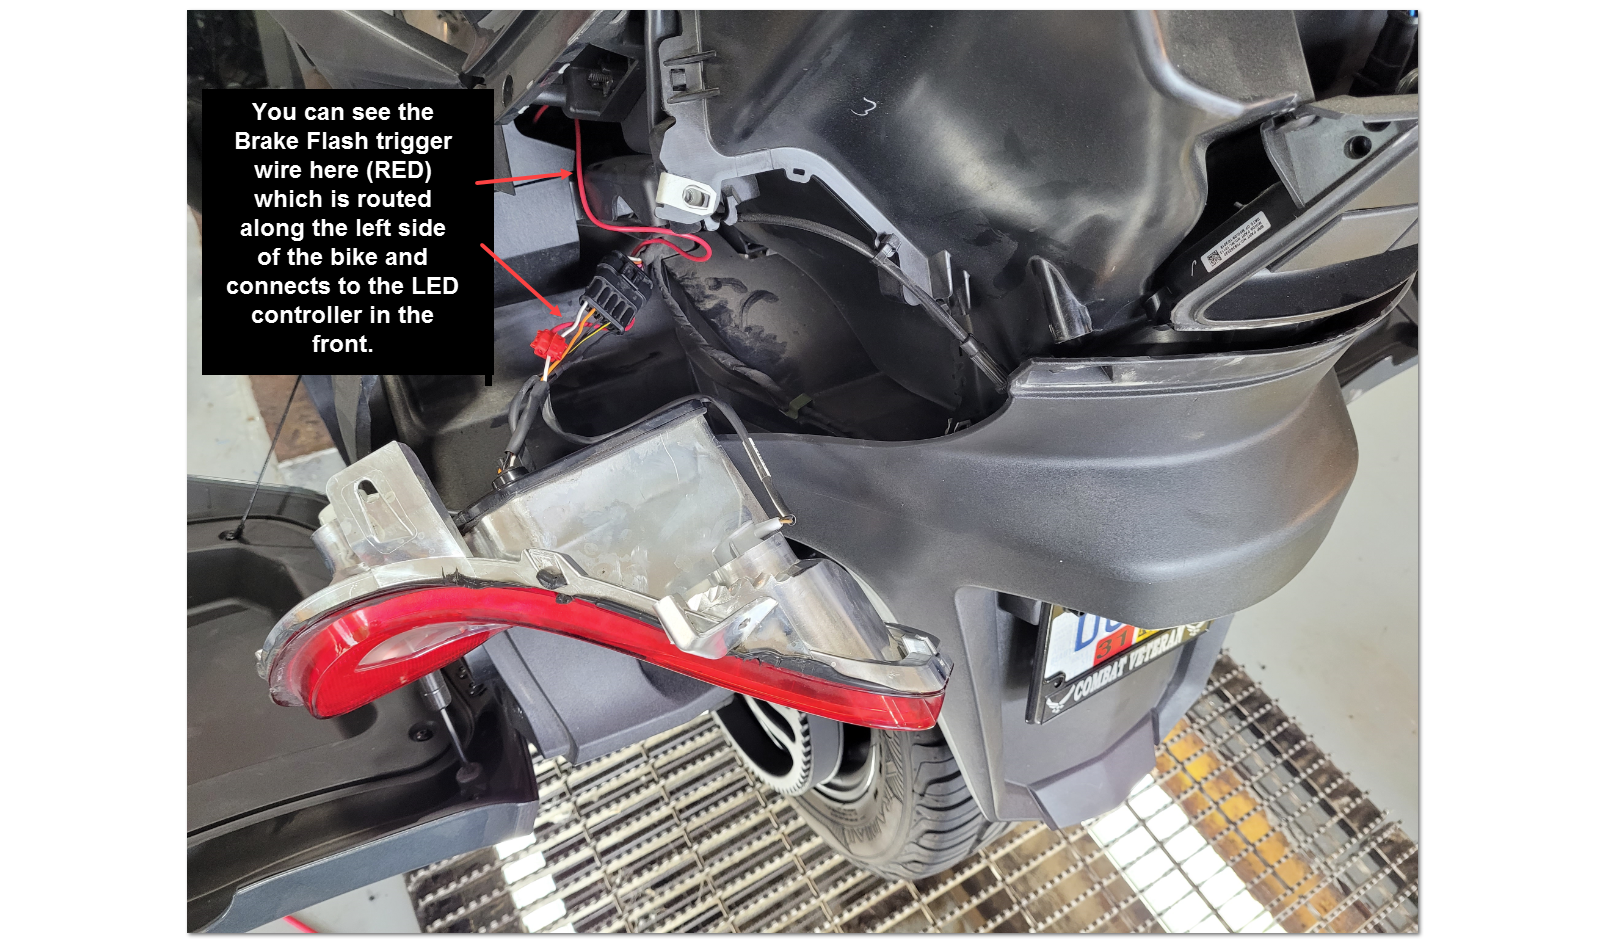
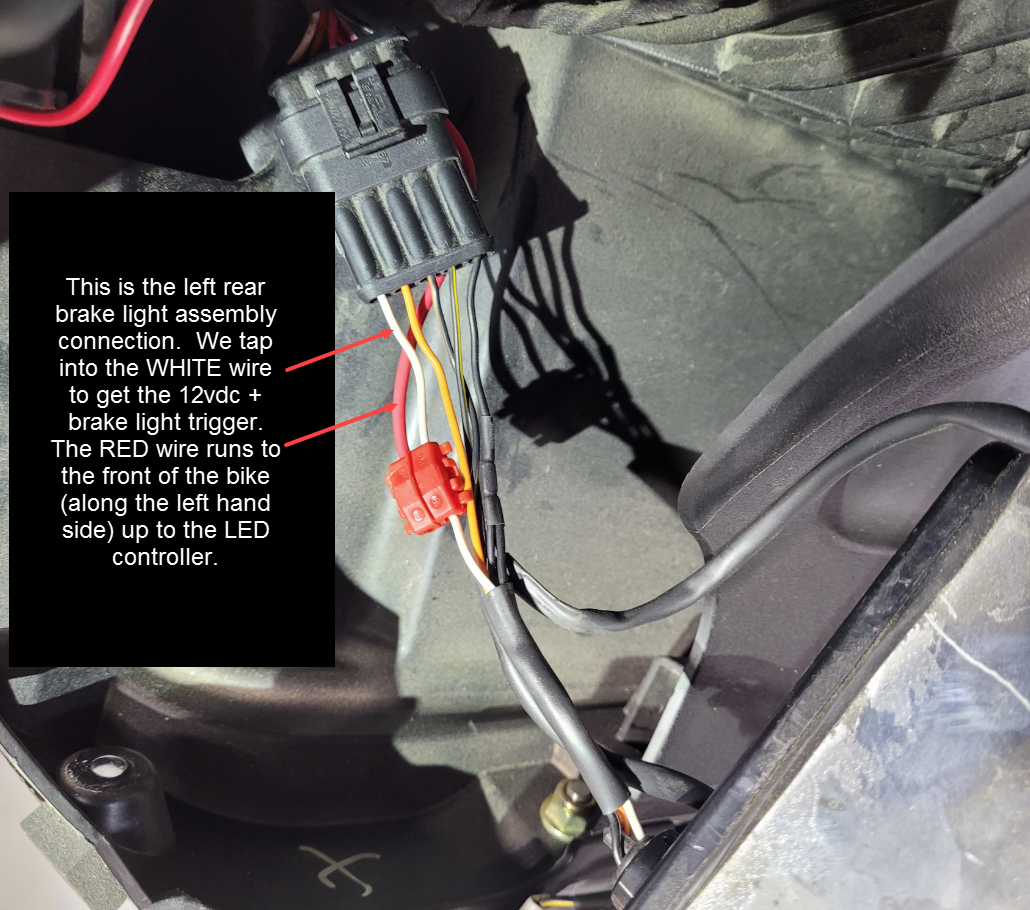
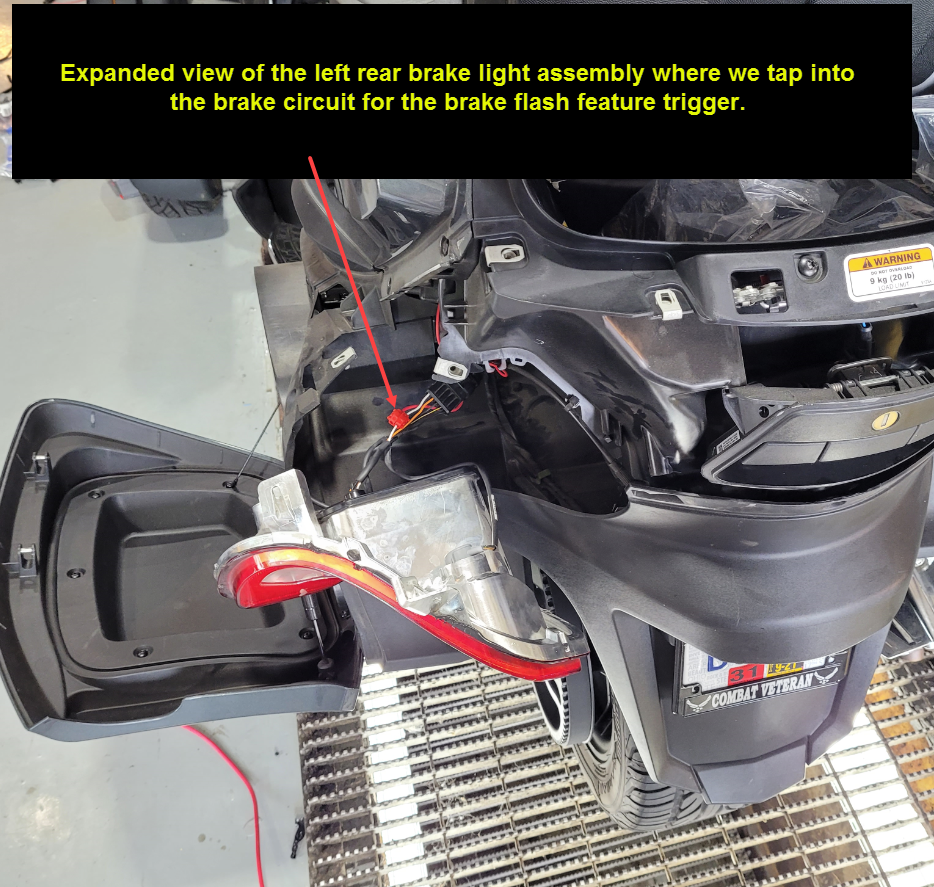
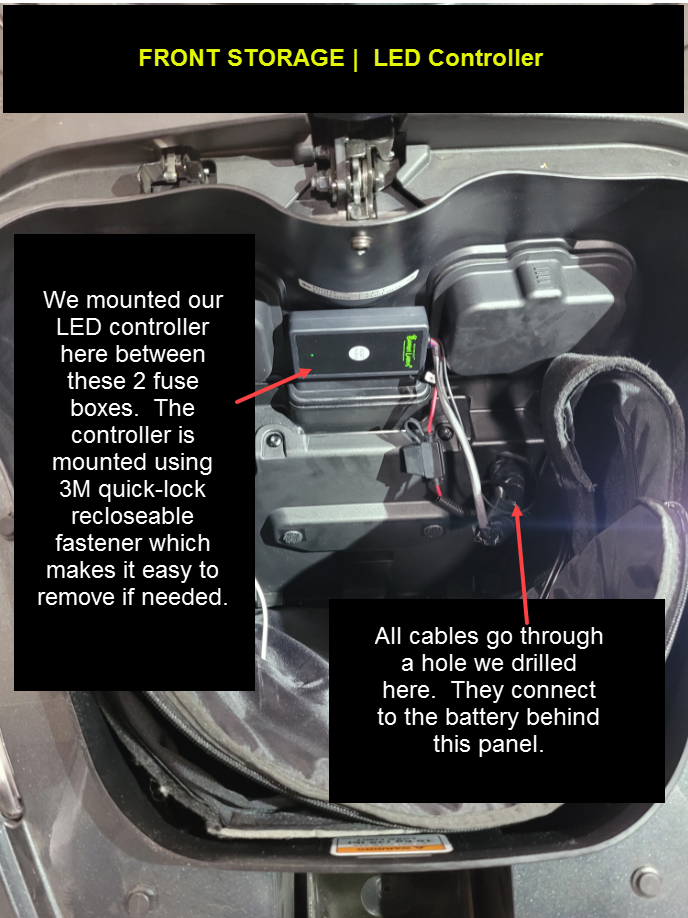
There are 27 different mounting locations in this kit and all of the power leads need to be carefully run. Included in that number of mounting locations are the LED strips mounted to the inside of the removable lower engine covers on both the left and right sides of the bike. These two engine covers will require quick-disconnects to be installed such that these panels can be easily removed for service without having to cut the power leads. We include the quick-disconnects and heat shrink in our lighting kit so you can make these connections. DIYers will need to be familiar with removing the plastics on the bike. You will likely need floor jacks to get the bike high enough off the ground to install the under-glow light strips. For the brake light interface, you will need to gain access to the rear brake lights to tap into the brake light circuit. We used the left rear brake light assembly. The LED controller is mounted in the front storage compartment (aka "frunk") in close proximity to the battery. The wiring on the bike is segmented into 6 areas: left side rear, left side front lower, left side front upper, right side rear, right side front lower, right side front upper. The power leads coming from the LEDs mounted in each of these areas come together in their respective locations. For the left side rear and front lower, a feeder cable is run up to the left side front upper which ultimately connects to the LED controller. The same with the right side. Our installation manual includes more detail on all of this including photos of the suggested mounting locations for each strip. We do not however include detailed instructions on how to remove the various plastics. We assume anyone attempting to install this light kit has the knowledge to do this already (or, is willing to figure it out on their own using any number of online sources).
GEN2 SUPER LED CONTROLLER
Due to the number of LEDs in this light kit, we have to use our GEN2 SUPER LED CONTROLLER. It's capable of powering up to 900 LEDs whereas the GEN2 PLUS controller we typically use for motorcycle light kits has a max limit of 300 LEDs. The GEN2 SUPER and PLUS LED controller versions however are wired differently for the brake flash feature to work. If you want to use the BRAKE FLASH feature to automatically turn on just the RED diodes when you press the bike's brake lever, be sure to follow the controller wiring diagram included with the installation documentation.

TYPICAL LED PLACEMENT
These are the LED placement locations we used for this kit. Nothing says you have to use this placement though.
Left Side
- Engine Panel / Lower: 1 - 9 LED, 1 - 6 LED, 1 - 12 LED mounted to inside of this removable panel. All three strips connect to a quick-disconnect.
- Engine Panel / Upper: 1 - 9 LED, 1 - 6 LED mounted to the bike directly.
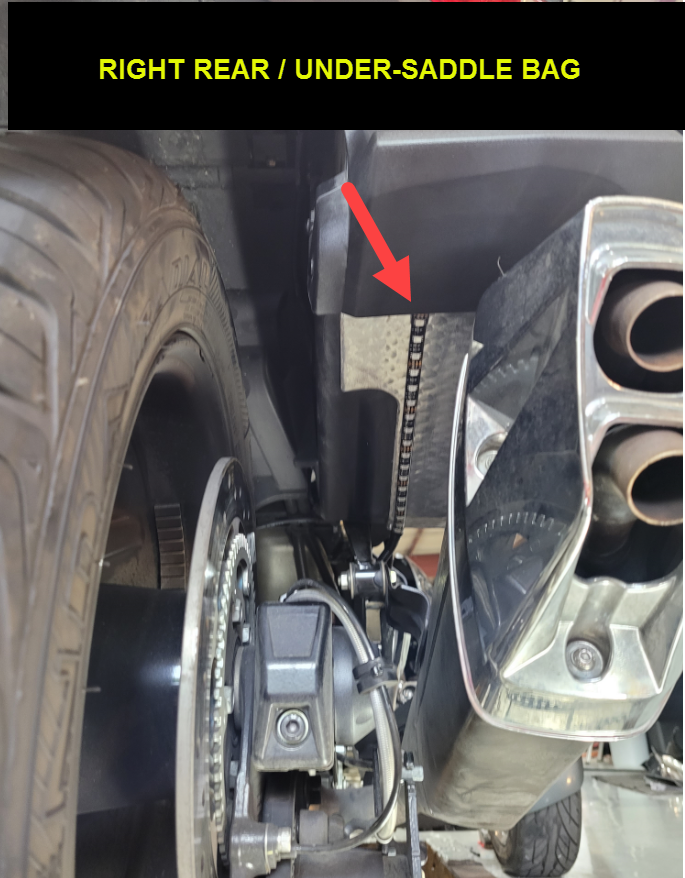
- Under-Glow: 1 - 9 LED under engine area, 1 - 6 LED under foot peg, 2 - 9 LEDs under wheel strut, 1 - 18 LED under saddle bag.
Right Side
- Engine Panel / Lower: 1 - 12 LED mounted to inside of this removable panel. Connects to a quick-disconnect. 1 - 9 LED mounts to the bike.
- Engine Panel / Upper: 1 - 9 LED, 1 - 6 LED both mounted to the bike directly.
- Under-Glow: 1 - 9 LED under engine area, 1 - 6 LED under foot peg, 2 - 9 LEDs under wheel strut, 1 - 18 LED under saddle bag
Front
- Under-Glow: 1 - 21 LED, 2 - 12 LEDs mounted to the bottom of the front nose area in a 'V' shape.
- Air-Intake: 2 - 6 LED strips mounted in each of the air-intakes (top)
Rear
- Wheel Well: 2 - 12 LEDs mounted on the inside edge of each side of the rear wheel fender facing inward toward the rear tire.
Center (Under-Glow)
- Under-Glow: 1 - 51 LED strip mounted to the support frame on the bottom of the bike running down the center of the bike.
- The LED controller is mounted in the front storage (aka "frunk") area near the battery.
Here are some photos from our Installation Manual.