


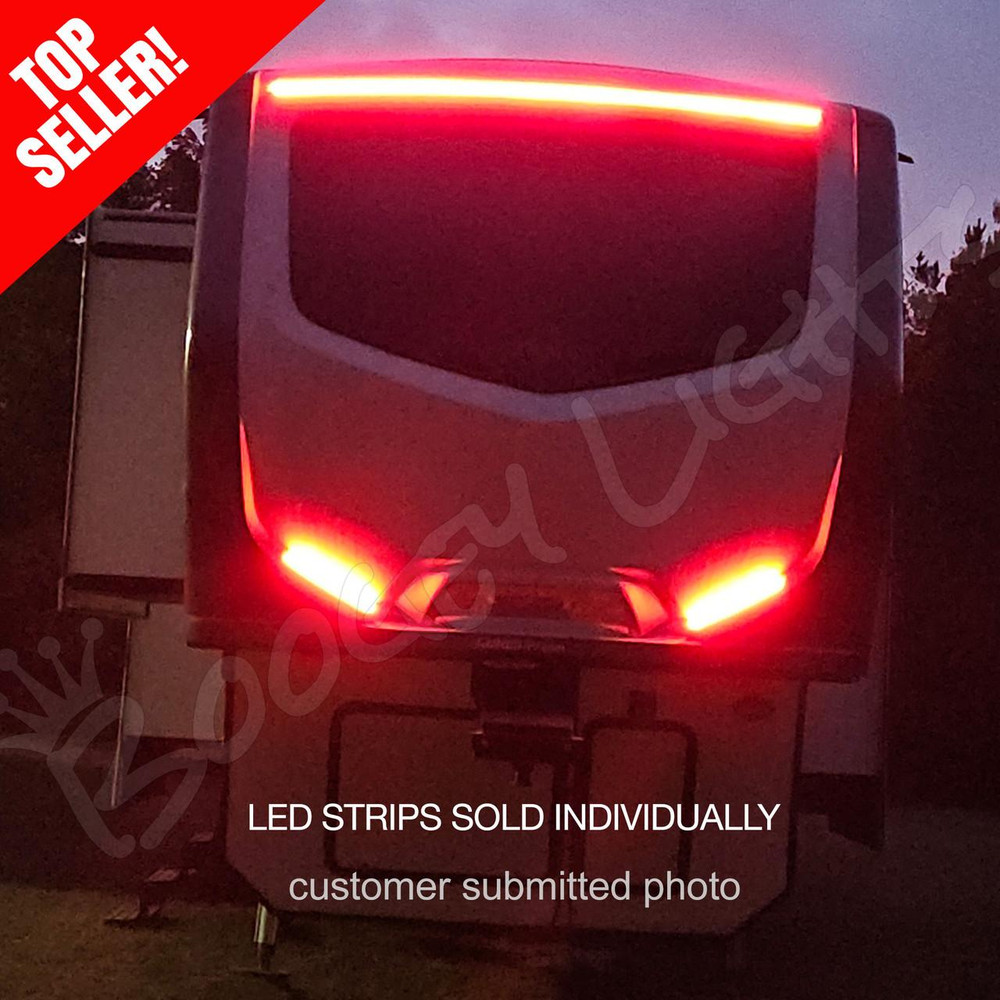


REPLACEMENT END CAP LED LIGHT STRIPS FOR RVS
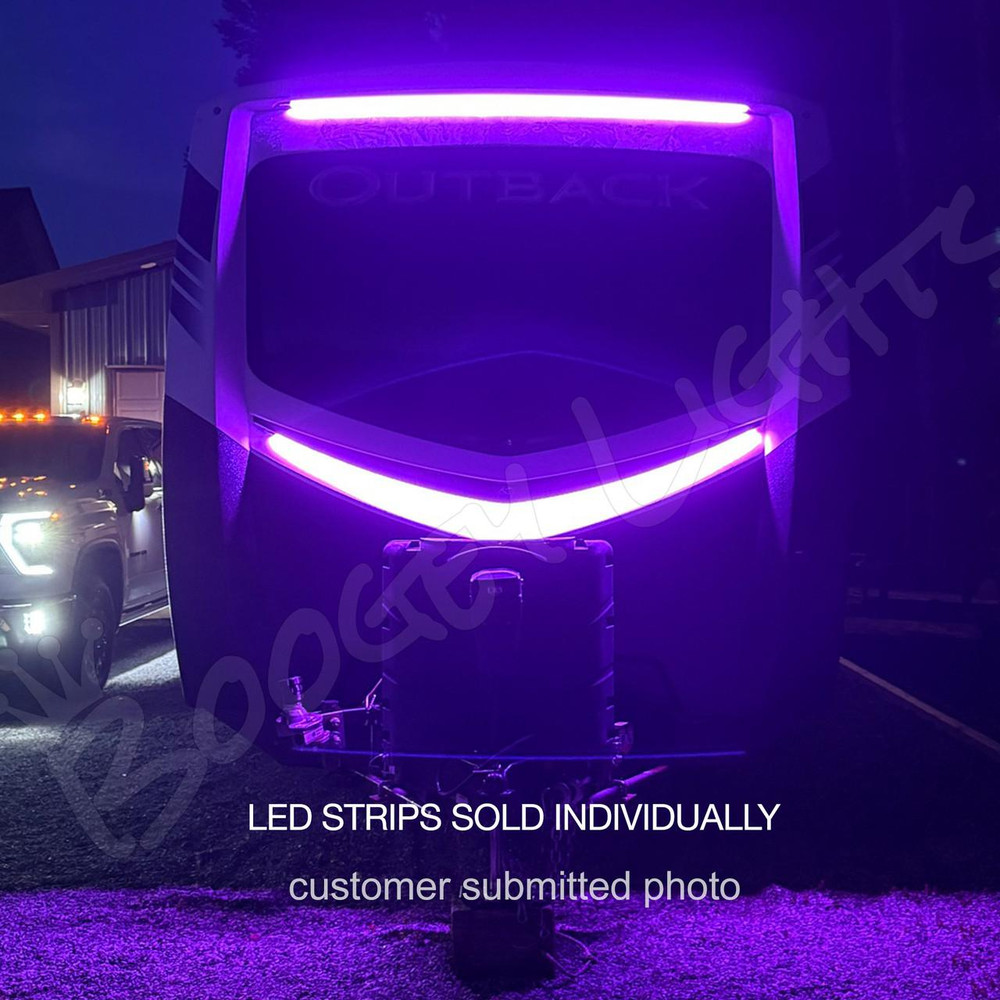
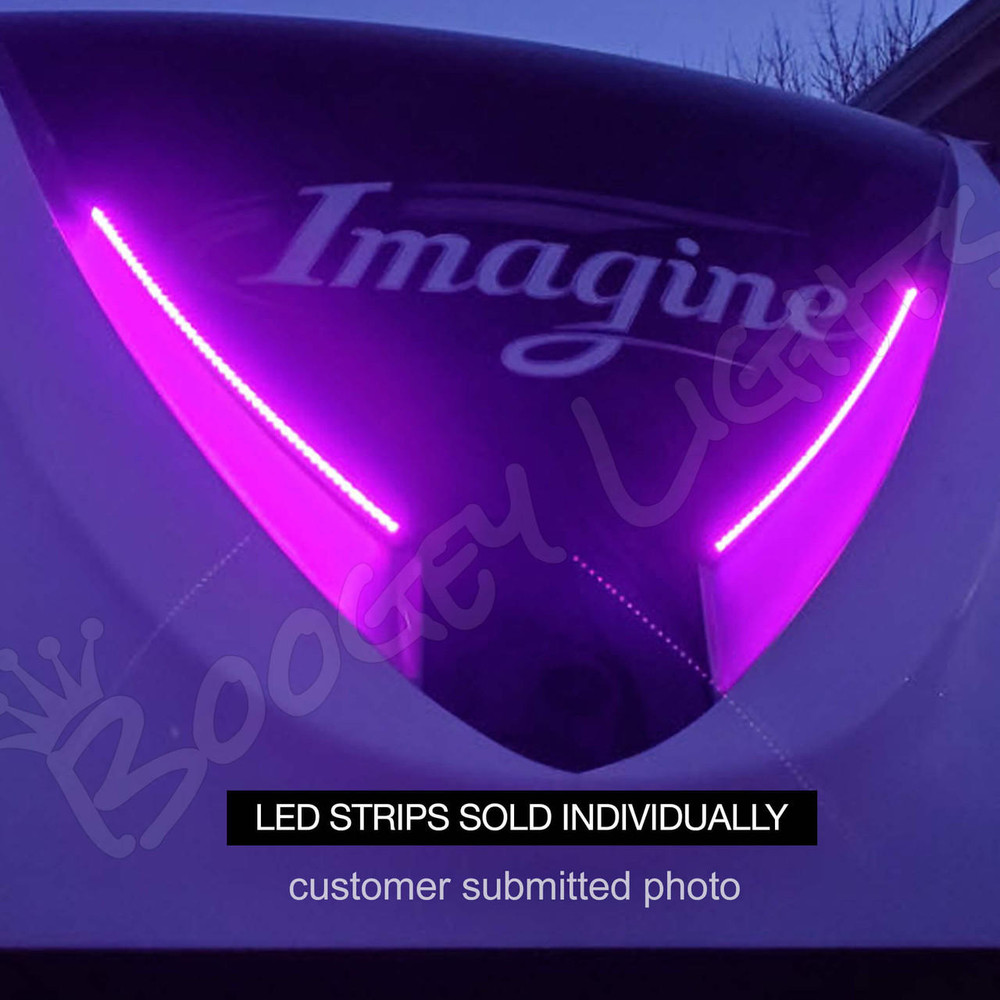
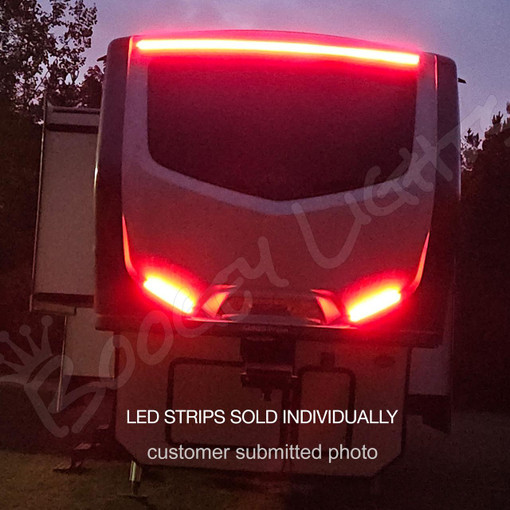
Many travel trailers and fifth wheel trailers today include LED lighting on the end cap of the trailer; usually facing forward. These lights are often the first lights to fail in new trailers mainly because they're facing forward and subject to wind/rain damage. Boogey Lights LOW PROFILE surface mounted LED light strips are built tougher. They're also brighter. Our impressively bright surface mounted LOW PROFILE LED flexible strips are ideal for End Cap LED Light replacements found on many travel trailers today. We offer them in a variety of single color options which in most cases can be a direct replacement for factory installed lights using existing wiring. Simply remove the existing LED strip and replace it with a Boogey Lights LED strip. If you want to upgrade to a multi-color RGB light strip, we offer that option too although it does require the purchase of an LED controller. Also, the installation is more complex since it requires the installation of the LED controller into the circuit which usually requires cutting at least one access panel hole in the inside wall facing the end cap. It's usually the only way to gain access to the area behind the end cap. NOTE: The price listed is for one single LED strip. Details below. LENGTHS ARE IN INCHES.
Be sure to scroll down into this product page for important details including FAQs, configuration specifics, product options, specifications, installation docs and more.
READ THIS BEFORE ORDERING!
Successful installation requires reading the written installation directions. While our How-To Videos offer helpful overviews, they do not replace the detailed documentation. Reading the instructions carefully is essential for proper fit, function, and long-term performance. Most support calls and warranty claims we receive stem from customers who don't read this information. Please take our advice and read the directions. We promise, you'll be happy with the results if you do.
FAQS | Frequently Asked Questions
While we encourage you to read all of the information presented on this product page (including the information on the navigation tabs), below are the most frequently asked questions we get about this product. In all cases, the answers to these FAQs will refer you to other sections of this product page for more details on the topic.
Do I really need to read the installation instructions?
My RV doesn't currently have end cap lighting but I'd like to add them. Can I use this product?
My RV has single color end cap lights on it now. I want to upgrade to multi-color. Can I replace them with Boogey Lights® multi-color LEDs?
My trailer came from the factory with multi-color end cap lights installed but they are burning out and don't look good. Can I use Boogey Lights® multi-color lights as a replacement?
My RV's end cap has lights on it now that form an 'L' shape. Do you have something I can use to replace them?
How long will Boogey Lights® End Caps last on the front of my RV?
Are these difficult to install?
Can you tell me the lengths of LED strips needed for my specific RV year, make and model?
Can these LED strips be trimmed?
Can these be used a turning indicators?
What is Priority Processing?
PRODUCT FITMENT HEADS UP
1. This product requires a recessed mounting location. Scroll down for more about this issue
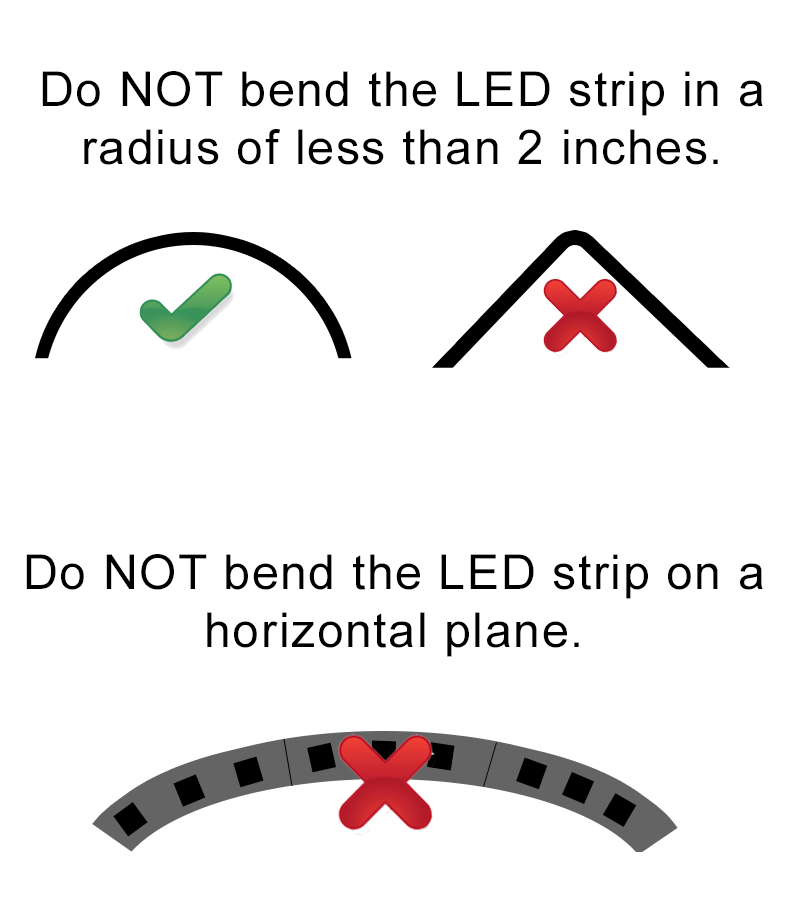
2. This product cannot bend around curves, bend on a horizontal plane or be used to create an 'L'. It requires a smooth, straight flat surface. Scroll down for more about this issue.
3. The RGB version of this product is likely NOT COMPATIBLE with your existing RGB controller. Scroll down for more about this issue.
RECESSED MOUNTING LOCATION IS REQUIRED
A Recessed Mounting Location is Essential. This product is designed and intended to be used to replace existing factory installed end cap led lights that have the wiring in place (single color usually) as well as a recessed location to mount the LED strip on the end cap. In most factory installed end cap lights there's a recessed structure the LED light strip fits or sits in. It's part of the end cap design and helps protect the strip from side wind-shear and weather forces beating against it while the trailer moves down the road. This is especially important for LED strips that are mounted in such a way that the side of the LED is mostly facing the on-coming wind. If your RV doesn't have factory installed end cap LED strip lights OR if it does not have a very clear recessed indentation at least 1/8" deep where the LED strip can be safely mounted protecting it from side wind shear forces, we do not recommend using this product as it will likely fail prematurely (not covered under warranty).
PRODUCT HIGHLIGHTS
Built with two ounce copper PCB, the brightest 5050 LEDs available and 1.2mm of genuine 3M® VHB double sided tape, these LOW PROFILE LED strips are super easy to install yet made tough for motor sports applications. They're available on either white or black PCB in varying lengths ranging from 3 LEDs (about 2 inches long) to 300 LEDs (16' long). While they can be cut every 3 LEDs (see install details which you can download directly from this page), we strongly encourage you to take the time to measure your existing LED strips and order the length needed rather than cutting.
The single color default configuration has a 12", two conductor (red + black) power lead hard wired to the end of the strip. This power lead connects to the existing end cap lighting circuit.
The multi-color default configuration has a 10', four conductor power lead. The LED strips can be cut every 3 LEDs. If you want longer power leads, we offer additional power lead length options.
The SINGLE COLOR and RGB versions of our LOW PROFILE LED strip used in this End Cap replacement light kit width is 3/8" (10mm). The height is 1/8" (3mm). Detailed specifications for our Low Profile LED strips can be found on the SPECS navigation tab on this product page. Expand the section title 'LOW PROFILE LED STRIPS'.
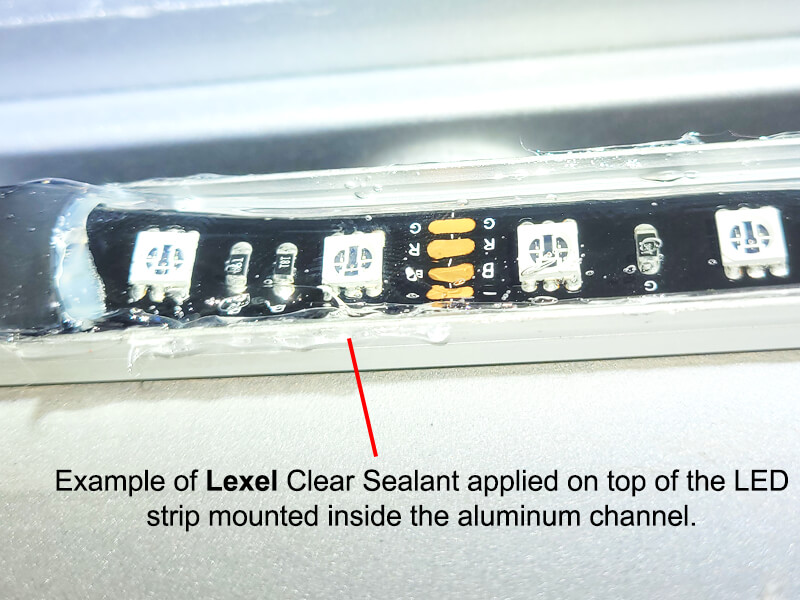
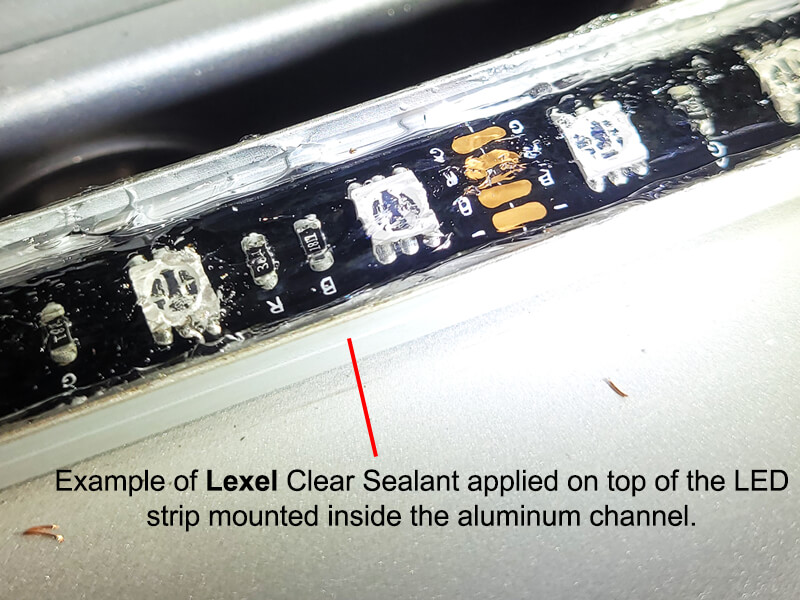
If the end cap light strip you're replacing is mounted horizontally on the end cap of your RV, we strongly suggest smearing some Lexel sealant on the upper edge (aka high side) of the LED strip. Doing so will help stop the water that will naturally pool on that high side from working it's way in-between the PCB and the LED strip coating. We detail this in the installation guide.
These LED strips cannot be mounted on a curve or bend on a horizontal plane. They must be mounted in a straight line to a smooth, flat surface. If your end cap has lights that form an 'L' shape or similar bend, the only option would be to use 2 LED strips to make the 'L'. Scroll down on this product page and expand the 'IMPORTANT WARRANTY ALERT' section which provide more detail on this issue.
This product is not vehicle specific. It can be used on all types of campers in all types of configurations. Many campers only have one end cap light. Some have two. Some have three. Some have four. We've even seen some with five. As such, this product is sold PER ONE SINGLE LED STRIP. The price listed is for one single LED strip. If your RV has two end cap lights both the same length and you wish to replace both of them, you'll need to order TWO of this product.
IMPORTANT. If your RV has multi-color RGB LEDs already installed, Boogey Lights® RGB LEDs will in almost all cases NOT WORK with the existing OEM LED Controller currently installed in your RV. You'll need to purchase a Boogey Lights® LED controller.
HOW TO ORDER
Single Color Replacement
You'll need to take a measurement of the LED strip you wish to replace. All lengths are in INCHES. Measure the existing LED strip on the RV now (just the LED strip -- not the power lead attached to it). In some cases you might be able to go a little longer. Each LED strip will need to be mounted to a smooth, mostly straight continuous surface. When taking the measurement of available mounting space be sure to allocate 1 to 2 inches from the end of the LED strip for the power lead wire coming off the LED strip can make the bend into the end cap. Note that the LED strip lengths listed on this product page are the lengths of the LED strip only. Does not include the power lead connection. You can look at the close-up daylight photo of a Boogey Lights LED strip on this product page mounted on the end cap of a Grand Design travel trailer to see what we're referring to. Since the single color LED strip is replacing the existing strip on the RV now, the default 12" power lead is more than enough. If you need to cut the LED strip you can (instructions here) however we encourage customers to measure correctly when ordering to avoid having to cut the LED strip. Also, if your end cap has more than one LED strip on it, we strongly suggest replacing all of them so the LED colors match exactly. One manufacturer's LED diodes are not the same as another - this is especially true with our LEDs (see difference #3 here as to why this is). Plus, typical end cap strips that have been installed for some period of time will fade or lose their intensity which can make the hue difference even more noticeable.
NOTE: If your existing end cap light is only one color (e.g. white, blue, amber, etc), you have a SINGLE COLOR LED strip currently installed. That strip has a 2 conductor power lead.
Multi-Color Upgrade
You'll need two measurements for each LED strip you wish to replace: 1) the length of each LED strip, 2) the length of the power lead you want attached to the LED strip. The default configuration for the power leads in multi-color is 10' which should work for more installations but we offer the ability to increase that length if needed. Each LED strip will need to be mounted to a smooth, mostly straight continuous surface. The power lead needs to be long enough to reach the LED controller which for multi-color installs is typically inside the end cap area or near that area where 12vdc power is available. If you need to cut the LED strip you can (instructions here) however we encourage customers to measure correctly when ordering to avoid having to cut the LED strip.
Once you have these measurements, you can place your order. For each LED strip and power lead combination you'll need to add one End Cap LED light strip product to your cart with those specifications. If you have any questions, give us a call and one of our product specialists can assist you with this process.
2 CONDUCTOR OR 4 CONDUCTOR?
For Single Color LEDs, we offer the ability to order the strip with either a 2 conductor or 4 conductor power lead wire. The default is 2 conductor (black and red). Why would you want 4 conductor power lead on a single color LED strip? Each LED has 3 diodes. In a single color LED, all 3 diodes are the same color. We normally will bridge the 12vdc power at the end of the strip such that all 3 diodes are connected to the red power lead conductor. If however you want to be able to control the power going to each of the 3 diodes, we will use 4 conductor power lead cable. This configuration is ideal for situations where you're using the single color LED strip and want to control the brightness of the strip by lighting one, two or all three diodes. Installation Note: If you decide you want a 4 conductor power lead and your existing installation only has a 2 conductor, you will need to make sure you have figured out how you're going to connect to the two to take advantage of this feature.
NOTE: If your existing end cap light is only one color (e.g. white, blue, amber, etc), you have a SINGLE COLOR LED strip currently installed. That strip has a 2 conductor power lead.
IF YOUR RV HAS MULTI-COLOR RGB LEDS ALREADY INSTALLED
All Boogey Lights® RGB LED strips are COMMON CATHODE LEDS. They share a common ground and will only work with positively switched LED controllers. Most RGB Multi-Color LED strips on the market today are COMMON ANODE (click the button below for details as to the difference in these two technologies). If your RV has multi-color RGB LEDs already installed, Boogey Lights® RGB LEDs will in almost all cases NOT work with the existing OEM LED Controller currently installed in your RV. You'll need to purchase a Boogey Lights® LED controller.
CONTROLLER OPTIONS
For SINGLE COLOR LEDs, you do not need a controller of any kind. For most people, all they need are the LED strips. Their RV already has the switching mechanism in place to turn the End Cap LEDs on/off. Very simple. This is why the default is NONE for Single Color LEDs. We however offer two Single Color wireless remote controls if needed. One is a simple RF wireless ON/OFF controller. They turn the lights on or off. The other is similar but offers ON/OFF + DIMMING capability. You'll see both of these options offered under the CONTROLLER OPTIONS product configuration for single color LEDs.
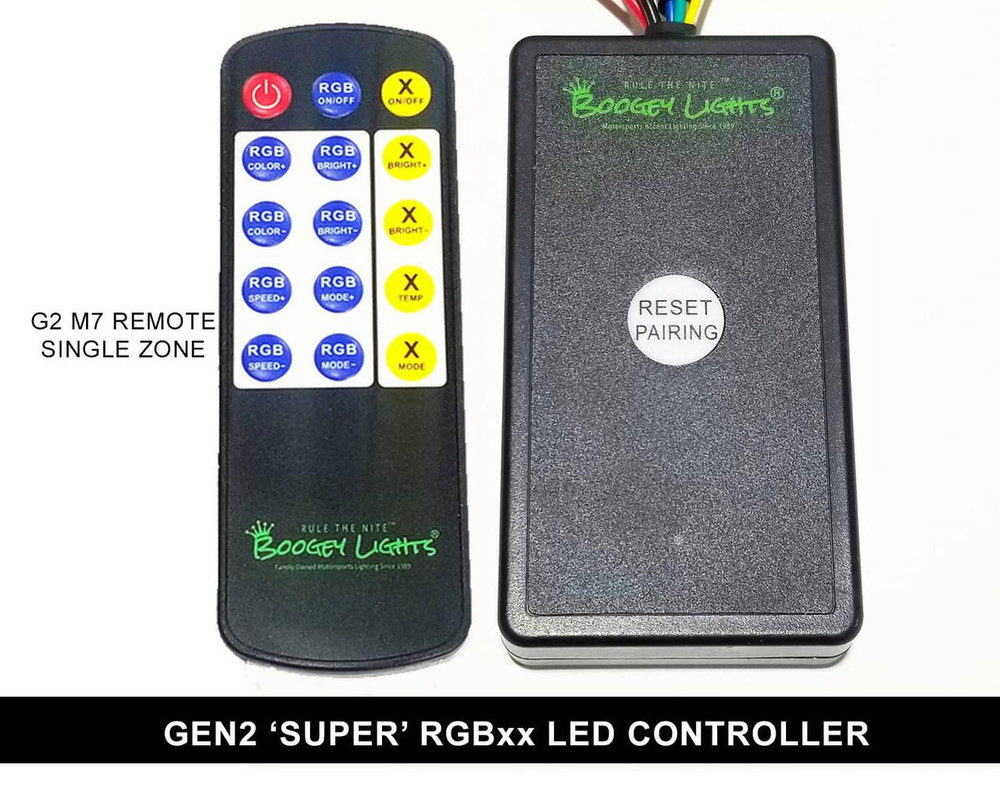
For MULTI COLOR LEDs, you absolutely need an RGB controller and it must be a POSTIVELY switched RGB LED controller. To the best of our knowledge, BOOGEY LIGHTS® is the only company that builds a positively switched RGB/RGBx LED controller. If your RV has RGB LEDs already installed it's unlikely it's a positively switch RGB controller and as such, will not work with Boogey Lights® LEDs (see the above note for more information about this very issue.) If you're purchasing RGB LEDs for your End Cap lights, you will need to purchase the RGB LED Controller as well. The product offers two options. Both will work. Both are RF wireless + Bluetooth. The only difference between the two are the capacity. The 900 LED capacity RGB Controller is more than enough capacity for any End Caps we've seen installed on any RV. We offer the higher capacity in the event someone wants to use the same controller to operate additional LEDs installed elsewhere on the RV. You can see photos of all of these control options in the product photo carousel.
Note: If you're adding an LED controller of any kind to the installation, you will likely need to install at least one access panel in the wall facing the end cap to gain access to the area behind the end cap.
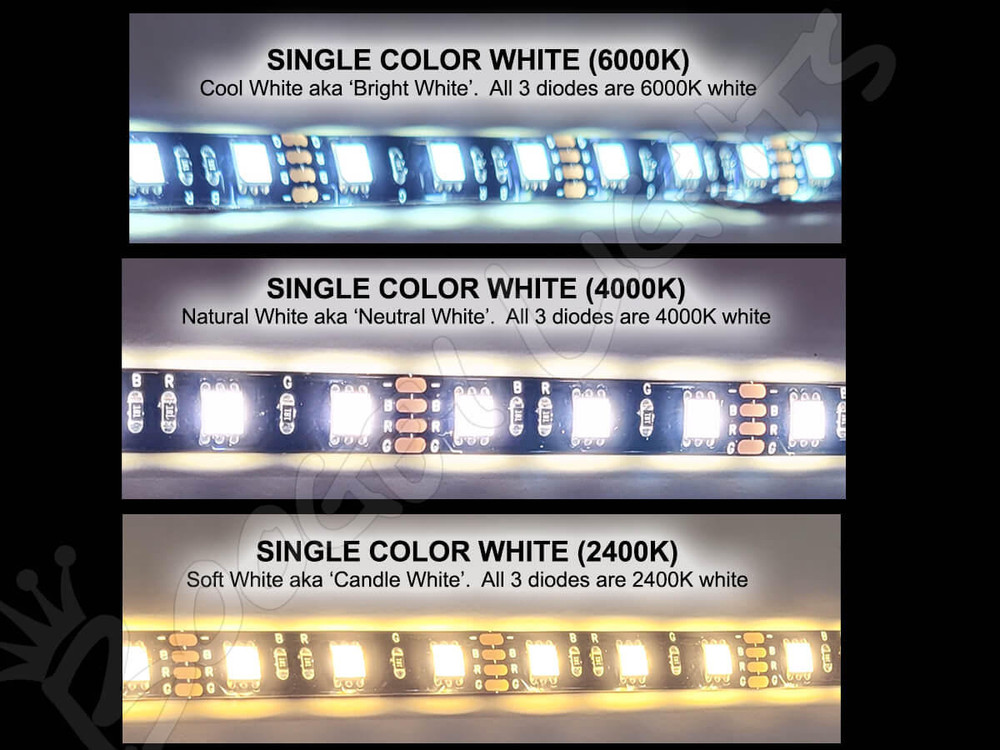
WHITE LEDS: 6000K, 4000K AND 2400k
Color temperature is a method of describing the color characteristics - warmth or coolness - of a white light source. Commonly referred to as the Correlated Color Temperature (CCT), it's a gauge of how yellow or blue a white light source appears to the human eye. The spectrum of color temperature is assigned a numerical value, measured in degrees of Kelvin (K), on a scale of 1,000 to 10,000. Most Kelvin temperatures for modern lighting applications however fall somewhere on a scale of 2000K to 6500K. The color temperature of a light source lets us know what the look and feel of the light produced will be.
We offer three different Kelvin temperatures of WHITE as follows: COOL WHITE (6000K), SOFT WHITE (2400K) and NATURAL WHITE (4000K).
Cool White (aka Bright White) is the most popular and is by default what we ship the most. It's also the color of white that is created with RGB LEDs (mixing equal parts red + green + blue = cool white). It's excellent for functional lighting and is used the world over in offices, public places, warehouses and the like.
Soft White (aka Warm White or Candle White) is the second most popular since it provides a nice contrast to the Cool White. It's on the opposite end of the Kelvin scale with a 2400K temp. Soft White has a yellowish tint to it making it softer; easier on the eyes - not nearly as bright as Cool White though. It's great for creating ambiance but not functional lighting. You'll notice we offer an RGBW product that includes RGB + one diode of this soft white color which provides both Cool White and Soft White options (along with RGB of course). It's our most popular Multi-Color LED strip for this reason.
Lastly, we offer a Natural White (aka Neutral White) which has a Kelvin temp of 4000. This shade of white is middle of the road - half way between Soft White and Cool White. We offer it in a single color only. See below images to help demonstrate the differences.


IMPORTANT WARRANTY ALERT!
A Recessed Mounting Location is Essential. This product is designed and intended to be used to replace existing factory installed end cap led lights that have the wiring in place (single color usually) as well as a recessed location to mount the LED strip on the end cap. In most factory installed end cap lights there's a recessed structure the LED light strip fits or sits in. It's part of the end cap design and helps protect the strip from side wind shear and weather forces beating against it while the trailer moves down the road. If your RV doesn't have factory installed end cap LED strip lights OR if it does not have a very clear recessed indentation at least 1/8" deep where the LED strip can be safely mounted protecting it from side wind shear forces, we do not recommend using this product as the LED strip will likely fail prematurely. While delamination is the most common issue, water intrusion into the LED strip causing the strip to short out can also occur. These issues are not covered under warranty.
Chemical Cleaners Can Damage the LEDs. Since these LED strips are mounted to the face of the RV, how you clean the end cap of the RV can impact the longevity of the LED strip. Many chemical cleaners will erode the epoxy coating of the LED strip which will cause the LED strip to delaminate. The epoxy protective coating will peal away from the PCB exposing the LEDs and components to water which will eventually ruin the strip. If you do wash the face of the RV, it's important that you only use soap and water. And even then, make sure sure there is no residue left on the LED strip. This is especially important for LED strips that are mounted horizontally on the face of the end cap since there will be a tendency for the water/chemicals to get trapped or pool on the high side of the LED strip. LED strips that delaminate when mounted to the face of the end cap are not covered under warranty.
Do Not Bend on a Curve or a Horizontal Plane. These LED strips need to be mounted on a flat, straight, smooth surface. They cannot be mounted on a surface that requires bending around a corner or bending on a horizontal plane. This is super important. Our LED strips are wider than stock LED strips to support the larger, brighter LEDs. This however limits their ability to bend on a horizontal plane vs thin LED strips. Bending them on a horizontal plane will stress the solder joint in the PCB and cause the LED strip to fail prematurely. LED strips that fail due to improper installation are not covered under warranty.
Mounting this product on the face of an RV that does not have a clear recessed indentation to protect the LED strip from wind side shear or mounting them on a surface that isn't straight and flat will result in premature failure of the LED strips. Failures of LED strips mounted this way are not covered under warranty.
READ CAREFULLY!
Order the correct length. ALL LENGTHS ARE IN INCHES. Yes, read the product configuration carefully. We list both the Number of LEDs and the LENGTH of the LED strip. Do not confuse the number of LEDs for the length. This product is considered a custom ordered product since it is cut to the length you specify. It may not be eligible to be returned - or if so, subject to additional fees and/or restrictions. Be sure to read our RETURN POLICY for details. NOTE: If needed, you can cut the LED strip every 3 LEDs. Details here: HOW TO CUT LOW PROFILE LED STRIP.
All Boogey Lights® RGB LED strips are COMMON CATHODE LEDS. They share a common ground and will only work with positively switched LED controllers. Most RGB Multi-Color LED strips on the market today are COMMON ANODE. If your RV has multi-color RGB LEDs already installed, Boogey Lights® RGB LEDs will in almost all cases NOT work with the existing OEM LED Controller currently installed in your RV. You'll need to purchase a Boogey Lights® LED controller.
WHAT IS PRIORITY PROCESSING?
If the product configuration you're purchasing is eligible for PRIORITY PROCESSING, you can select 'YES' (default is 'NO') and your order will be given priority in our build queue such that we'll build and ship your order using the shipping method you select at checkout within TWO business days (or less) regardless of what the current build time estimate states. You can read more about our BUILD TIME ESTIMATE here.
Business Day Note: The 'Business Day' cut off time is NOON Eastern. If for example you place your order before noon on Monday, we'll build and ship your order no later than Wednesday. If you place that same order after 12 noon eastern on Monday, we'll build and ship your order no later than Thursday. If for some reason we're unable to do this (e.g. out of stock item or some other limitation), we'll reach out to you via email to ask how you want to proceed: Either cancel the order or ship the order normally and refund the Priority Processing fee paid.
Be aware that not all product configurations are eligible for Priority Processing. For example, if your light kit has an LED CONTROL CENTER in it, we do not offer Priority Processing on that order. Also, we exclude high demand lighting components that are often purchased in bulk by commercial accounts (eg. RED 75 Heavy Duty LED strips).
Priority Processing is offered per line item, not per order. If your order has multiple LED light kits or LED strip components on it, only those products that are eligible for Priority Processing (and selected as YES) will be shipped within the two business day time frame. Any remaining light kit products will be shipped via ground per our normal build time estimate. If your order has other non-LED components on it (e.g. controllers, switches, replacement parts, wire, 3M primer, etc), we will ship them with the priority processing item.
Does this mean that orders placed ahead of mine are being pushed back?
If I upgrade my shipping to 2 day or overnight, does this speed up the build time?
RETURN POLICY ALERT!
RETURN POLICY EXCEPTION. This product is considered a custom ordered product since it is cut to the length you specify. It is not eligible to be returned for a credit to your original payment method. STORE CREDIT REFUNDS ONLY. Be sure to read our RETURN POLICY for details. NOTE: If needed, you can cut the LED strip every 3 LEDs. Details here: HOW TO CUT LOW PROFILE LED STRIP.
ADD LEXEL CLEAR SEALANT?
We like LEXEL over others in that it dries clear (doesn't impact the amount of light the LED chips emit) and most importantly, it's petroleum based. A petroleum based sealant is required so the material will adhere to the Low Profile LED strip coating. A water based sealant will absolutely not work. For End Cap Replacement Lights, you only need a 5 ounce squeeze tube. Highly recommend.
NOTE: We provide this product as a convenience to customers. We are not the manufacturer. You can purchase this product elsewhere for less.
3M ADHESION PRIMER INCLUDED
This light kit has been updated (03-19-24) to include 3M Adhesion Primer (previously it was optional). To achieve the full adhesive strength of the 3M® tape affixed to the back of each strip 3M® Adhesion Promoter (aka Primer) must be applied to the mounting surface first. This is an important step to ensure a secure bond. The 3M® Adhesion Promoter creates a chemical bond between the tape and the mounting surface such that the LED strip will stay stuck (at least until you decide you want to remove it). Using any other solvent such as rubbing alcohol or acetone is not the same thing as using 3M® Adhesion Promoter. While these solvents will help clean the surface, they do not prime the surface. There is a big difference. We include enough 3M Adhesion Primer to properly mount the LED strips in this kit. You do not need to buy more. That said, some folks prefer to have extra on hand. If you're one of those people, you can purchase additional 3M ADHESION PRIMER on our website in one-half, one, two or four ounce bottles. A 1/2 ounce bottle when installed according to our directions should be sufficient for at least 4 LED strips of 96".
CLEAR COATING OR SMOKE TINTED COATING
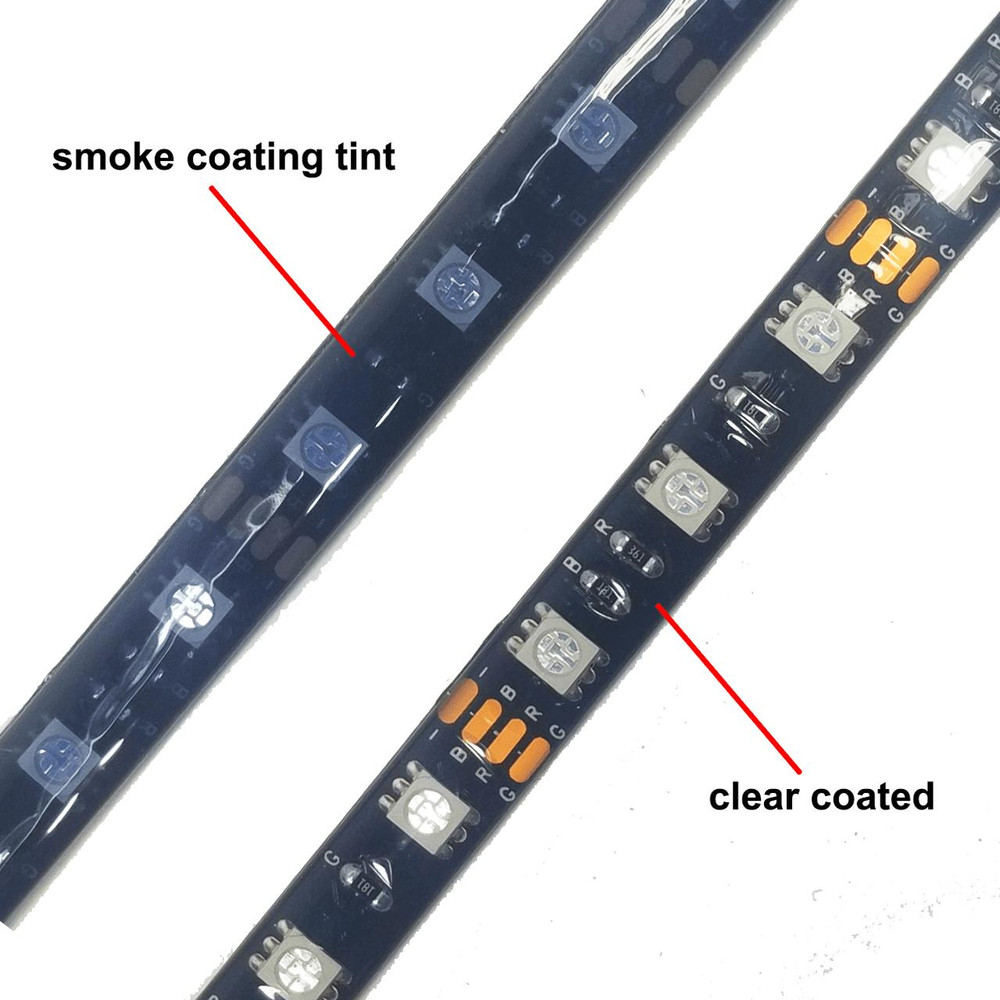
We offer the option of SMOKE TINTED COATING for our Black Multi-Color PCB LED strips instead of the standard clear coating on our END CAP LED Light kits. The smoke tinted LED strip (see photo above) has a nicer daylight look when mounted in plain sight. Some customers prefer this look on their RVs as it blends better particularly with darker color paint schemes. This is a cosmetic option only for LED strips that are mounted where they can be seen in the daylight. It is important to note that this smoke tinted coating does reduce the brightness of the LEDs by about 20%. Boogey Lights LED strips are already incredibly bright so most folks don't mind the reduction in brightness but it is something to be aware of. If you want the absolute brightest END CAP LIGHT strip, go with the default clear coat selection. If you want the LED strip to blend in better with your RV's paint scheme during the daytime (and the installation to look a little more finished) and you're OK with a little less light, the tinted coating might be better.
IMPORTANT. You must have an understanding of 12vdc power. An essential skill with installation of any Boogey Lights LED products is knowing how to correctly wire the product to a 12vdc circuit. This includes understanding the importance of having a properly sized fuse at the power source, polarity, how to properly seal an electrical connection, using properly sized wire gauge for the load, measuring voltage and measuring the additional amperage draw you're adding. If you are uncertain or unfamiliar with any of these concepts, we urge you to ask someone who has the knowledge to assist you. Electricity is unforgiving. You can DOWNLOAD the installation documentation for this product directly from our website before purchasing so you know what's involed. Be sure to scroll down, expand each text group section and read the information presented.
⚠️ We strongly encourage you to read the Installation Instructions before proceeding. The vast majority of folks who have problems with this product are those who ignore our advice here.
Recessed Mounting Location is Required
A Recessed Mounting Location is Essential. This product is designed and intended to be used to replace existing factory installed end cap led lights that have the wiring in place (single color usually) as well as a recessed location to mount the LED strip on the end cap. In most factory installed end cap lights there's a recessed structure the LED light strip fits or sits in. It's part of the end cap design and helps protect the strip from side shear wind / weather forces beating against it while the trailer moves down the road. If your RV doesn't have factory installed end cap LED strip lights OR if it does not have a very clear recessed indentation at least 1/8" deep where the LED strip can be safely mounted protecting it from side wind shear forces, we do not recommend using this product as it will likely fail prematurely (not covered under warranty).
These LED strips cannot be mounted on a curve or bend on a horizontal plane. They must be mounted in a straight line to a smooth, flat surface. If your end cap has lights that form an 'L' shape or similar bend, the only option would be to use 2 LED strips to make the 'L'.
If your RV has Multi-Color RGB LEDS already installed
All Boogey Lights® RGB LED strips are COMMON CATHODE LEDS. They share a common ground and will only work with positively switched LED controllers. Most RGB Multi-Color LED strips on the market today are COMMON ANODE (click the button below for details as to the difference in these two technologies). If your RV has multi-color RGB LEDs already installed, Boogey Lights® RGB LEDs will in almost all cases NOT work with the existing OEM LED Controller currently installed in your RV. You'll need to purchase a Boogey Lights® LED controller.
Installation Overview
It's simply not possible to provide detailed instructions for all installation scenarios. This information is intended to be used as a guide. You may need to vary your installation based on your RV configuration. DOWNLOAD End Cap Installation Guide
What You'll Need
- Rubbing alcohol, 3M Adhesion Primer, Clean rags
- Lexel, Butyl Putty or similar petroleum based sealant (NOT water based).
- Cutting pliers, Wire Strippers, Heat gun (or hair dryer).
- Eraser Wheel w/Variable Speed Drill, Plastic putty knife or similar edged tool used to remove existing OEM LED light strip.
- Ladder (or similar) so you can reach the End Cap LED strips on the front of your RV
A Recessed Mounting Location is Essential. This product is designed and intended to be used to replace existing factory installed end cap led lights that have the wiring in place (single color usually) as well as a recessed location to mount the LED strip on the end cap. In most factory installed end cap lights there's a recessed structure the LED light strip fits or sits in. It's part of the end cap design and helps protect the strip from side shear wind / weather forces beating against it while the trailer moves down the road. If your RV doesn't have factory installed end cap LED strip lights OR if it does not have a very clear recessed indentation where the LED strip can be safely mounted protecting it from side wind shear forces, we do not recommend using this product as it will likely fail prematurely (not covered under warranty).
Do Not Bend on a Curve or a Horizontal Plane. These LED strips need to be mounted on a flat, straight smooth surface. They cannot be mounted on a surface that requires bending around a corner or bending on a horizontal plane. This is important. Our LED strips are wider and thicker than stock LED strips to support the larger, brighter LEDs. This however limits their ability to bend around curves or on a horizontal plane vs thin LED strips. Bending them on a horizontal plane or around corners will stress the solder joint in the PCB and cause the LED strip to fail prematurely. LED strips that fail due to improper installation are not covered under warranty.
If you need to cut the LED strip you can (instructions here) however we encourage customers to take the time necessary to correctly measure the LED strip mounting area length when placing the order to avoid having to cut the LED strip.
Mounting this product on the face of an RV that does not have a clear recessed indentation to protect the LED strip from wind side shear or mounting them on a surface that isn't straight and flat will result in premature failure of the LED strips. Failures of LED strips mounted this way are not covered under warranty.
Single Color vs Multi-Color
The vast majority of END CAP LED light installs are single color. This is because every factory installed End Cap LED light strip we know of is single color. Replacing a single color LED light strip using the existing factory installed wiring and wall switch is by far the easiest to do. Typical single color installation time is 1.5 to 2 hours to do both End Cap LED strips. Multi-color LED strip install is more complicated because you need to install an LED controller between the LED strip and the 12vdc power source. Doing so almost always requires that you install at least one (sometimes two) access panel holes in the interior wall just behind the End Cap. This allows access to the back side of the End Cap where you can run the extra wires needed for multi-color LED (4 instead of 2) and then route those wires down to the battery box or storage area where you can mount the LED controller and connect it to 12vdc power. Typical multi-color LED strip install is 5 to 6 hours.
IMPORTANT NOTE ABOUT MULTI-COLOR LEDS. All Boogey Lights® RGB LED strips are COMMON CATHODE LEDS. They share a common ground and will only work with positively switched LED controllers. Most RGB Multi-Color LED strips on the market today are COMMON ANODE (click the button below for details as to the difference in these two technologies). If your RV has multi-color RGB LEDs already installed, Boogey Lights® RGB LEDs will in almost all cases NOT work with the existing OEM LED Controller currently installed in your RV. You'll need to purchase a Boogey Lights® LED controller.
Installation Process
- Remove the existing END CAP LED light strip from the face of the End Cap. We typically do one at a time, start to finish. Most OEM strips will peel off fairly easily. If they leave some adhesive residue, we prefer to use an eraser wheel with variable speed drill to quickly remove that residue. If you don’t have an eraser wheel and variable speed drill handy, you can use a plastic putty knife coupled with some solvent and/or rubbing alcohol. Just be careful not to scratch the RV's painted surface. Note: Eraser wheels can be purchased online or locally at hardware stores, auto parts stores or big box store. They are very common.
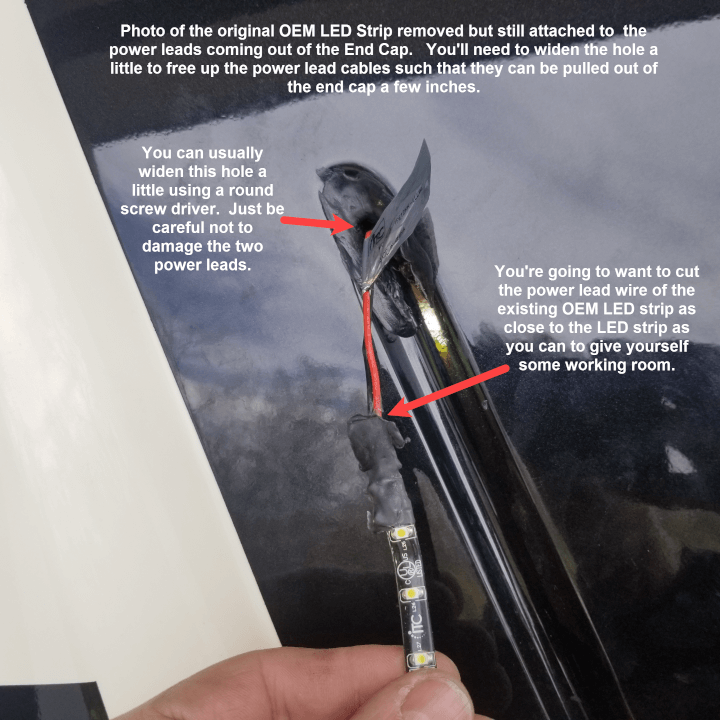
- The hole where the power lead wires of the existing LED light strip come out of the end cap is usually filled with a sealant of some type when it comes from the factory. You'll need to remove some of this sealant – at least enough of it to allow the power lead wires coming out of the end cap to move freely. You can usually insert a round screw driver or similar tool into the hole to widen it. Just be careful not to damage the power leads that come out of that hole; you need them!
- Carefully pull the extra power lead wire of the existing End Cap LED light strip from behind the End Cap out so you have some wire to work with. There's usually 3 or 4 inches you can pull out. Tape these wires to the end cap so they won't fall back into the End Cap when you cut them in the next step.
- Cut the existing power lead wires (should be 2 of them – usually a red and black wire) that attach to the existing End Cap LED light strip. Cut as close to the end of the existing LED strip as possible. You want to maximize the amount of existing power lead wire you have to work with.
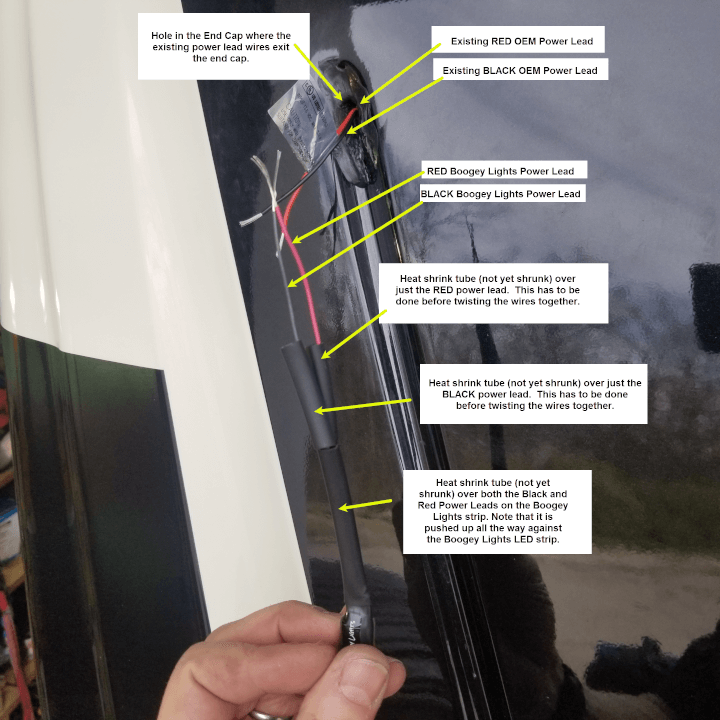
- Strip one-half inch of the insulation away on the existing power lead wires that come out of the end cap. Do the same for the power lead wires coming from the Boogey Lights replacement LED strip.
- Slide a 2 or 3" piece of supplied heat shrink tubing over both the black and red power leads coming out of the Boogey Lights led strip. Push the heat shrink up to the LEDs as far as it will go and then using a heat gun, secure the heat shrink in that position. The goal here is to completely cover the immediate two or three inches of exposed power lead wire connected to the Boogey Lights LED strip with heat shrink.
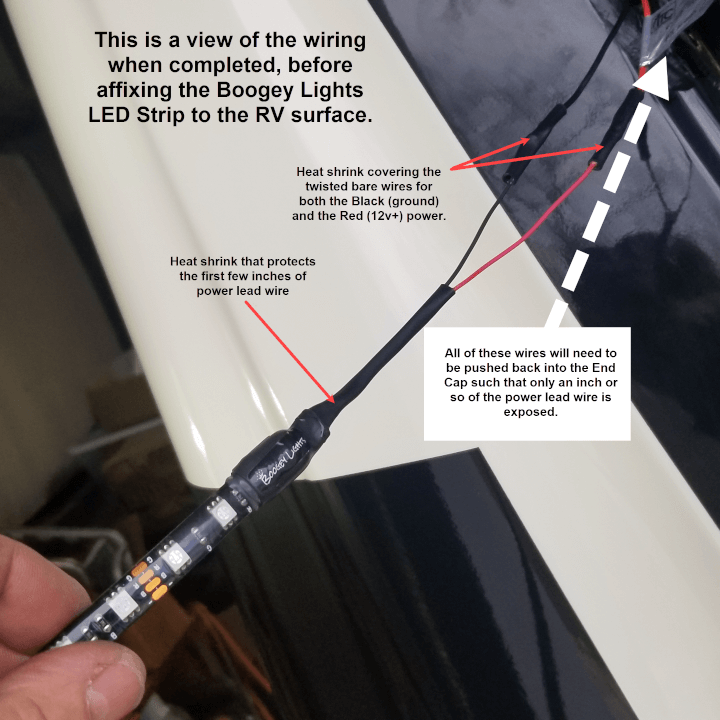
- Slide a 1 to 2" piece of supplied heat shrink tubing over just the black Boogey Lights power lead. Twist the black Boogey Lights power lead together with the black existing OEM power lead coming out of the End Cap. You're going to want to make sure these wires are tightly twisted. Then, slide the heat shrink over the twisted bare wire connection and secure the heat shrink in that position with a heat gun. Make sure the twisted bare wire is fully covered with heat shrink.
- Repeat the above process for the red Boogey Lights power lead and existing red OEM power lead.
NOTE: We know folks may be tempted to use electrical tape to cover these wires but we urge you to use the supplied heat shrink because the heat shrink has an adhesive glue backing which will make the seal around the twisted wires water tight. - With the Boogey Lights LED strip now attached to the existing OEM wires going into the end cap, it's time to test the light before affixing it to the RV end cap. The light should work. If not, check your connections and/or switch/power source before proceeding.
- Push as much of the extra power lead wire back into the end cap as you can. You're going to want to position the Boogey Lights LED strip on the end cap surface where the previous OEM strip used to be. You don't want any extra power lead wire hanging from the end cap.
- Before you attach the Boogey Lights LED strip to the end cap you need to first clean the surface with rubbing alcohol. Next, apply 3M Adhesion Primer to the area where the strip will be placed. This is a critical step. Do not skip it. 3M Adhesion Primer must be used if you want your LED light strip to stay stuck.
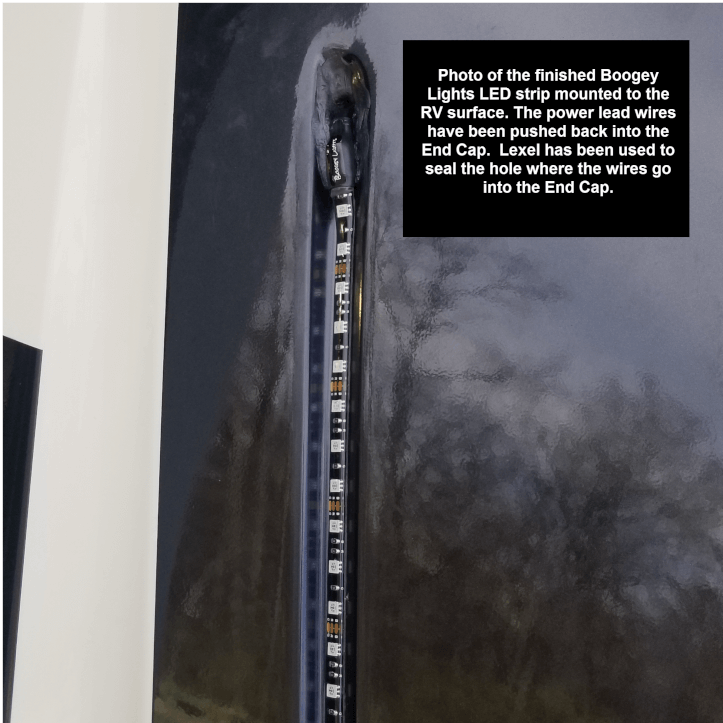
- Starting at the end where the power lead feeds into the end cap, carefully peal the backing tape from the LED strip and gently position the LED strip against the RV surface. You'll need to do this for the entire length of the LED strip. Note that you only get one try at this. The instant the LED strip makes contact with a properly prepared surface it will bond to the surface; it cannot be moved without damaging the LED strip.
- Use Lexel (or similar petroleum based clear adhesive sealant) to fill the hole where the power lead goes into the end cap. This is important as you do not want water to intrude into that front end cap. Note too for horizontally mounted LED strips we strongly suggest smearing some Lexel sealant on the upper edge of the LED strip to help stop water that will naturally tend to pool on that side from working it's way in-between the PCB and the LED strip coating.
- Repeat the above steps for the second End Cap LED Light strip.
Installation Photos