


 Quick Shop
Peterbilt Air Cleaner Lights
$223.99
Burns Brighter. Lasts Longer. Built Tougher.

Your shopping cart is currently empty.
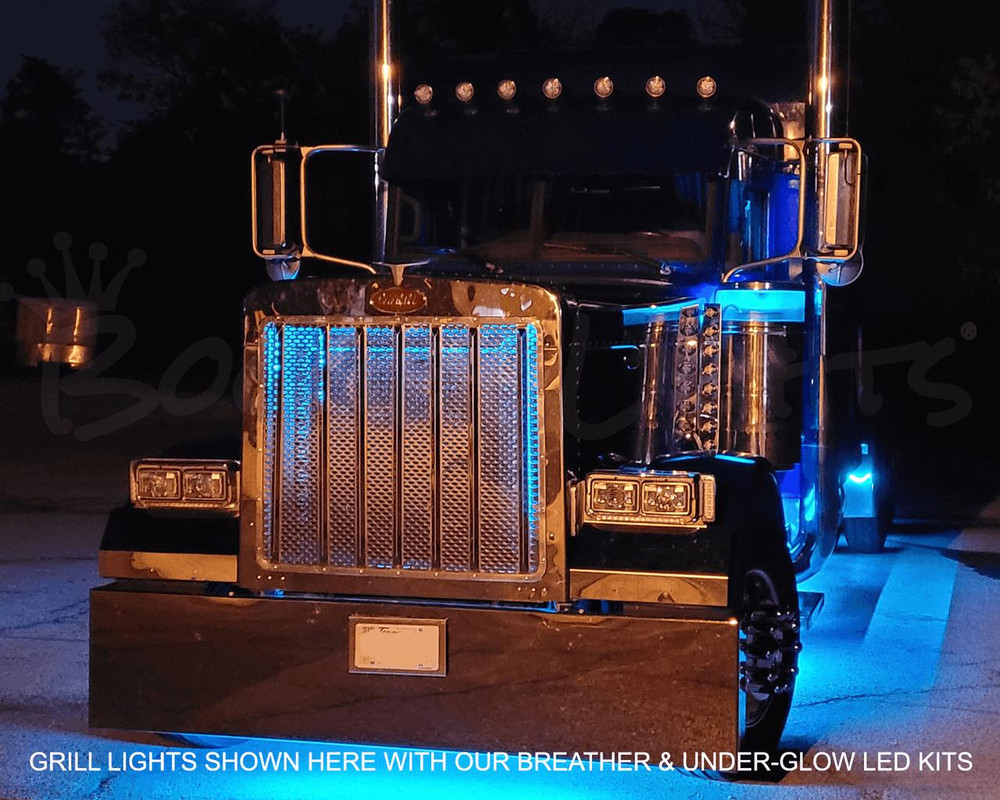
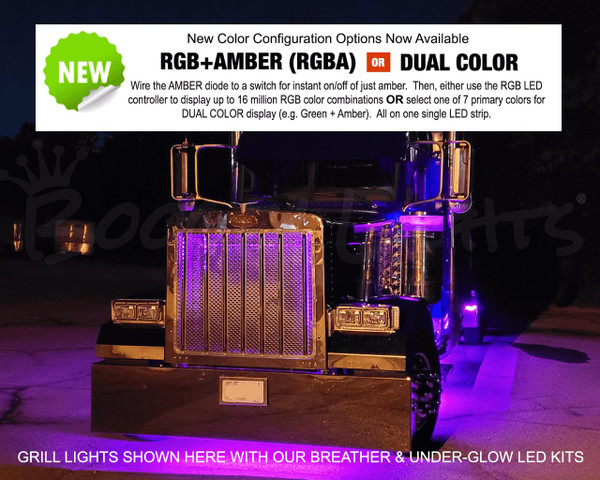
Light up your grill with our super-bright LED light kit built for the 379 or 389 grill. Offered in multi-color RGB, RGBA, Dual Color (your choice of 7 primary colors + amber) and single color (8 choices) configurations. This kit can also be combined with our BREATHER LIGHT KIT and / or our UNDER-GLOW LIGHT KITs for the 379/389 too. 12vdc.
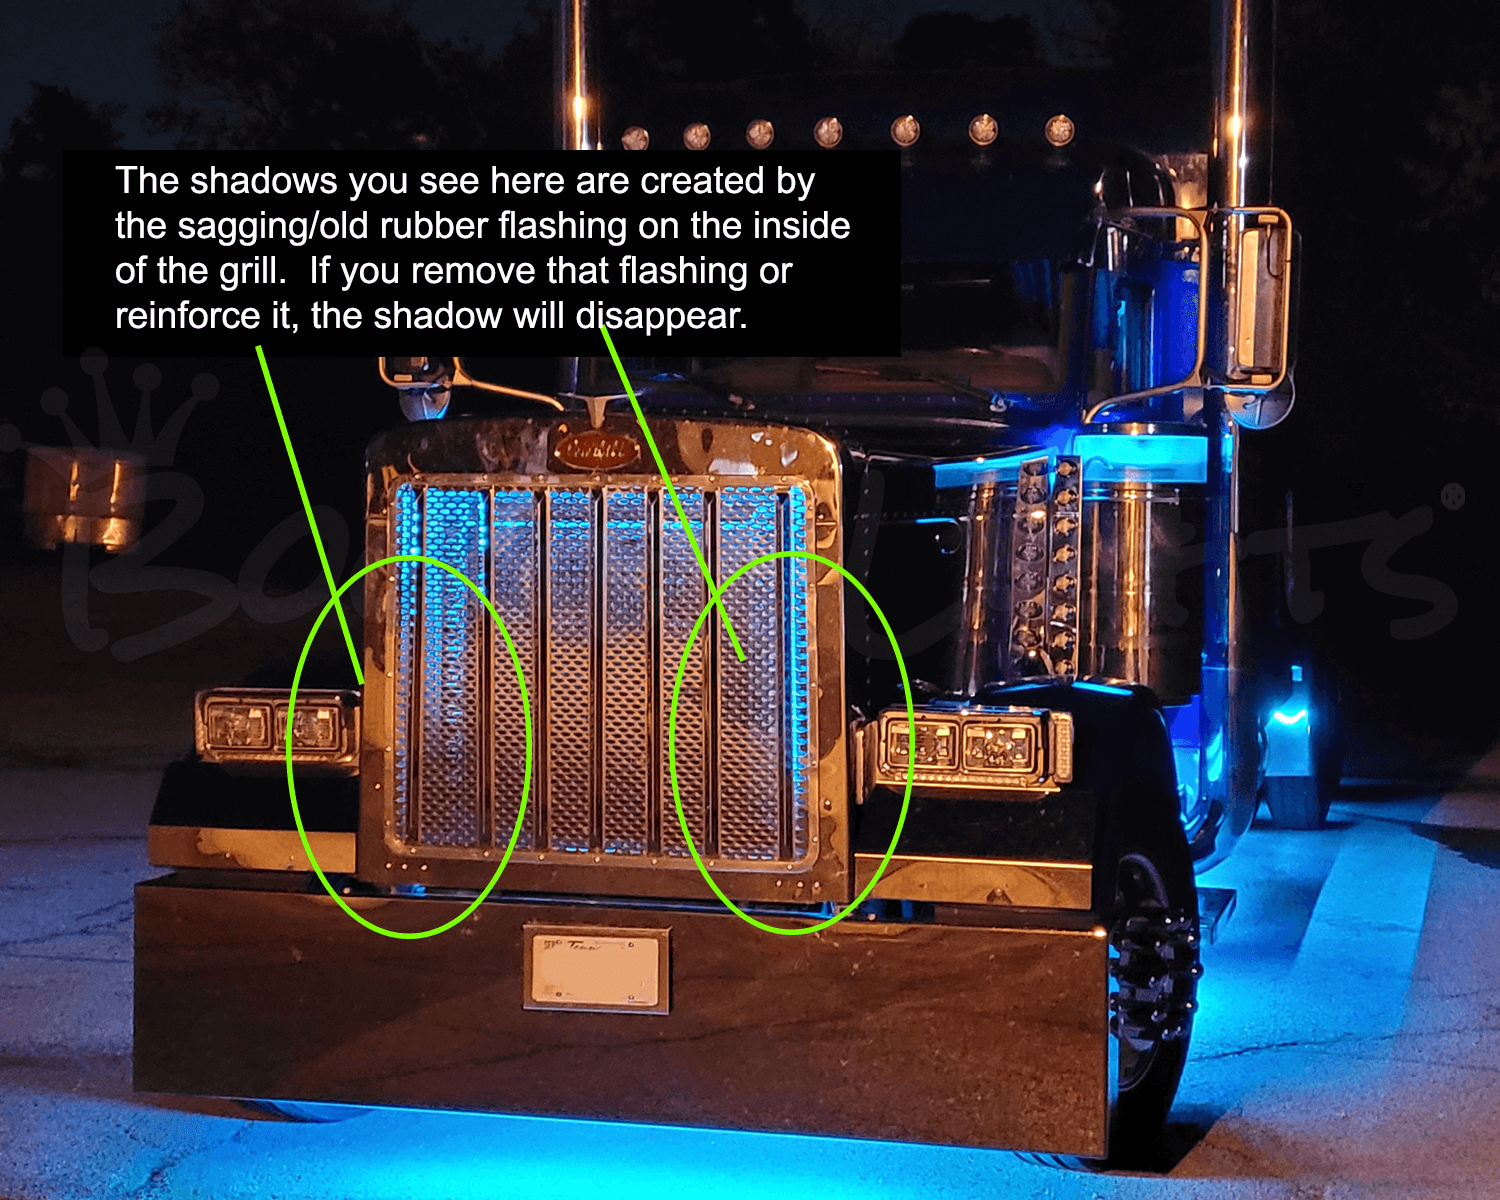
Be sure to scroll down into this product page for important details including FAQs, configuration specifics, product options, specifications, installation docs and more.
Unlike most every other light kit out there, these light kits are ACCENT LIGHT KITS. When mounted properly, you'll never see the LED lights themselves. You'll only see the glow from the LEDs. If you're interested in learning more about WHY Boogey Lights are different than any other LED lighting system on the market, click here: WHY BOOGEY LIGHTS . We do a deep dive into the ten differences between Boogey Lights® and all the others.
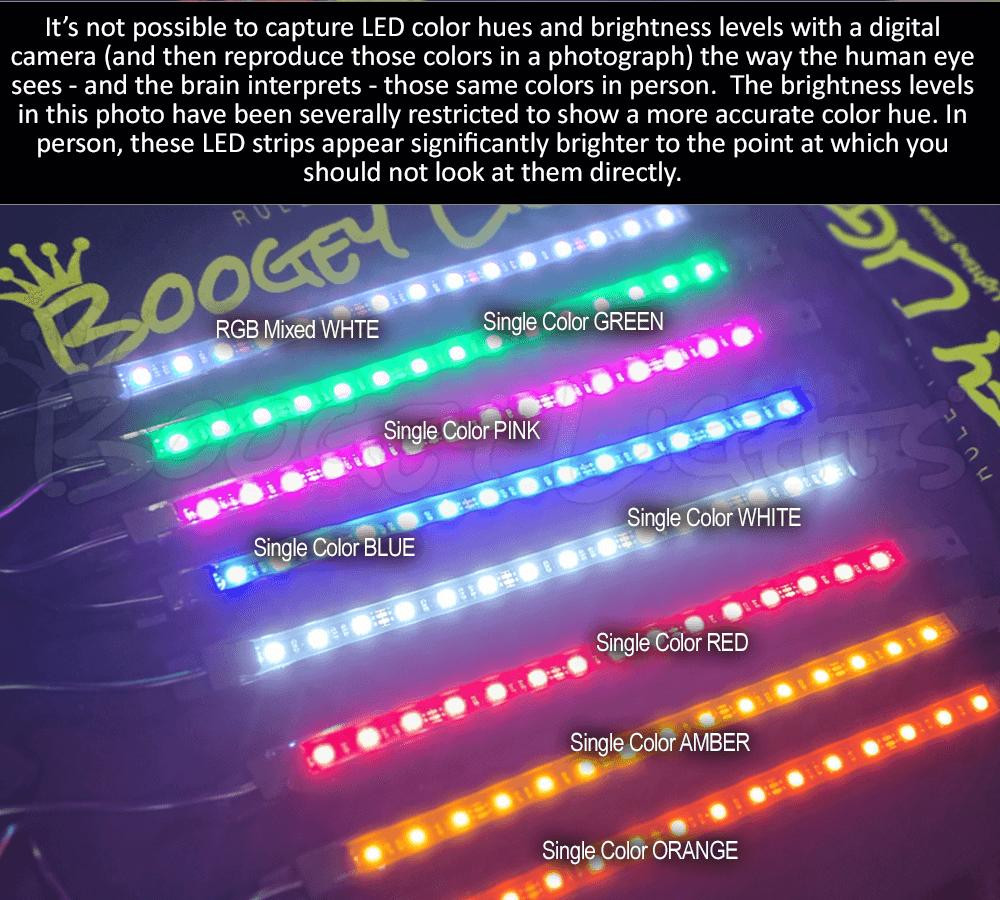
Single colors are going to be brighter than RGB (multi-color) LEDs. The reason is that in an RGB LED there are three diodes: red, green and blue. The LED controller mixes those three colors to create other colors. For example, equal amounts of red + green + blue = white. In a single color LED, all three diodes are the same color. So in a single color white LED, there are three white LEDs which is much brighter than an RGB led mixed to show white. If you're for the absolute brightest color for your truck, go with single color. If however you want to be able to change the colors from time to time, go with RGB. Just be aware that the RGB version of isn't as bright as the single color version.
RGB / Multi-Color: For RGB led lighting an LED Controller is needed to operate the lights. The controller is what operates the lights and mixes the colors. In addition to providing a wireless on/off capability, the LED controllers offered allow you to control your lights with your Bluetooth 4.0 enabled smart phone and our free smart phone APP (Android and IOS) OR the included RF wireless remote. With the included RF remote you can change between 7 colors and functions of on/off, blending, strobing, breathing, flashing, fading and dimming. You can also use your Bluetooth enabled smart phone to create that custom look with over 16 million different color combinations plus three pre-sets.
NOTE: If purchasing RGB, be aware that an RGB LED cannot create the color orange. It can come close but not exact. Why? As mentioned previously, RGB leds have three color DIODES: RED, GREEN and BLUE. It's the mixing of these three colors together that create other colors. The color ORANGE is created by mixing RED + YELLOW. The color YELLOW is created by mixing RED + GREEN. With an RGB LED, there is only one RED diode so it can only be used once. To get something that looks more like orange to the human eye using RGB LEDs you need to mix equal amounts of RED + GREEN (actually just a bit less green since the human eye is more sensitive to green wavelengths). This will give you the color YELLOW. Then, increase the intensity of the RED just a little (or, pull back the green). This will essentially add a little red to the yellow to effectively mix a color that has an orange tint which is closer to AMBER. It's not perfect but it's as close as you can get to the color orange using RGB led lights.
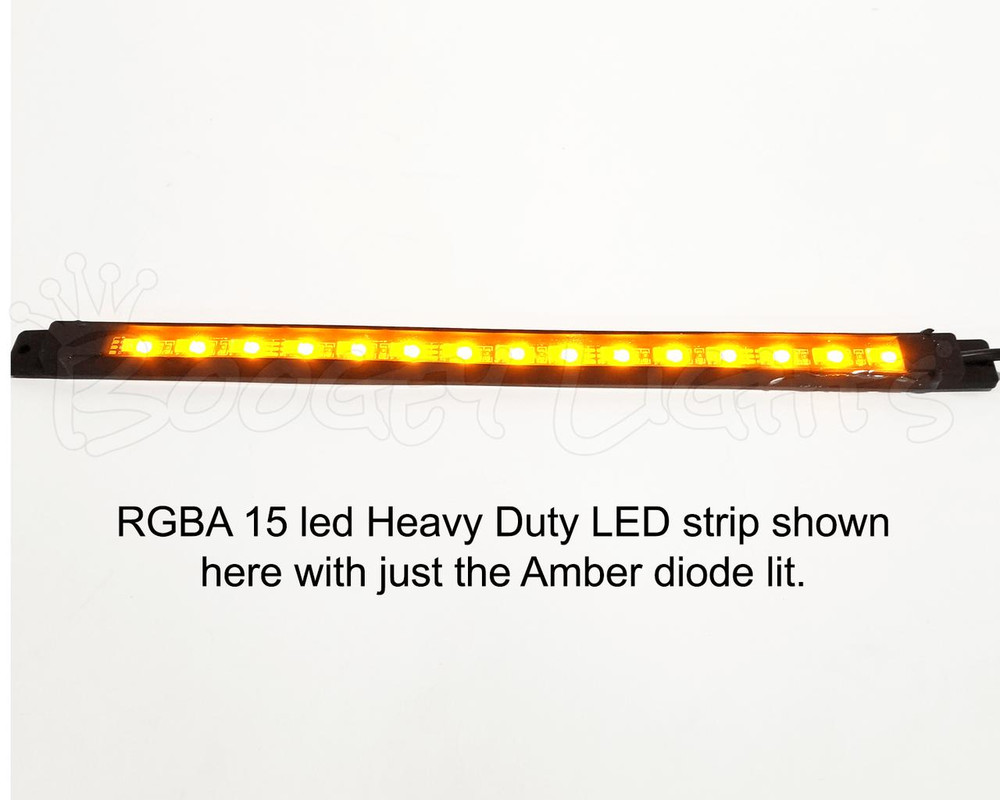
If you really like orange but want the flexibility that RGB provides, we suggest using RGBA. RGBA will create a nice rich orange color by mixing equal parts RED and AMBER.
RGBA is a new type of LED strip format Boogey Lights® developed. It is available in both our Low Profile and Heavy Duty LED strip formats. The RGBA led strip includes our core RGB tri-chip technology using a 5050 RGB LED with the addition of a fourth 2835 diode that is AMBER. Designed primarily for motor vehicle applications, that fourth AMBER diode can be wired to a separate switch on the dash (or tied into a relay to work with existing running lights) that allows you to quickly and easily turn on just the AMBER leds. Then, for those who want the flexibility to be able to display up to 16 million color combinations using the RGB tri-chip, they can do that too. RGB + A provides the best of both worlds. Single color amber plus RGB tri-chip multi-color. The product photo carousel of this product page includes a close-up view of the LED strip design and wiring diagram. Note that due to the addition of that fourth diode, the RGBA strips are a little wider than our standard tri-chip RGB and single color LED strips. Also, the power lead wires use five conductor vs four. For additional information including product specs, click the SPECS navigation tab on this product page.
The Dual Color LED configuration uses our RGBA LED strip but instead of pairing that LED strip with an RGB LED controller (to mix up to 16 million different color combinations), we hard wire a combination of one, two or all three of the RGB diodes (red, green or blue) along with the AMBER diode to two on/off switches. One switch operates the primary color diode(s). The other switch operates the amber diode. There are a total of seven Dual Color configuration options: RED+AMBER, GREEN+AMBER, BLUE+AMBER, MAGENTA+AMBER, YELLOW+AMBER, CYAN+AMBER, WHITE+AMBER. With a Dual Color configuration you don't need an LED Controller. Instead, you only need two switches (and relays); one to control each color. The primary color is chosen from the available dual color drop down list. The secondary color is always amber.
To achieve the full adhesive strength of the 3M® tape affixed to the back of each strip 3M® Adhesion Promoter (aka Primer) must be applied to the mounting surface first. This is an important step to ensure a secure bond. The 3M® Adhesion Promoter creates a chemical bond between the tape and the mounting surface such that the LED strip will stay stuck (at least until you decide you want to remove it). Using any other solvent such as rubbing alcohol or acetone is not the same thing as using 3M® Adhesion Promoter. While these solvents will help clean the surface, they do not prime the surface. There is a difference. 3M® Adhesion Promoter is included with this kit although you may elect to purchase more if you'd like.
True purple LED's are actually ultra-violet (UV). They produce a soft, pleasant purple glow particularly when used on or near shiney reflective surfaces (e.g. chrome motorcycle engines). The color however is not a real bright effect like you'll get with any of the other LED single colors. If you want a subtle, purple glow that looks great, then the UV/LED's may well be for you. If however you want the brightest lights possible, you will not be happy with UV/Purple. We do not recommend UV Purple for Semi-Truck applications for this very reason. The alternative to UV/Purple is MAGENTA (some call it a 'hot purple') which looks similar but has a brighter, pinkish tint. Magenta is available by mixing 100% RED + 100% BLUE which is what our single color Magenta is. You can also mix magenta using our RGB LEDs and an LED controller. Scroll through the photo carousel of this product to see an example of how the MAGENTA looks on a truck when installed. You can also click on the SPECIFICATIONS tab of this product page and scroll down to see photos of all color options.
If the product configuration of the light kit you're purchasing is eligible for PRIORITY PROCESSING, you can select 'YES' (default is 'NO') and that light kit will be given priority in our build queue such that we'll build and ship the light kit using the shipping method you select at checkout within TWO business days (or less) regardless of what the current build time estimate states. You can read more about our BUILD TIME ESTIMATE here.
Business Day Note: The 'Business Day' cut off time is NOON Eastern. If for example you place your order before noon on Monday, we'll build and ship your order no later than Wednesday. If you place that same order after 12 noon eastern on Monday, we'll build and ship your order no later than Thursday. If for some reason we're unable to do this (e.g. out of stock item or some other limitation), we'll reach out to you via email to ask how you want to proceed: Either cancel the order or ship the order normally and refund the Priority Processing fee paid.
Be aware that not all product configurations are eligible for Priority Processing. For example, if your light kit has an LED CONTROL CENTER in it, we do not offer Priority Processing on that order. Also, we exclude high demand lighting components that are often purchased in bulk by commercial accounts (eg. RED 75 Heavy Duty LED strips).
Priority Processing is offered per line item, not per order. If your order has multiple LED light kits or LED strip components on it, only those products that are eligible for Priority Processing (and selected as YES) will be shipped within the two business day time frame. Any remaining light kit products will be shipped via ground per our normal build time estimate. If your order has other non-LED components on it (e.g. controllers, switches, replacement parts, wire, 3M primer, etc), we will ship them with the priority processing item.
The short answer is probably not. All Boogey Lights® RGB LED strips are COMMON CATHODE LEDS. They share a common ground and will only work with positively switched controllers. Most LED strips on the market today are COMMON ANODE because the controller technology used to power them is less expensive to manufacture. However they're not nearly as bright and are an overall inferior design when compared with COMMON CATHODE LEDs. For more information, click the button below.
No two installation scenarios are the same. Not everyone shares the same installation quality goals. Some folks are OK with twisting wires together, others want to solder them. Some folks are OK with running wires where they may be seen or unprotected to save money/time, others want a tidy, clean install without any wires showing. Some folks are OK with mounting their LED strips to whatever surface they can find, others want to take the time necessary to build out appropriate mounting surfaces to provide the best lighting effect on their vehicle. The point is it's not possible to provide all the materials necessary for all installation scenarios and quality goals. Our light kits provide the essential components needed for a high-quality, functioning lighting system. Installation of our light kit to your specific vehicle may however require additional items to make it look and fit the way you want. This is particularly the case with electrical wiring and mounting of LED strips. Before proceeding with your installation we suggest you consider THESE OTHER ITEMS.
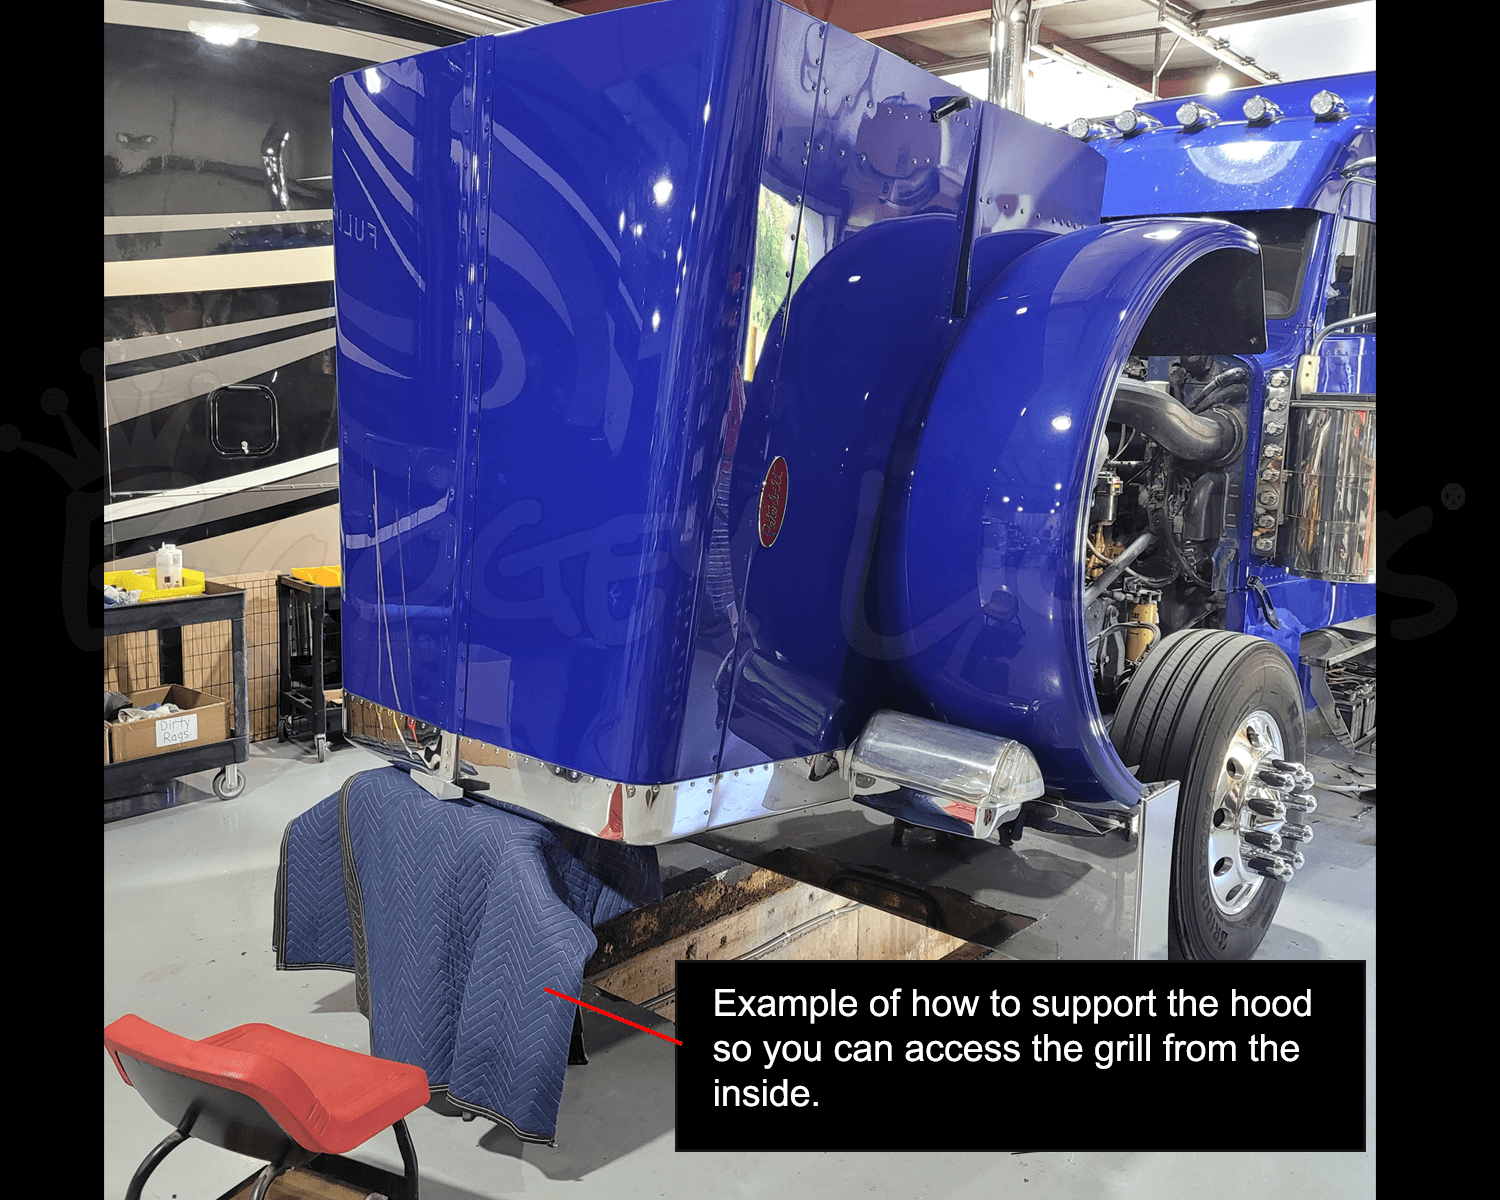
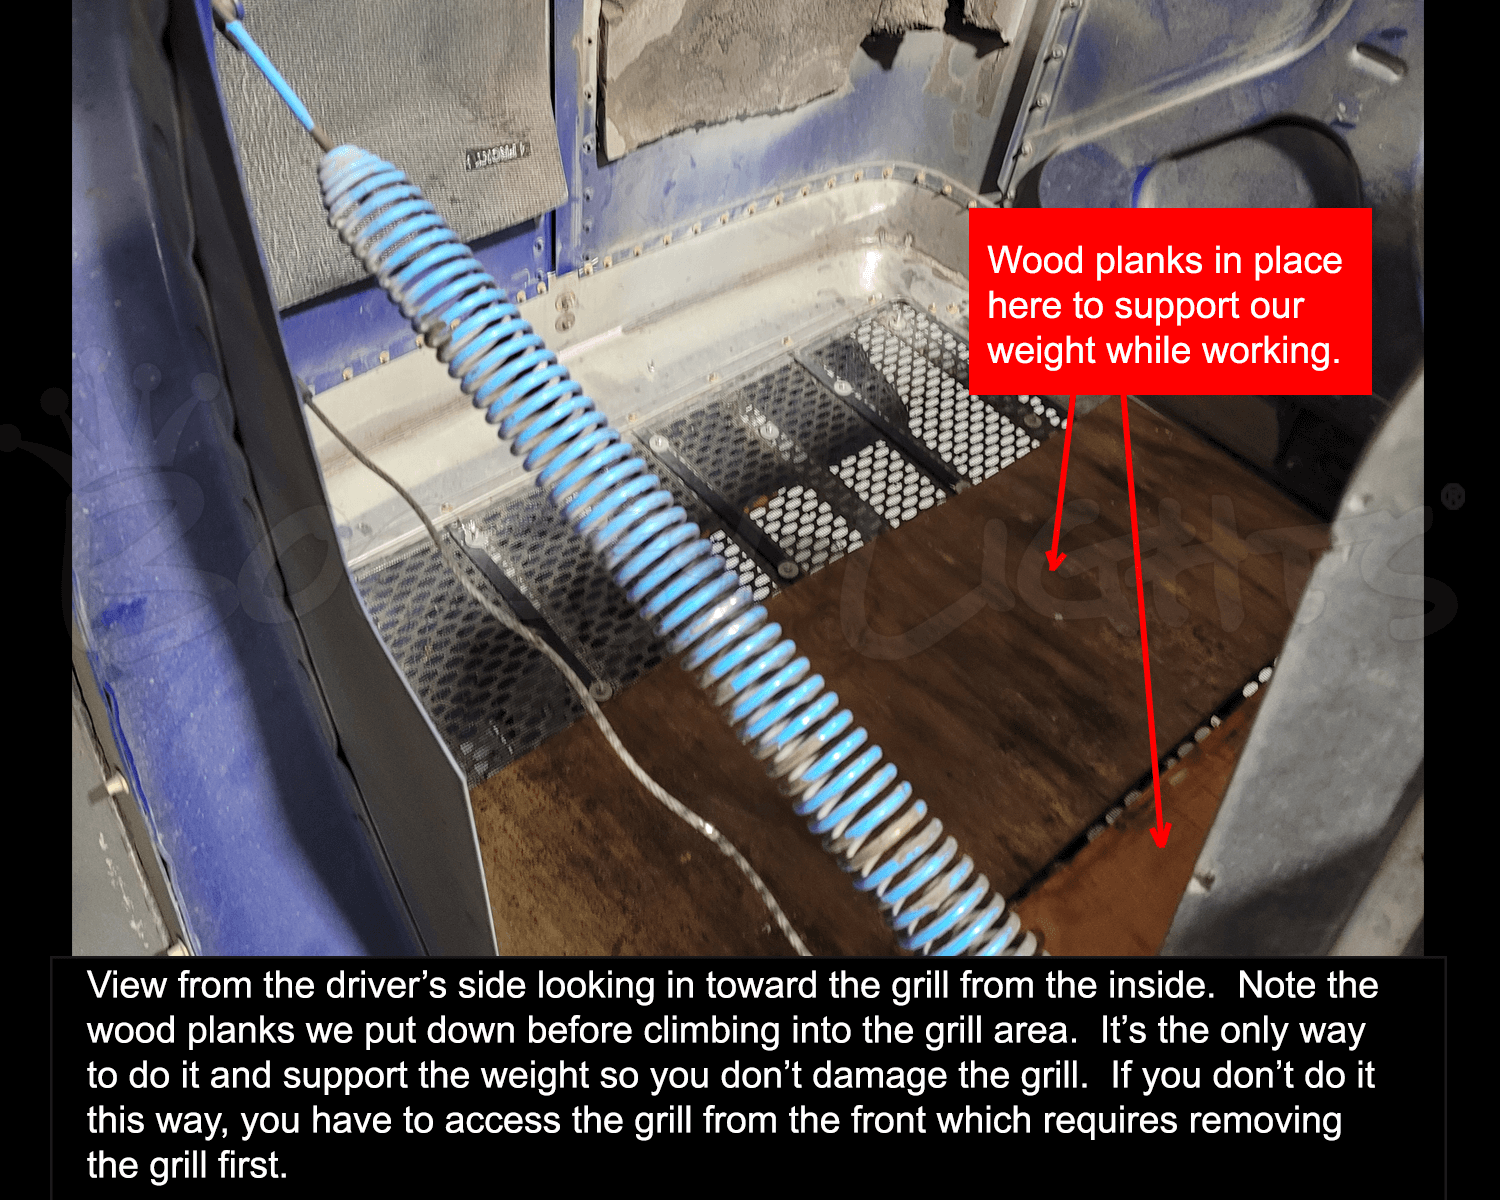
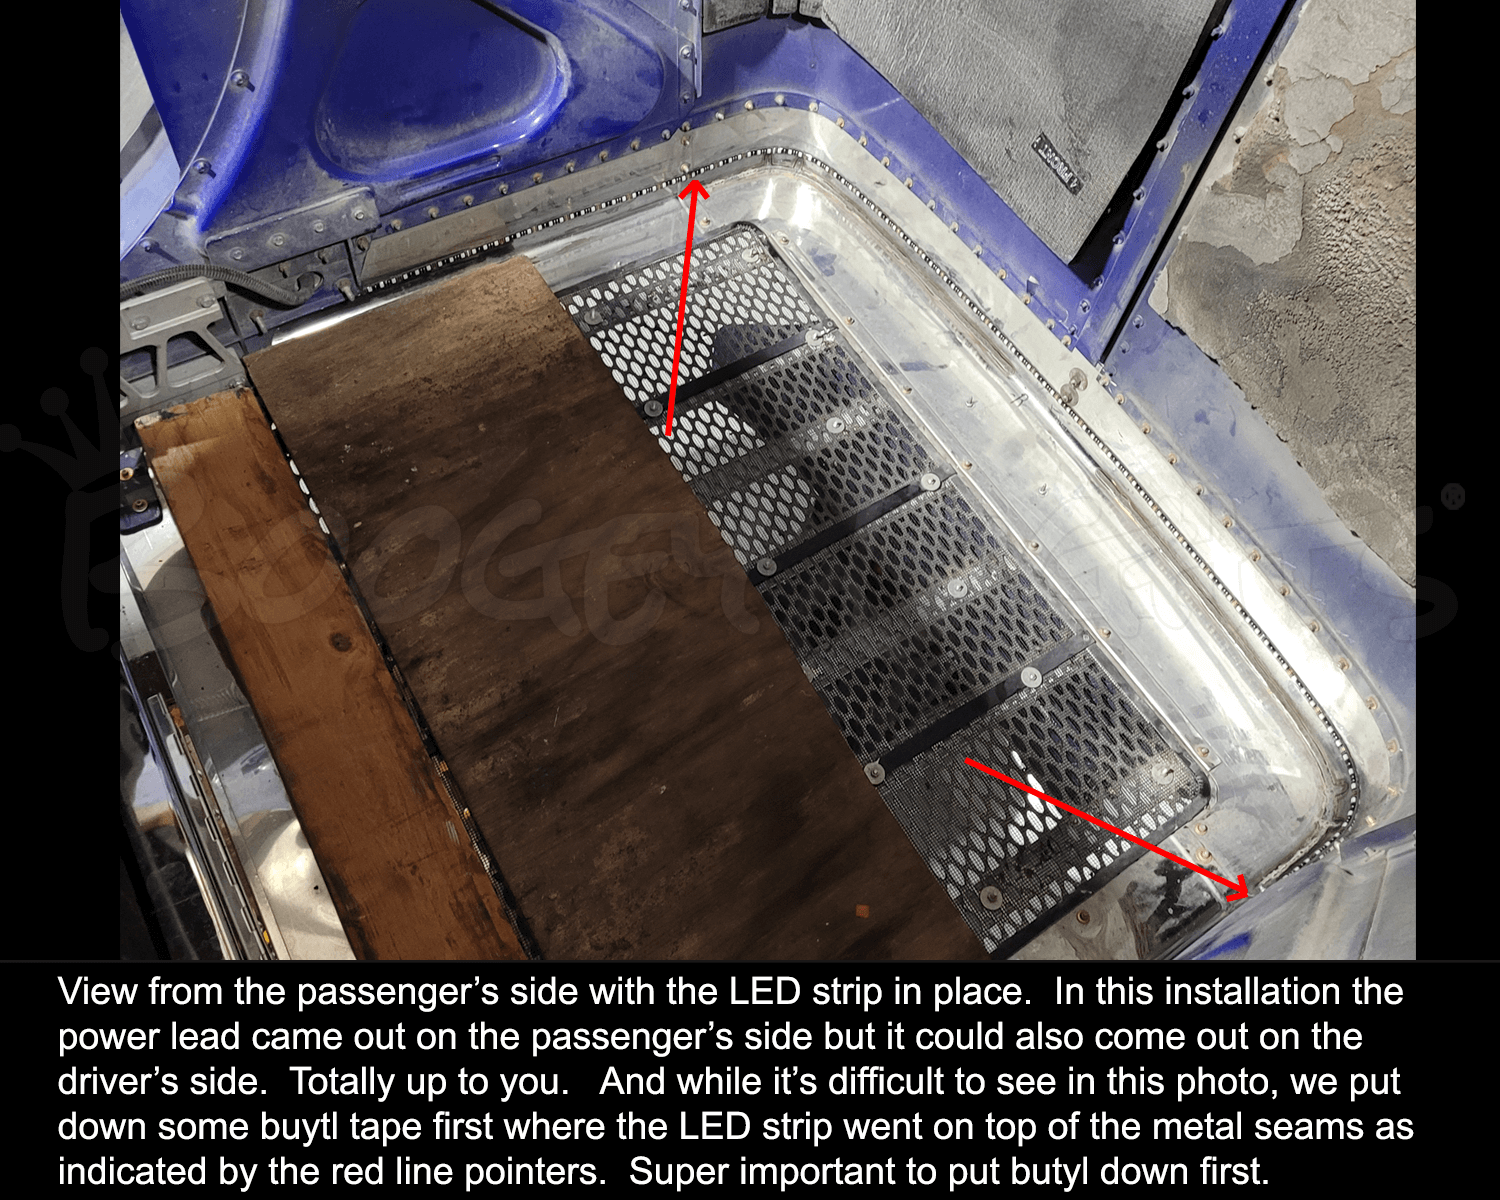
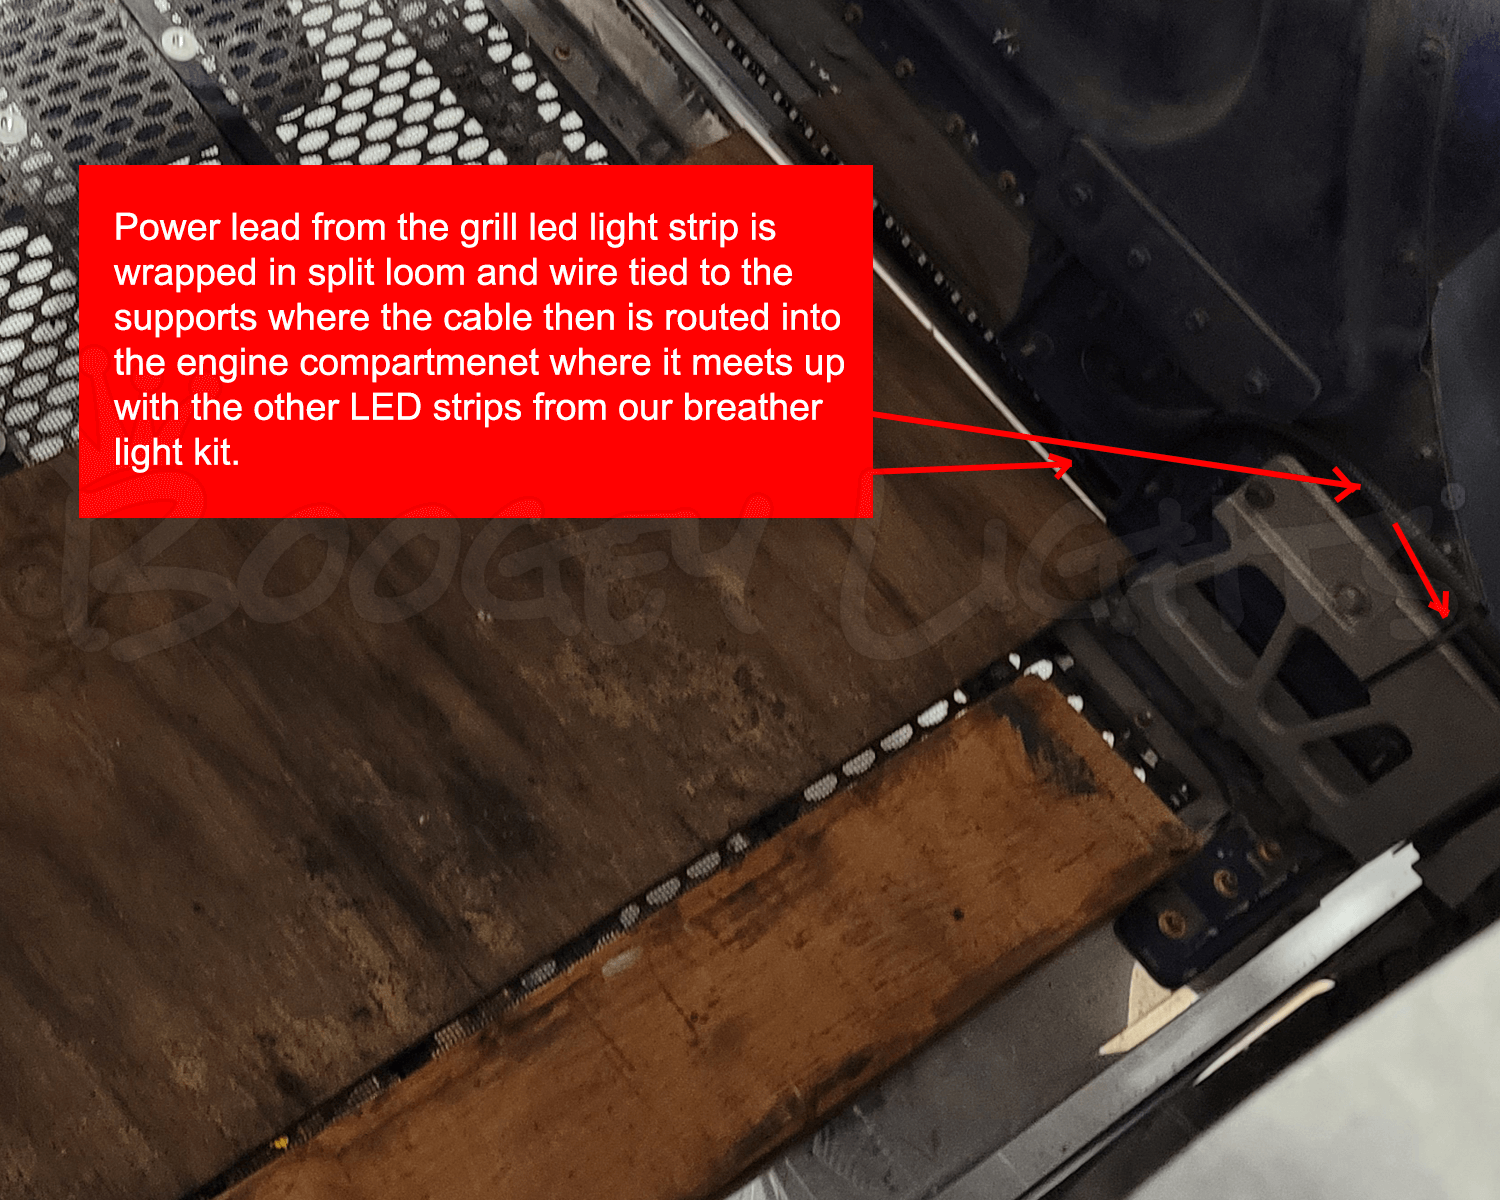
Installation takes about an hour depending on whether or not you're integrating with another light kit. Here are the basic steps.
 Quick Shop