


C7 Corvette LED Under-Glow Light Kit
With Grill, Hood Scoop and Wheel Vent Add-On options.
Light up your Vette with 300 super bright hi-intensity LEDs!
Designed specifically for use in motor vehicle applications, this multi-color RGB LED light kit is incredibly bright - no other competitor comes close. Designed for the C7 Corvette Stingray, Grand Sport and Z06 (2014-2019) our low profile hi-intensity LED strips produce a smooth, even glow of super bright light to give your C7 that custom look. Unlike all the others, this BOOGEY LIGHTS Corvette C7 Under-Glow light kit contains 300 super brights LEDs -- at least twice the number of LEDs of any competitor. Plus, we only use 5050 LEDs -- the largest, brightest 12vdc LEDs available.
Be sure to scroll down into this product page for important details including FAQs, configuration specifics, product options, specifications, installation docs and more.
READ THIS BEFORE ORDERING!
Successful installation requires reading the written installation directions. While our How-To Videos offer helpful overviews, they do not replace the detailed documentation. Reading the instructions carefully is essential for proper fit, function, and long-term performance. Most support calls and warranty claims we receive stem from customers who don't read this information. Please take our advice and read the directions. We promise, you'll be happy with the results if you do.
FAQS | Frequently Asked Questions
While we encourage you to read all of the information presented on this product page (including the information on the navigation tabs), below are some of the most frequently asked questions we get about this product. In many cases, the answers to these FAQs will refer you to other sections of this product page for more details on the topic.
Will the double-sided 3M® tape really hold the lights permanently?
I've purchased other LED light strips from Amazon and EBay. Candidly, they're not very good and didn't last long. What makes Boogey Lights® different?
How difficult are these lights to install?
The one skill you do need is an understanding of 12vdc power. This includes understanding the importance of having a properly sized fuse at the power source, polarity, how to properly seal an electrical connection, using properly sized wire gauge for the load, measuring voltage and measuring the additional amperage draw you're adding. Beyond that, if you are willing to read and follow the directions (yes -- you must be willing to read the directions!), most people find the installation straight forward.
The good news is you don't have to guess at this. Our product installation documentation is very detailed - and you can download it directly from this product page right now. We do this on purpose so consumers have an opportunity to assess the level of difficulty BEFORE making their purchase decision. If you click on the INSTALL navigation tab on this product page you'll find downloadable links for each light kit offered on this product. The documents are PDFs so they can be viewed on any platform - desktop pc, mobile phone, tablet, etc. We also offer some HOW TO VIDEOS that customers find helpful. Remember too that our lighting systems are not vehicle specific when it comes to the installation process. Whether you're installing the light kit on a car, a pontoon boat, semi-truck, a pickup truck or an RV, the installation process is the same. The only difference is the vehicle format.
What's the difference between RGB, RGBW and RGBA?
What are the power requirements?
PRODUCT HIGHLIGHTS
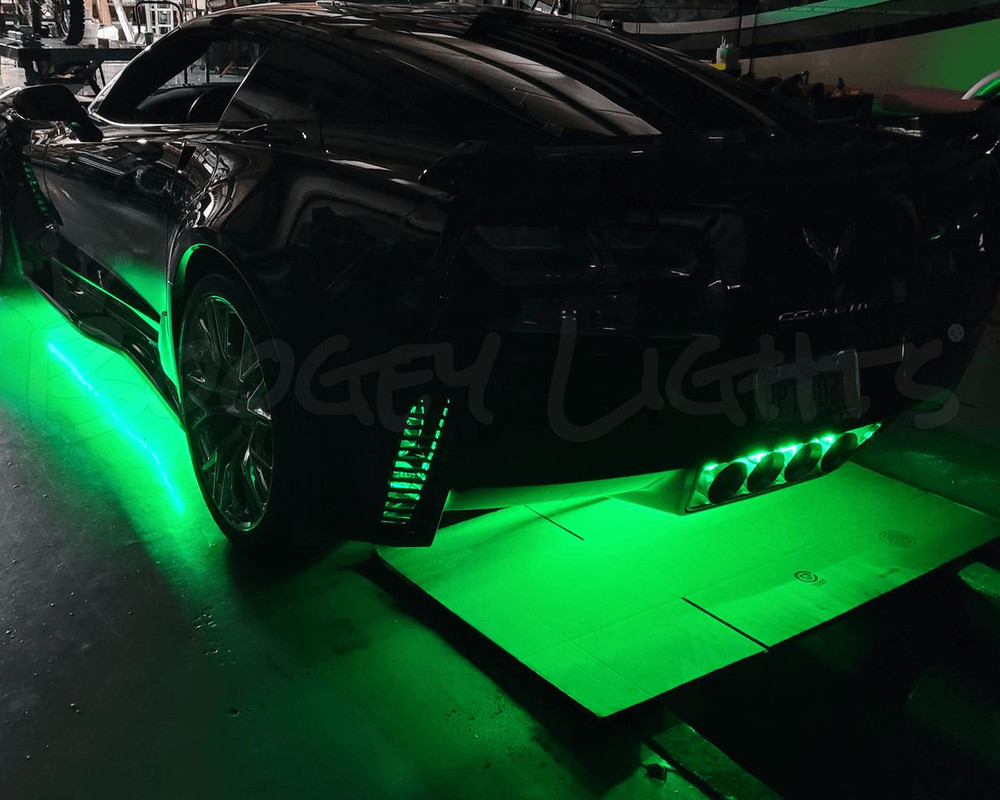
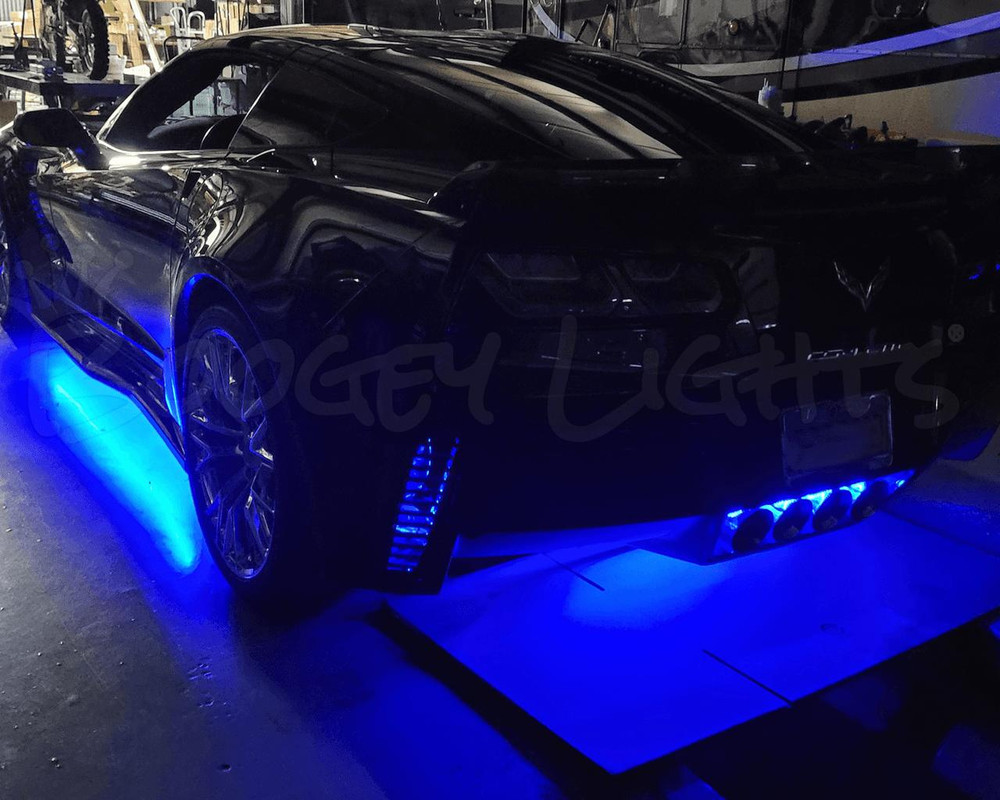
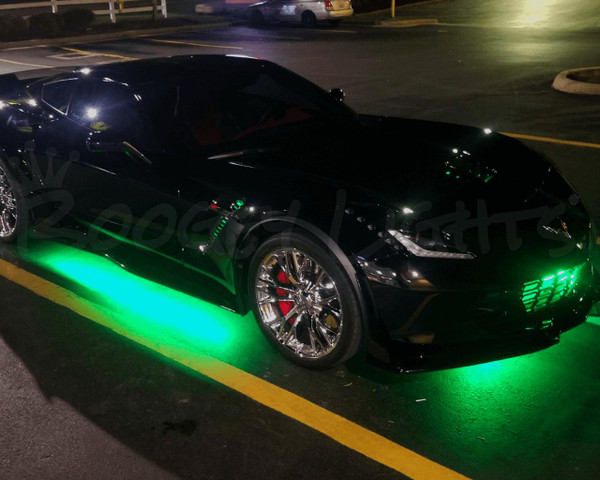
With this many LEDs you get true, FULL PERIMETER lighting under the car. Also includes lights to illuminate the exhaust tips. PLUS, if you want to add more lights, we offer optional ADD-ON LED light kits too including kits to light up the C7's grill, hood scoop, front and rear fender cove vents. Note: Above photos show the under-glow, vent cove, grill and hood scoop LED light kits installed.
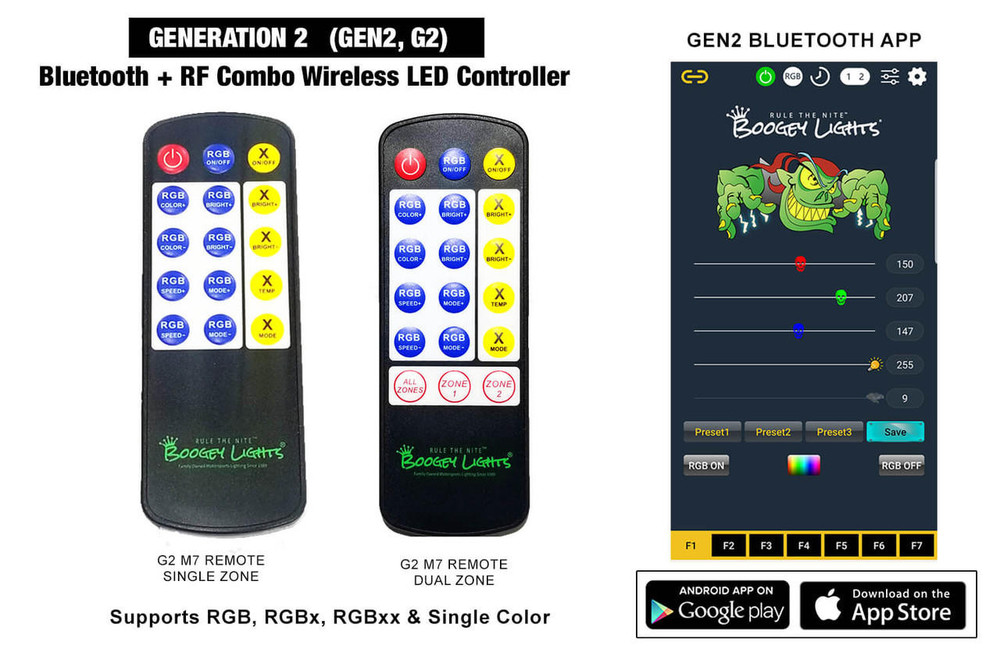
Control this light kit using either the included RF hand held RF wireless remote OR your Bluetooth enabled smartphone and our free APP (IOS / Android).
With the RF hand held remote and the Boogey Lights RGB LED controller you can change between seven pre-set colors: white, red, green, blue, pink, lime green, light blue. Also, you can control the functions of on/off, color blending, strobing, breathing, flashing, fading and 7 levels of dimming. In the Blending, Breathing, Flashing and Strobing modes these features can be set to remain on a single color or to cycle through each of the 7 colors. You can also adjust the speed at which this happens.
With our Bluetooth APP and your smartphone, you can do everything the RF hand held remotes does PLUS you can create a custom look with over 16 million possible different color combinations plus three pre-sets along with two or three color programming functionality. Click on the GEN2 LED Controller text block for details.
AVAILABLE CONFIGURATIONS
This led light kit is available in the following five configurations:
- Under-Glow Only
- Under-Glow + Grill
- Under-Glow + Grill + Hood Scoop
- Under-Glow + Grill + Vents (4: 2 forward, 2 rear)
- Under-Glow + Grill + Hood Scoop + Vents
Make your selection from the drop down box.
Note: The installation video shows three small LED strips (each with 3 LEDs) installed in the crease of the hood scoop. This kit doesn't include those three small strips but it's something you could add if you want. Ask use about it and we'll direct you to the product we used.
GEN2 LED Controller
Our GEN2 LED Controllers are based on the Bluetooth 5 chip set family which provide fast response times and the best possible RF/Bluetooth transmission distance. This controller is designed to be used with RGB/Multi-Color LEDs although it can also be used with single color LEDs too. In addition to ON/OFF, this controller provides DIMMING, STROBBING and FLASHING capabilities. Plus, this LED controller will work with your Android® or iOS® Smart phone equipped with Bluetooth (max of 16 million color possibilities). With the included RF remote you can change between 7 colors (Red, Green, Blue, White, Light Blue, Lime Green/Yellow, Hot Pink/Purple) and functions of on/off, blending, strobing, breathing, flashing, fading and dimming. You can also use your Bluetooth enabled smart phone to create that custom look with over 16 million different color combinations plus three pre-sets and color rotation programming. It will also work with the included RF wireless remote. You get the best of both worlds. More details about these advanced GEN2 LED Controllers are below as well as on the CONTROLLERS navigation tab of this product page.
Single Zone or Dual Zone?
We offer the option of a single zone (default) or dual zone (upgrade) LED controller. With the single zone controller all of the LEDs will do the same thing. They turn on and off together. With the optional Dual Zone LED controller, you can segment the LED lights into two separate light zones. For example, you may want to wire the Underglow on ZONE ONE and the Interior or Engine Bay lights on ZONE TWO. This will allow you to control each of the zones independently. Or, you might want to set zone one LEDs on one color and zone two LEDs on another. Lots of flexibility with the DUAL ZONE controller.
Key Features & Capabilities
- Our GEN2 LED Controllers are based on the Bluetooth 5 chip set family which provide fast response times and the best possible RF/Bluetooth transmission distance.
- The PLUS (300 LED max capacity) GEN2 Controller can support Single Color and RGB LED strips with both RF and Bluetooth control. Controller measures 2-1/2" x 1-3/4" x 7/8". Brake flash feature included. Bluetooth + compact 4 button KEY FOB wireless RF operation.
- The SUPER (900 LED max capacity) can support Single Color, RGB, RGBx and RGBxx LED strips with both RF and Bluetooth control. Measures 4-1/4" x 2-1/4" x 7/8". Quick-Switch feature included. Bluetooth + G2 15 button M7 wireless RF operation.
- The HEAVY DUTY controller version can support Single Color, RGB, RGBx and RGBxx LED strips with both RF and Bluetooth control. It is available in a SINGLE ZONE and DUAL ZONE version. The Single Zone has an 1800 LED max capacity. The Dual Zone has a 3000 LED max capacity (1500 LEDs per zone). The Single Zone version measures 5.5" long x 3.25" wide and 1.5" high. Note that the overall length to accommodate room for wires is 7.5". Quick-Switch feature included. Two external antennas. Bluetooth + G2 15 button M7 wireless RF operation. The Dual Zone version measures 5.5" long x 3.25" wide and 1.5" high. Note that the overall length to accommodate room for wires is 10". Quick-Switch feature included. Two external antennas. Bluetooth + G2 18 button M7 wireless RF. This DUAL ZONE LED controller allows you to segment your lighting system into two lighting zones. Each zone can be operated independently or together.
- The HEAVY DUTY controller versions include two antennas: a screw-on 2" stubby antenna and an extended magnetic mount antenna with 15' of wire for optimal reception on any vehicle.
- Use the included RF wireless remote to quickly turn on/off/dim your Boogey Lights. You can also select up to 7 different preset colors using the RF remote as well as access 7 different lighting features.
- Use your smartphone to operate your Boogey Lights®: On, Off, Dimming, Color Selection, Brightness, Speed, Color Programming, Timers
- Adjust the color sliders or color square to select the color you want.
- Access additional lighting features (e.g. strobing, flashing, breathing, morphing) modes using the 7 Function Keys.
- Save your favorite lighting configuration using Pre-Sets
- Countdown Timer and a 24 hour On/Off Timer function
- Quick-Switch feature for use with RGBx LED strips.
- Password protection to stop others from connecting to your LED controller.
- Programmable Color Rotation mode offers the ability to program the controller to display two or three colors of your choice and then rotate those colors in sequence.
- Assign a 'nick name' to your controller so you can easily find it when scanning.
- Set the APP to auto-connect to your LED controller every time you launch the APP on your phone
- DOWNLOAD the GEN2 LED Controller Operating Manual & Wiring Diagrams
- DOWNLOAD the GEN2 Bluetooth Operating Manual
- DOWNLOAD the GEN2 M7 RF Wireless Remote Operating Information
- VIEW the GEN2 LED Controller Series Product Page
- VIEW the GEN2 BLUETOOTH APP Information Page
INSTALL VIDEO
Here's a 7 minute video showing the installation of this light kit. The INSTALL navigation tab of this product page has the details of the LED strip placement along with photos of the installation.
OTHER ITEMS YOU MAY NEED
No two installation scenarios are the same. Not everyone shares the same installation quality goals. Some folks are OK with twisting wires together, others want to solder them. Some folks are OK with running wires where they may be seen or unprotected to save money/time, others want a tidy, clean install without any wires showing. Some folks are OK with mounting their LED strips to whatever surface they can find, others want to take the time necessary to build out appropriate mounting surfaces to provide the best lighting effect on their vehicle. The point is it's not possible to provide all the materials necessary for all installation scenarios and quality goals. Our light kits provide the essential components needed for a high-quality, functioning lighting system. Installation of our light kit to your specific vehicle may however require additional items to make it look and fit the way you want. This is particularly the case with electrical wiring and mounting of LED strips. Before proceeding with your installation we suggest you consider THESE OTHER ITEMS.
WILL BOOGEY LIGHTS® WORK WITH OTHER BRANDS?
The short answer is probably not. All Boogey Lights® RGB LED strips are COMMON CATHODE LEDS. They share a common ground and will only work with positively switched controllers. Most LED strips on the market today are COMMON ANODE because the controller technology used to power them is less expensive to manufacture. However they're not nearly as bright and are an overall inferior design when compared with COMMON CATHODE LEDs. For more information, click the button below.
WHY BOOGEY LIGHTS®?
Unlike most every other light kit out there, these light kits are ACCENT LIGHT KITS. When mounted properly, you'll never see the LED lights themselves. You'll only see the glow from the LEDs. If you're interested in learning more about WHY Boogey Lights are different than any other LED lighting system on the market, click here: WHY BOOGEY LIGHTS . We do a deep dive into the ten differences between Boogey Lights® and all the others.
Installation Information
IMPORTANT. You must have an understanding of 12vdc power. An essential skill with installation of any Boogey Lights LED products is knowing how to correctly wire the product to a 12vdc circuit. This includes understanding the importance of having a properly sized fuse at the power source, polarity, how to properly seal an electrical connection, using properly sized wire gauge for the load, measuring voltage and measuring the additional amperage draw you're adding. If you are uncertain or unfamiliar with any of these concepts, we urge you to ask someone who has the knowledge to assist you. Electricity is unforgiving.
Assembly Required
Installation Overview
You can DOWNLOAD OUR INSTALLATION GUIDE for this product directly from our website. It's a PDF file.
The layout for each light kit configuration is as follows:
UNDER-GLOW
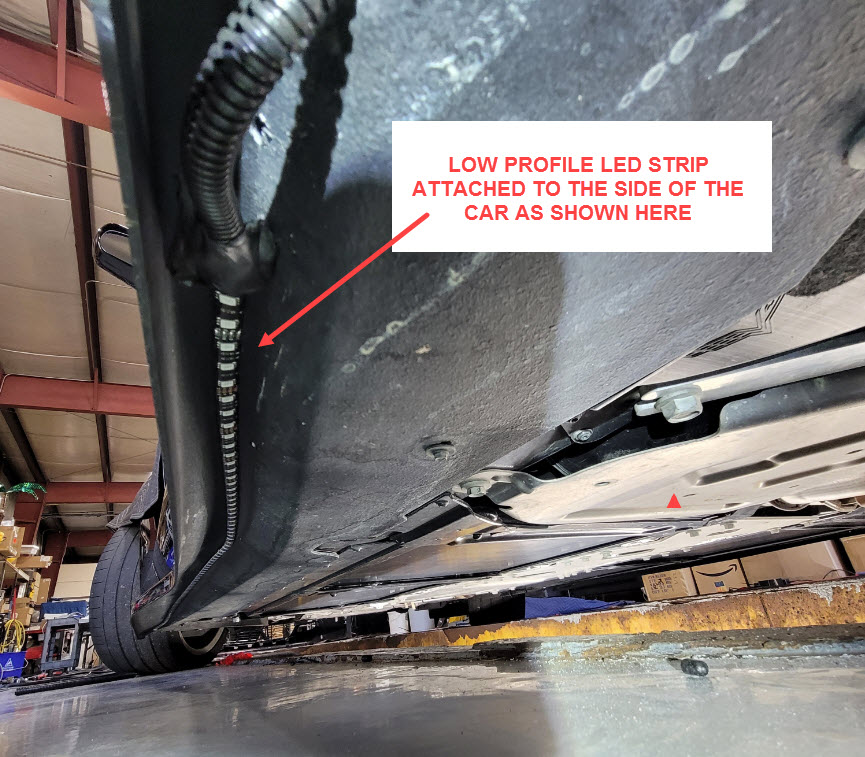
- 2 - 65" (99 leds each) low profile LED strips. One mounted on each side of the car.
- 1 - 31" (48 LEDs) low profile LED strip mounted under the front bumper.
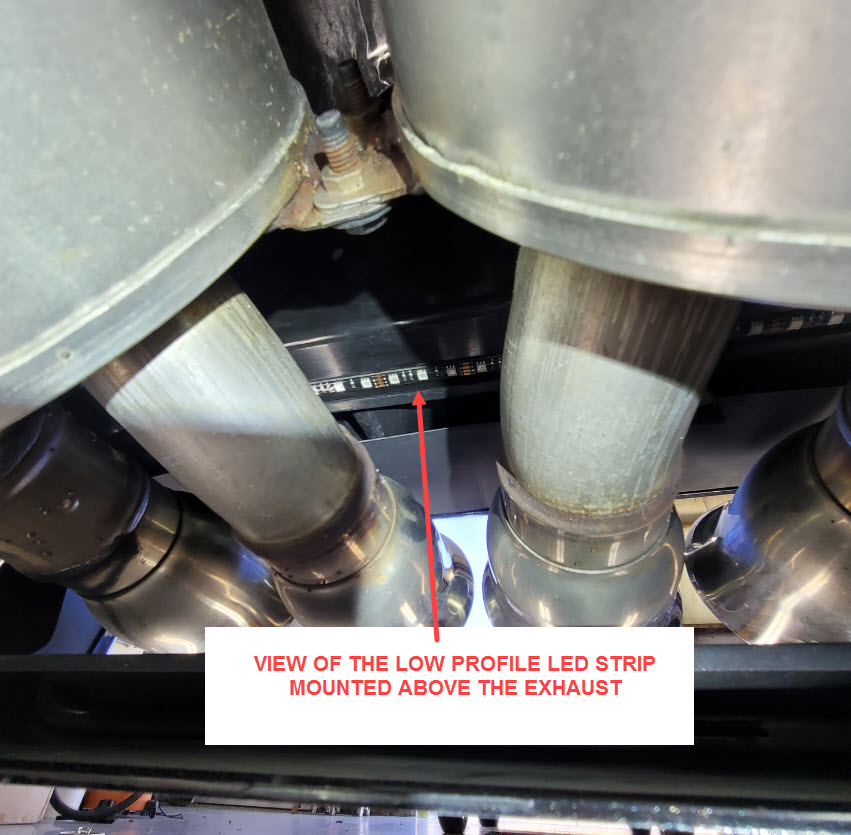
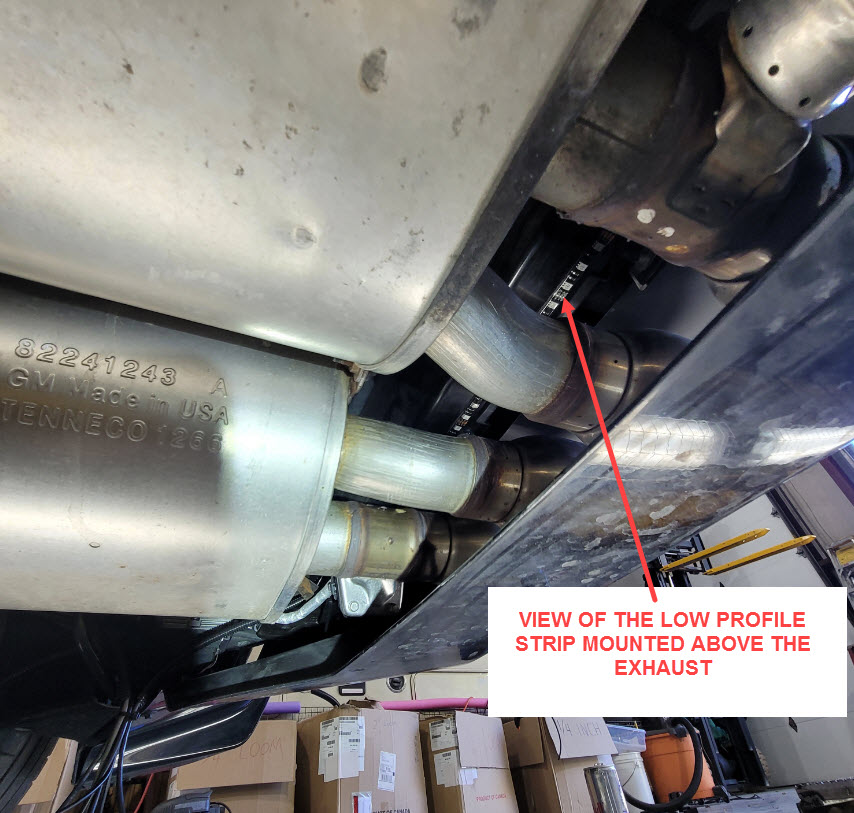
- 1 - 13.75" (21 LEDs) low profile LED strip mounted above the exhaust on the rear.
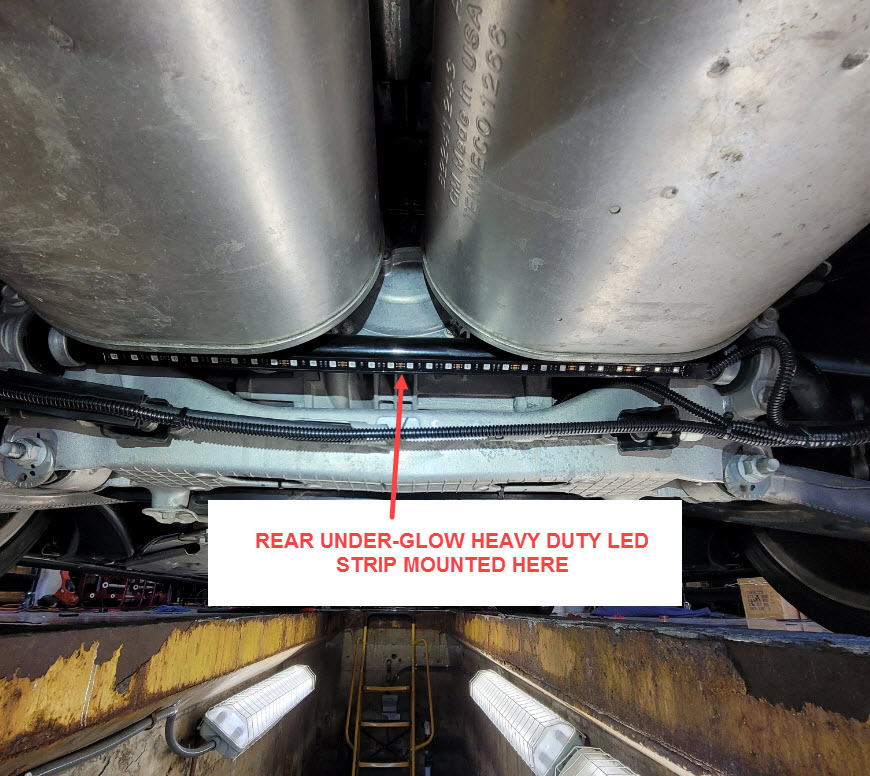
- 1 - 22" (30 LEDs) heavy duty LED strip mounted under the rear bumper.
GRILL
- 1 - 17.75" (27 LEDs) low profile LED strip mounted in the grill.
In our experience, the front bumper has to be removed to give you enough room to install this LED light strip in a location that illuminates the grill area without being able to see the LED directly. We know some guys have done it without removing the front bumper due to the time involved but it doesn't look nearly as good in our view.
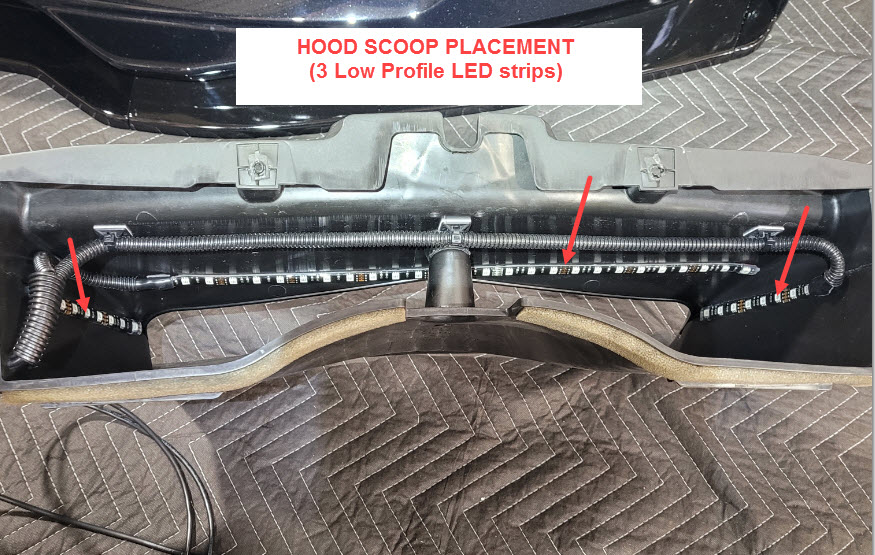
HOOD SCOOP
- 1 - 17.75" (27 LEDs) low profile LED strips mounted at the top of the hood scoop
- 2 - 6" (9 LEDs) low profile LED strips mounted on each side of the inside of the hood scoop.
Note that the hood scoop kit includes a quick disconnect M/F connector that needs to be installed between the hood scoop assembly (where the 3 LED strips are mounted) and the power lead connection coming from the car. This allows the hood scoop assembly to be removed for service without having to cut any wires. Yes, you have to remove the hood scoop to install these lights. The installation video shows three small LED strips (each with 3 LEDs) installed in the crease of the hood scoop. This kit doesn't include those LEDs but it's something you could add if you want.
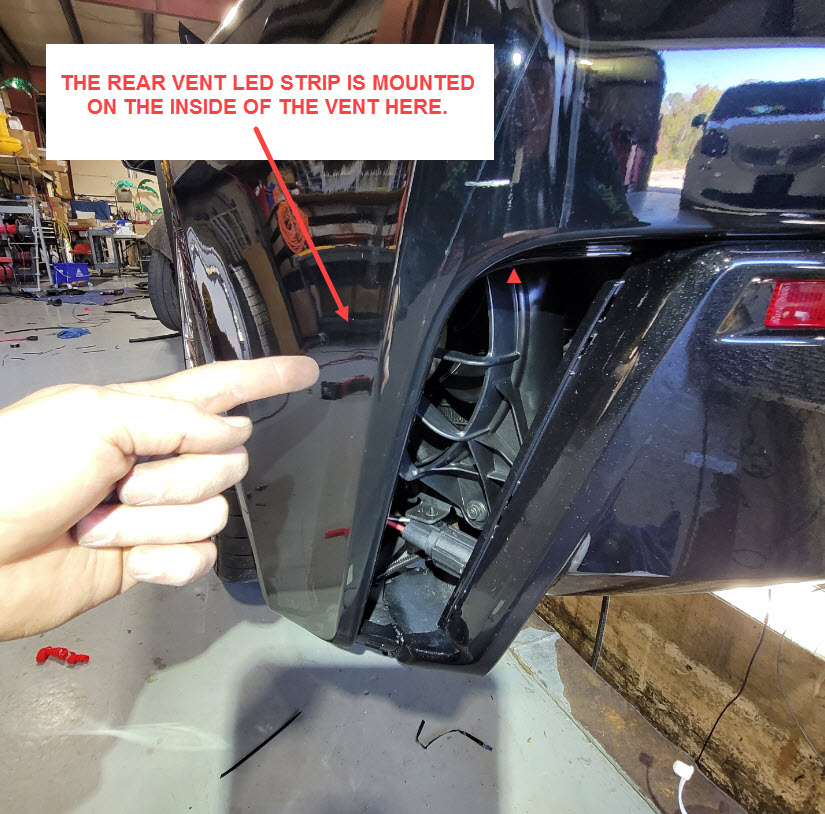
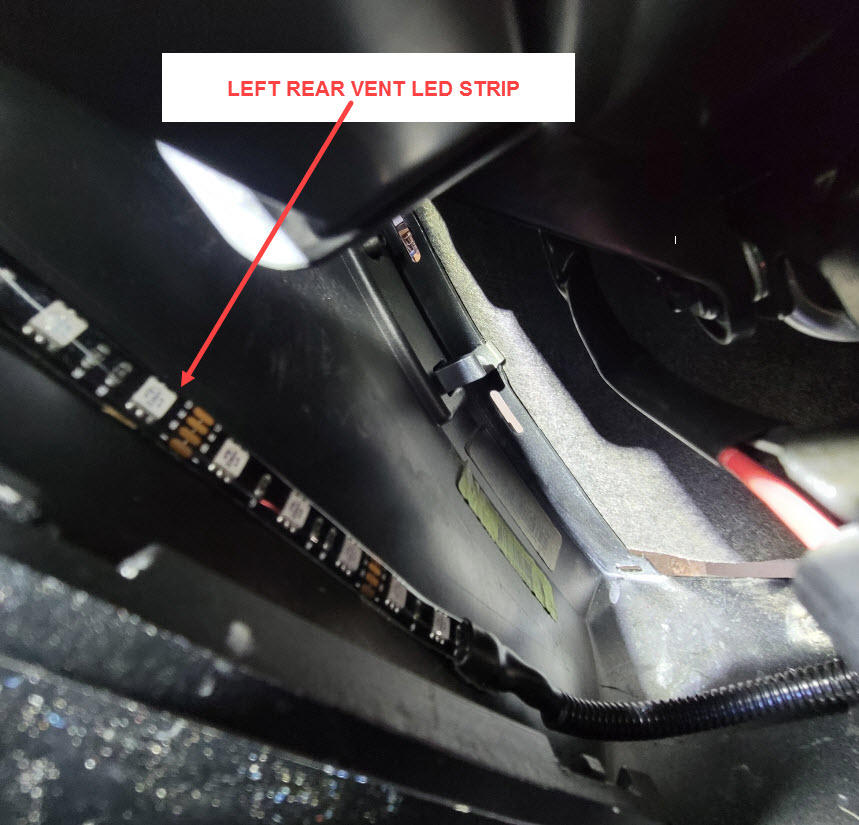
SIDE VENTS
- 2 - 13.75" (21 LEDs) low profile LED strips mounted inside the front vents
- 2 - 11.75" (18 LEDs) low profile LED strips mounted inside the rear vents
Photos of the placement of these LED strips are below. We also include an installation video. The placement doesn't have to match exactly. Adding accent lighting to your vehicle is all about achieving the look YOU want. As long as the LED strips are mounted to a location that is smooth, flat, straight and doesn't span multiple surfaces, it's ultimately up to you to decide what look you like the most. When installed properly, you shouldn't be able to see the LED strips themselves – only the glow from them.
Installation Photos

Installation Video
Using 3M Adhesion Primer
To achieve the full adhesive strength of the 3M® tape affixed to the back of each strip 3M® Adhesion Promoter (aka Primer) must be applied to the mounting surface first. This is an important step to ensure a secure bond. The 3M® Adhesion Promoter creates a chemical bond between the tape and the mounting surface such that the LED strip will stay stuck (at least until you decide you want to remove it). Using any other solvent such as rubbing alcohol or acetone is not the same thing as using 3M® Adhesion Promoter. While these solvents will help clean the surface, they do not prime the surface. There is a difference. 3M® Adhesion Promoter is included with this kit although you may elect to purchase more if you'd like.
Bench Testing
Before shipping, we tested the lights and controller in your order to make sure they work. We strongly suggest bench testing the lights and controller before installing. Doing so will also help you understand the wiring setup. For shorter LED strips (under 300 leds), you can typically use a common 9vdc battery to test your lights if you don't have a 12vdc bench testing power source available. The lights of course won't be as bright but it is an easy way to test your lights before installing. For longer LED strips, you need 12vdc as 9vdc isn't enough. You can download this PDF that explains the Bench Testing process. We also have a How to Bench Test Video.