


— Build Your Own Kit —
Trailer Under-Glow LED Light Kit | For 2 or 3 Axle Trailers
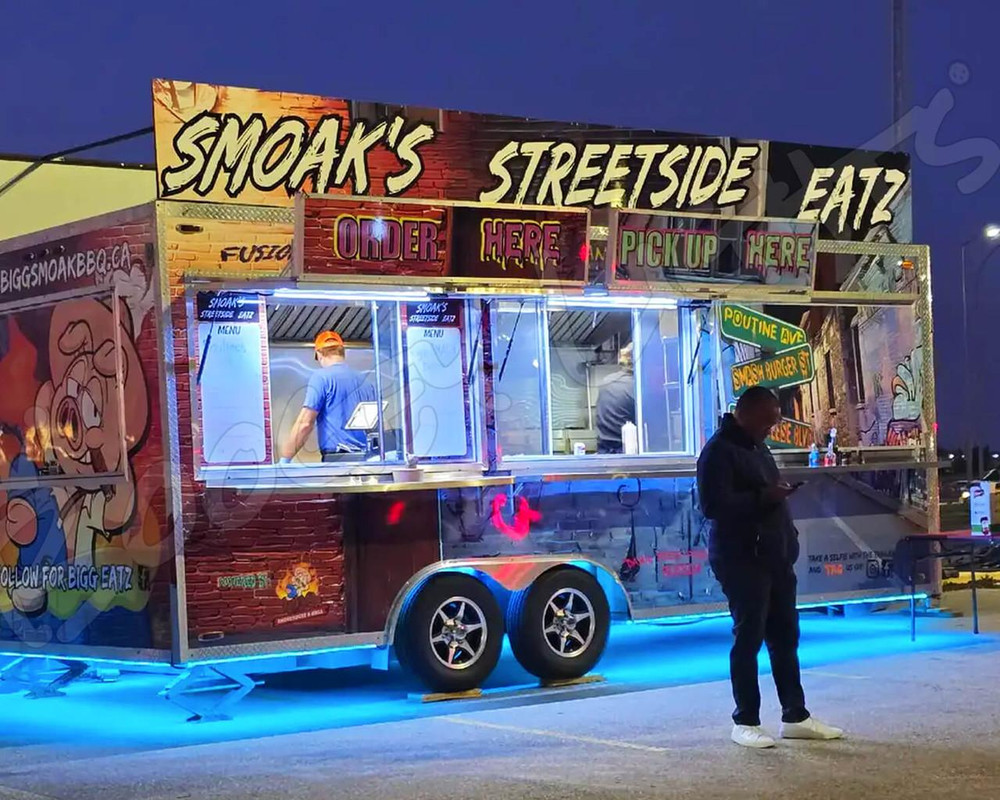
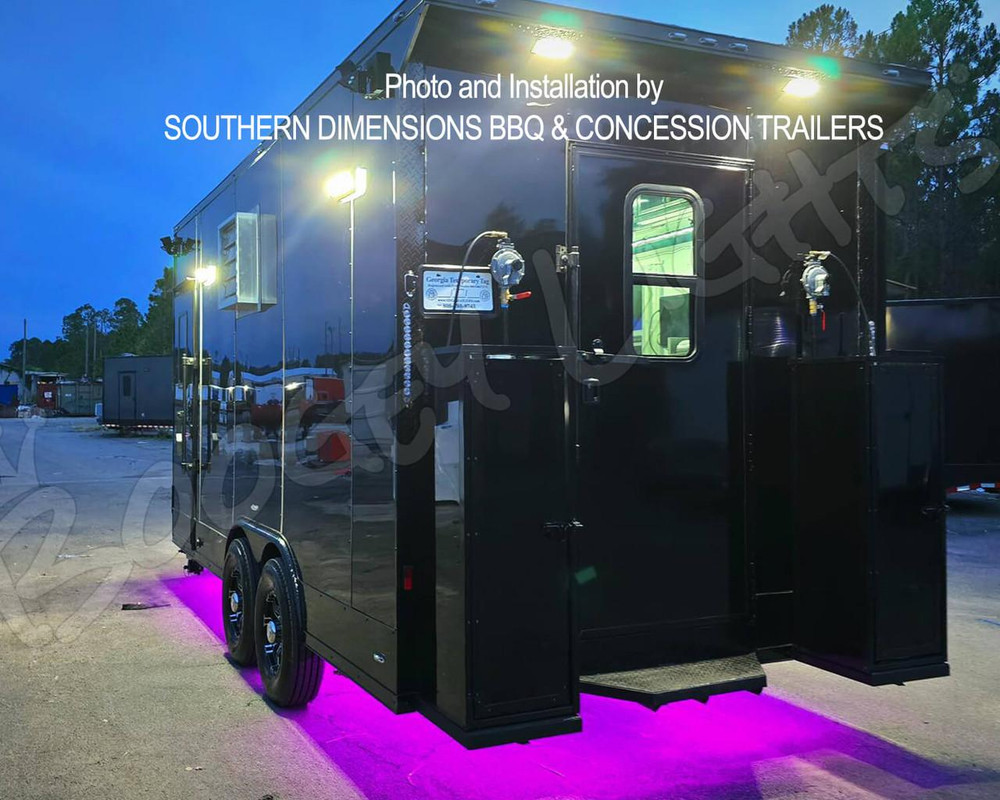
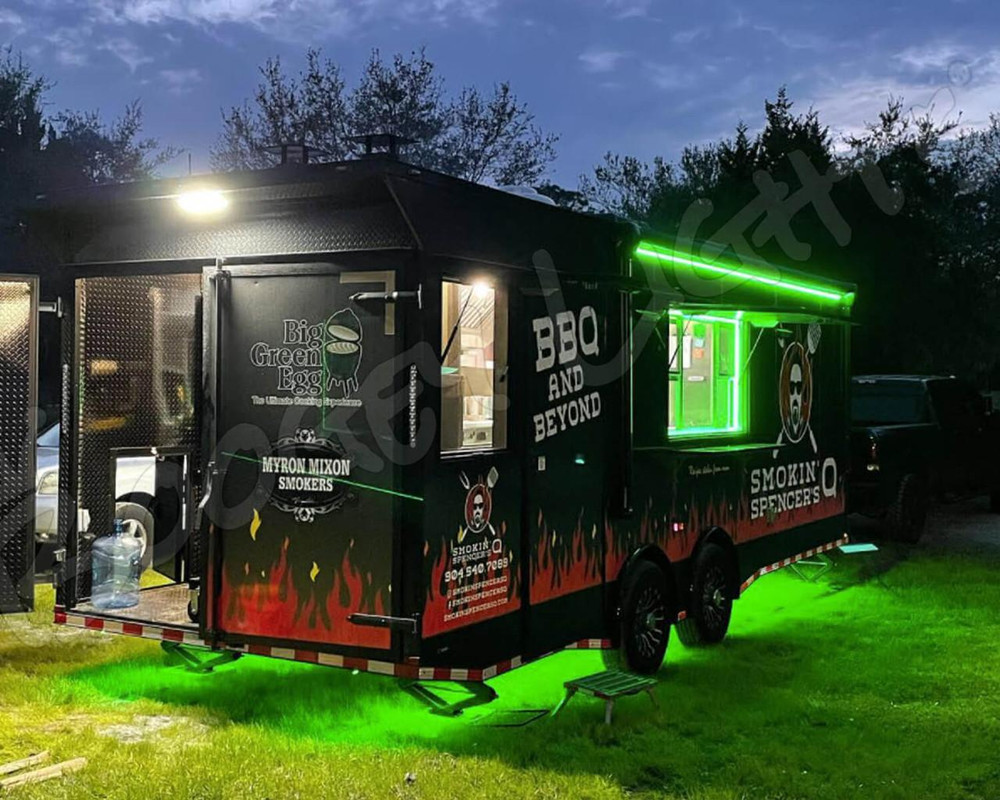
Add Under-Glow Lighting to your trailer: Cargo, Utility, Car Hauler, Food Trailer, Flat Bed. Doesn't matter. This light kit can be configured for just about any 2 or 3 axle trailer. This Boogey Lights® TRAILER UNDER-GLOW LED light kit is designed to mount to the bottom of the trailer with the LED strips facing downward toward the ground producing the under-glow effect. Offered in three MULTI-COLOR versions (RGB, RGBW and RGBA), seven different DUAL COLOR versions and eight different SINGLE COLOR versions. The default configuration is set to amber because it offers DOT compliance but you can adjust the LED color selection using the drop down product options on this page for the other color options.
We encourage you to take time to review the information we have assembled here before making your purchase decision. Be sure to scroll down, expand each text group section and read the information presented within each group. It's very thorough. Be sure to click on the INSTALL tab too. This is where you'll find downloadable INSTALL DOCUMENTATION and WIRING DIAGRAMS for this kit. These materials contain important installation considerations.
We manufacture two styles of LED strips. One is our LOW PROFILE (LP) LED Strip. The other is our HEAVY DUTY (HD) LED Strip. Which style you choose depends mostly on your operating environment. For commercial trucks/trailers, we typically recommend using our HEAVY DUTY LED (HD) strips. They're more expensive and take longer to install but they're more durable than our LOW PROFILE LED Strips. For recreational applications oir if durability isn't a factor and/or budget is an issue, then our LOW PROFILE (LP) LED strips are the easiest to install.
NOTE: We do not include a trailer wiring harness with this kit. Why? Because there are too many variations and configurations possible. Plus, you can purchase a 4 way flat, 5 way or even 7 way trailer plug/harness at any auto parts store or online. They're inexpensive and plentiful.
LED STYLE: LOW PROFILE or HEAVY DUTY?
We manufacture two styles of LED strips. One is our LOW PROFILE (LP) LED Strip. The other is our HEAVY DUTY (HD) LED Strip. Which style you choose depends mostly on your operating environment. For commercial trucks/trailers or if you're operating in harsh outdoor conditions, we typically recommend using our HEAVY DUTY LED (HD) strips. They're more expensive and take longer to install but they're more durable than our LOW PROFILE LED Strips. For recreational applications or if durability isn't a factor and/or budget is an issue, then our LOW PROFILE (LP) LED strips are the easiest to install. Specifications for each LED strip style are as follows:
Low-Profile (LP): Our Low Profile LEDs are 'low profile' for easy-to-conceal placement. IP65 rated. RGB and Single color low profile LED strip width is 3/8" (10mm). RGBW (RGB + Soft White), RGBA (RGB + Amber) width is about 1/2" (12mm). Height is 1/8" (3mm). LEDs are mounted on BLACK PCB. Lengths of the low profile LED strips vary based on the number of LEDs ordered. For this product, we offer our Low Profile LED strips one foot increments up to 16' long (no, they cannot be daisy chained together). The LED strip can be cut in the field if needed. Each Low Profile LED strip has a 36" power lead hard wired to it. The other end of the power lead is bare wire.
Heavy Duty (HD): Our Heavy Duty LED strips are IP67 rated and use the same LEDs and PCB as our low-profile LEDs however they're encased in PVC rubber for more protection. This makes them wider and taller than our low profile strips. RGB and Single color Heavy Duty LED strip width is .50" wide and .25" tall. The RGBA (RGB + Amber) Heavy Duty LED strip width is 11/16" wide (almost .75" wide) and 1/4" tall. Our Heavy Duty LED strips are available in these five fixed lengths: 12", 22", 32", 42" and 52". They cannot be cut. They cannot be produced in longer lengths. Only these five lengths. LEDs are mounted on Black PCB. Each Heavy Duty LED strip has a 36" power lead hard wired to it. The other end of the power lead is bare wire.
PRODUCT FITMENT
This product can be configured to fit just about any 2 or 3 axle trailer. For our LOW PROFILE style led strips, the kit allows for a total of 14 LED segments. For our HEAVY DUTY style led strips, there are up to 26 LED segments (see layout diagrams). See diagrams below. You'll need to measure the mounting surface you have available and then based on those measurements, order the length of LED strips needed to cover that area. Note that you don't have to use all LED segments. The point is that the length, number of, how and where you mount these LED strips is totally up to you. The LED strips don't care where you mount them as long as you make sure to mount them to a straight, flat, rigid, flat surface. Details of the mounting restrictions can be found in the install docs provided on this product page. We suggest reviewing them before purchasing. In some cases you may need to build out the mounting surface using aluminum, wood or similar structure. It all depends on the construction of your trailer and where you are mounting the LED strips.
For our LOW PROFILE LED STRIPS, The maximum length of a single LED strip is 16'. For HEAVY DUTY, the maximum length is 52 inches. Sorry -- they cannot be built longer (details as to why can be found further down on this product page). For longer distances, use multiple lengths which is one of the reasons why this kit offers up to 14 (or 26) LED strips total. Each LED strip comes with a 3' power lead permanently attached to one end of the LED strip. The other end is bare; no connector. It is intended to be hard wired into the wiring harness. We include additional feeder cable with the kit for use in connecting the LED strips and running the wiring harness up to the tongue of the trailer.
For multi-color RGB/RGBx configurations, you'll need an LED Controller. The LED controller is intended to be mounted in the tow vehicle. It should not be mounted on the trailer itself unless the mounting location is protected from the elements; mainly water. The LED controller cannot be submerged. If you are purchasing the multi-color (RGB/RGBx) version of this Under-Glow light kit with our Landing Strip light kit - or, you already have a Boogey Lights® LED controller - you can order the RGB/RGBx version of this kit without a controller.


HOW TO ORDER
- Look at your trailer and measure the amount of room you have to mount the LED strips to the bottom of the trailer (more info on what you need to know in the section below).
- Determine which LED strip style you want to purchase: Low Profile (LP) or Heavy Duty (HD). You'll notice that when you make this selection from the product option drop down, the number of available LED strips you can purchase will change. For our LOW PROFILE LED strips, you can have a maximum of 14 Low Profile LED strips. For HEAVY DUTY LED strips, you can have a maximum of 26 Heavy Duty LED strips. You do not have to use all available segments though.
Once you know which LED strip style you want, refer to the diagram for the layout segmenetss based on number of axles. You can download the PDF diagram for your trailer configuration below. Here are the 4 possible layout diagrams:
Low Profile - 2 Axle
Low Profile - 3 Axle
Heavy Duty - 2 Axle
Heavy Duty - 3 Axle - We suggest printing out the layout diagram for your trailer and then writing down the measurements for each LED numbered segment. Those measurements will then be transferred to the product page when placing the order.
- Using the measurements you took, select the length of the LED strip you want for each position as indicated on the diagram. For example, if you're ordering the Low Profile (LP) LED strip, you have up to 14 different strips (LP Length 1 -> LP Length 14) you can order of varying lengths listed in each drop down. If you don't need all 14 strips, leave the ones you don't need set to 'NONE'. The same holds true for the HEAVY DUTY (HD) LED strips. Your trailer may not need all 26 HD segments to get the coverage you need. Only use the segments you need, leave the others set to 'NONE'.
- If you want to add Wheel Well lighting, set that option to YES. You'll notice that when you do, additional Wheel Well lengths will appear. If your trailer is a 2 axle trailer, there will be FOUR possible length options. If your trailer is a 3 axle trailer, there will be SIX possible length options. Note that regardless of LED strip style, ALL Wheel Well LED strips use our Heavy Duty style.
- Select the LED COLOR. Amber is the default color setting since that's the most popular however you'll notice we offer a wide variety of additional colors. If you select either the RGB or RGBA LED colors, you'll need an LED controller which is why you'll be asked to make a selection of either a Single Zone or Dual Zone LED controller. More details about that are here on this product page.
Once you've made your selection, click ADD TO CART and check out. As an option, we can take your order over the phone too (800.847.1359 M-F, 9-6 eastern). Just make sure you have your measurements ready.
TAKING MEASUREMENTS | What You Need to Know
It's important when measuring your trailer to examine the mounting area you have available. When doing so, make sure the area where you will be attaching the LED strip is clean, straight, smooth and rigid. The LED strip MUST be mounted flat against a single continuous, rigid mounting surface, in a straight line; it cannot bend around a radius or corners. Plus, the entire strip needs to be stuck to the mounting surface and not span across mounting surfaces. If you do, the strip will almost certainly fail in the spot that isn't affixed firmly to the mounting surface or, the point at which is spans across the two mounting surfaces. If you don't have a smooth, flat, rigid, contiguous mounting surface we recommend riveting or screwing aluminum, plastic L channel or similar to the trailer's cross member support beams and then mount the LED strip to that surface. The point is to carefully examine the mounting locations for your trailer when you're taking these measurements before placing your order.
Once you have identified the mounting locations and have your measurements, you're ready to place your order using this product page. You'll notice each LED strip segment on this product page has a drop down box listing the available lengths for every LOW PROFILE LED STRIP or HEAVY DUTY LED STRIP depending on the LED Style you've selected. For those LED segments that don't apply to your trailer, simply leave them set to 'none'. For each LED segment, select the corresponding LED length from the drop down.
PRODUCT OPTIONS
Some are required. Some are optional. Refer to the following for details on each of the product options offered.
LED STYLE: Select from LOW PROFILE (LP) or HEAVY DUTY (HD). See detailed explaination above for the differences between these two LED styles and how it might impact your lighting project.
NUMBER OF AXLES: Select from 2 or 3. This selection only impacts the number of Wheel Well lights offered.
LED COLOR OPTIONS: This option tells us what color format you want for your light kit. There are three multi-color, seven dual color options and eight single color options. We have a detailed discussion about these LED color options further down on this product page. Be sure to read it. It's important. If you select any of the three multi-color options, you'll be presented with the option to make an LED CONTROLLER selection (essential to operate RGBx LEDs). If you select any of the dual color or single color options, you'll be presented with a switching option.
CONTROLLER CONFIGURATION: The controller configuration will vary based on your LED color selection. More information about these options are further down on this product page. Be sure to review them.
LED STRIP LENGTHS: Depending on the LED Strip Style you select, there will be either 14 or 26 possible LED strip lengths you can order on this kit. Using the drop down box select the length of the LED strip you want for each LED strip. For any unused LED lengths, leave set to 'NONE'.
MULTI COLOR CONTROL OPTIONS
RGB, RGBA or RGBW MULTI-COLOR OPTION: The multi-color RGB LED version provides over 16 million color combinations that you control and includes its own on/off wireless switch. The multi-color RGB, RGBA and RGBW kits include our GEN2 Heavy Duty combo Bluetooth + RF controller so you can control the lights with your Bluetooth enabled smartphone or the included wireless RF G2 M7 remote control. The CONTROLLERS navigation tab on this product page has additional details. With any of the Boogey Lights® BLUETOOTH controllers you can control your lights with your Bluetooth enabled Android or IOS smartphone. These high-tech controllers are capable of displaying 16 million different color combinations. In addition, lighting effects on the Smartphone controller are significantly more controllable in terms of speed and intensity. Each color and lighting effect is controlled by "sliders" or a color square on your smartphone screen so you can adjust the speed and intensity to get the lighting exactly the way you want it. Our controllers operate on 12vdc. Also, all of our Bluetooth Combo controllers include an RF remote control allowing for quick on/off of the controller. You can operate this controller with the included RF wireless remote OR you can use your Bluetooth enabled smartphone and our free smartphone APP (Android and IOS). Boogey Lights® RF Controllers will display seven colors (steady on + four lighting effects): RED, GREEN, BLUE, WHITE, LIGHT BLUE, BOOGEY LIGHTS GREEN (LIME GREEN/YELLOW), HOT PINK/PURPLE. The lighting effects options for our RF Controller include: DIMMING, BLENDING, BREATHING, STROBING. In the Blending, Breathing and Strobing modes these features can be set to remain on a single color or to cycle through each of the 7 colors. You can also adjust the speed at which this happens. The RF remote control offers SEVEN levels lighting effects (e.g. 7 levels of dimming). For the DUAL ZONE Heavy Duty LED controller, these functions work independently per zone OR both zones together.
Quick Switch: The Quick Switch feature comes standard on our HEAVY DUTY SINGLE ZONE and HD DUAL ZONE LED Controllers (all RGBx controllers). Whatever color LED you have connected to the WHITE output wire on the controller is the color that will display when the Quick Switch is triggered with 12vdc +. The most common use for this configuration is with commercial vehicles who want to be able to instantly turn off whatever color they're running and turn on a DOT compliant AMBER which is on our RGBA LED strips. For these installations, the yellow trigger wire is connected to a toggle switch or other wireless switch that activates the AMBER leds. When the Quick Switch trigger wire is not energized, the LED controller operates the RGBxx diodes normally. NOTE: This Quick Switch feature eliminates the need to use a relay for RGBA LEDs.
Single Zone or Dual Zone: If ordering RGB or RGBA, you have your choice of a SINGLE ZONE or DUAL ZONE GEN2 Heavy Duty LED Controller. As the name suggests, a SINGLE ZONE controller has one lighting zone. All LEDs wired to that zone display the same color and features. For DUAL ZONE, there are two distinct lighting zones. All LEDs wired to Zone 1 operate the same. All LEDs wired to Zone 2 operate the same. Each zone can be used independently or together.
SINGLE COLOR or DUAL COLOR CONTROL OPTIONS
If you're ordering any of the Single Color or Dual-Color LED color options, you'll be presented with the option to add our Dual Zone Controller to the order. This is an option. The default is 'none'. If selecting the Dual Zone Controller with any of the single color or dual-color options, you'll receive our Strobing Dual Zone single color controller. Designed primarily for commercial, working truck applications this heavy duty LED controller is ideal for situations where you need to control (on/off), strob or flash large numbers of single color LEDs. A typical scenario is with wide load truck haulers, wreckers and tow trucks. A typical scenario is with wide load truck haulers, wreckers and tow trucks. The unique dual zone capability allows the lights to be segregated into two distinct lighting zones if that's what you want to do.
For example zone one might be red LEDs and zone two amber LEDs. Another option could be to assign the two zones into LEDs mounted on different parts of the trailer (underglow = blue, landing strip lighting = amber). The options are endless. Each zone can be operated independently or together. In addition to ON/OFF control, STROBING and FLASHING, there's a STEADY-ON mode that offers dimming. All of these features are operated using the included wireless RF handheld remote.
Each zone will support up to 1500 tri-chip 5050 LEDs (20Amps) which means a total of 3000 tri-chip LEDs on a single LED controller. The operating modes include strobing, 3 burst flash and solid on. The speed can be adjusted and there's a brightness setting too. All of these features are operated using the included wireless RF hand held remote. This controller includes our Quick-Switch feature which when paired with a simple on/off switch will allow the controller to be turned on/off via a hard wired switch (mounted on the dash for example) as well.
The CONTROLLERS navigation tab on this product page has additional details on this controller option.
SINGLE COLOR VS MULTI-COLOR (RGB, RGBx)
Single colors are going to be brighter than RGB (multi-color) LEDs. The reason is that in an RGB LED there are three diodes: red, green and blue. The LED controller mixes those three colors to create other colors. For example, equal amounts of red + green + blue = white. In a single color LED, all three diodes are the same color. So in a single color white LED, there are three white LEDs which is much brighter than an RGB led mixed to show white. If you're looking for the absolute brightest color for your trailer, go with single color. If however you want to be able to change the colors from time to time, go with RGB. Just be aware that the RGB version of isn't as bright as the single color version. The single color version is available in your choice of one of seven super-bright colors: Amber, Orange, Red, Green, Blue, White or Pink.
RGB / Multi-Color: For RGB led lighting an LED Controller is needed to operate the lights. The controller is what operates the lights and mixes the colors. In addition to providing a wireless on/off capability, the LED controllers offered allow you to control your lights with your Bluetooth 4.0 enabled smart phone and our free smart phone APP (Android and IOS) OR the included RF wireless remote. With the included RF remote you can change between 7 colors (white, red, blue, green, light blue, lime green, pink) and functions of on/off, blending, strobing, breathing, flashing, fading and dimming. You can also use your Bluetooth enabled smart phone to create that custom look with over 16 million different color combinations plus three pre-sets along with color rotation programming with either 2 or 3 color sets. There is significantly more detail on the BLUETOOTH APP navigation tab on this product page. Since our Dual Color products use the RGB chip on the RGBA led strip, it is considered a multi-color product even though you don't need an LED controller to operate.
NOTE: If purchasing RGB, be aware that an RGB LED cannot create the color orange. It can come close but not exact. Why? As mentioned previously, RGB leds have three color DIODES: RED, GREEN and BLUE. It's the mixing of these three colors together that create other colors. The color ORANGE is created by mixing RED + YELLOW. The color YELLOW is created by mixing RED + GREEN. With an RGB LED, there is only one RED diode so it can only be used once. To get something that looks more like orange to the human eye using RGB LEDs you need to mix equal amounts of RED + GREEN (actually just a bit less green since the human eye is more sensitive to green wavelengths). This will give you the color YELLOW. Then, increase the intensity of the RED just a little (or, pull back the green). This will essentially add a little red to the yellow to effectively mix a color that has an orange tint which is closer to AMBER. It's not perfect but it's as close as you can get to the color orange using RGB led lights. If a true orange color is important to you, purchase the RGBA LEDs instead. Mixing Red and Amber produces a vibrant orange.
SINGLE ZONE OR DUAL ZONE?
For the three multi-color LED options, this kit offers both SINGLE ZONE and DUAL ZONE controller options. As the names suggest, a Single Zone controller has just one single lighting zone. All LEDs wired to the controller are on one zone. Whatever color or feature set you apply will be what you get on all leds. Pretty simple. With our Dual Zone controller, you can set up and operate two distinct lighting zones which can be operated and controlled individually or together. On a Dual Zone controller each lighting zone is capable of supporting up to 1500 LEDs for a total of 3000 LEDs. It will work with your Android® or iOS® Smart phone. It will also work with the included M7 Style RF wireless remote. Details on features are below.
GEN2 LED CONTROLLERS
Bluetooth + RF Combo Wireless Control
The LED Controllers offered in this kit are our GEN2 Single Zone and Dual Zone Heavy Duty Bluetooth COMBO LED Controllers. COMBO means they can be operated using either the included M7 RF wireless hand held remote OR your Bluetooth enable smart phone (and our free APP). Both will work. The RGB version is capable of displaying 16 million different color combinations. The GEN2 RGBx version can display even more color combinations depending on the type of LED strips connected to them. In addition, lighting effects on the Bluetooth controller are significantly more controllable in terms of speed and intensity. Each color and lighting effect is controlled by "sliders" or a color square on your smart phone screen so you can adjust the speed and intensity to get the lighting the way you want it.
Key Features & Capabilities
- Our GEN2 LED Controllers are based on the Bluetooth 5 chip set family which provide fast response times and the best possible RF/Bluetooth transmission distance.
- The SUPER and HEAVY DUTY GEN2 Controller can support Single Color, RGB, RGBx and RGBxx LED strips with both RF and Bluetooth control.
- The HEAVY DUTY controller versions include two antennas: a screw-on 2" stubby antenna and an extended magnetic mount antenna with 15' of wire for optimal reception on any vehicle.
- Use the included RF wireless remote to quickly turn on/off/dim your Boogey Lights. You can also select up to 7 different preset colors using the RF remote as well as access 7 different lighting features.
- Use your smart phone to operate your Boogey Lights®: On, Off, Dimming, Color Selection, Brightness, Speed, Color Programming, Timers
- Adjust the color sliders or color square to select the color you want.
- Access additional lighting features (e.g. strobing, flashing, breathing, morphing) modes using the 7 Function Keys.
- Save your favorite lighting configuration using Pre-Sets
- Countdown Timer and a 24 hour On/Off Timer function
- Quick-Switch feature for use with RGBx LED strips.
- Password protection to stop others from connecting to your LED controller.
- Programmable Color Rotation mode offers the ability to program the controller to display two or three colors of your choice and then rotate those colors in sequence.
- Assign a 'nick name' to your controller so you can easily find it when scanning.
- Set the APP to auto-connect to your LED controller every time you launch the APP on your phone
- DOWNLOAD the GEN2 LED Controller Operating Manual & Wiring Diagrams
- DOWNLOAD the GEN2 Bluetooth Operating Manual
- DOWNLOAD the GEN2 M7 RF Wireless Remote Operating Information
- VIEW the GEN2 LED Controller Series Product Page
- VIEW the GEN2 BLUETOOTH APP Information Page
COLOR OPTIONS AND CONSIDERATIONS
This light kit is offered in eight single color options, seven dual color options and in three multi-color configurations: RGB, RGBW (RGB + warm white) and RGBA (RGB + amber).
For the single color and dual color options you can select a simple on/off switch or a wireless controller.
For the multi-color RGB options, you have the same capabilities as the single color however the feature set is significantly expanded since you also have the ability to change/adjust/tweak the colors you want to display. RGB stands for Red Green Blue. It's the mixing of these three primary colors together that will produce up to 16 million different color options. To mix and produce these colors however you need an LED controller which is why when you select any of the RGB or RGBx color options you'll also be prompted to make a LED Controller selection. The Boogey Lights® LED controllers offered are both RF wireless + Bluetooth enabled controllers. With the included RF wireless remote you can change between 7 pre-set colors (Red, Green, Blue, White 6000K, Light Blue, Lime Green/Yellow, Hot Pink/Purple) and functions of on/off, blending, strobing, breathing, flashing, fading and dimming. You can also use your Bluetooth enabled smart phone to create a custom look. The Bluetooth APP allows you to program the RGB diodes of any of our RGB, RGBW and RGBA strips with over 16 million different color combinations plus three pre-sets. Also, the Bluetooth APP offers 2 and 3 color rotation programming along with two timer features. Click the BLUETOOTH APP navigation tab on this product page for significantly more information on both the Bluetooth capabilities and APP functionality (including a video showing how the Bluetooth APP works)
RGBW: On the RGBW led strip, in addition to RGB, you get one extra diode which is Warm White. That warm white diode has a Kelvin temperature of 2400 which means it has a yellowish look giving it a warmer, softer, candle like look (see photo below). That fourth diode on the RGBW led strip can be wired directly to our GEN2 LED Controller which supports RGBx LEDs. As an option, you could also wire that fourth diode to a completely separate on/off switch. Your choice. You could also use the Quick-Switch feature with this fourth diode too.
RGBA: On the RGBA led strip, in addition to RGB, you get one extra diode which is AMBER. That fourth diode on the RGBA led strip can be wired directly to our GEN2 LED Controller which supports RGBx LEDs. As an option, you could also wire that fourth diode to a completely separate on/off switch. Your choice. You could also use the Quick-Switch feature with this fourth diode too.
PRE-BUILT LED CONTROL CENTER OPTION
For light systems that include an LED controller, we offer the option of pre-building the LED Control Center with your order. These LED Control Centers make for a professional looking installation. Also makes the installation a little easier for DIYers since the controller wiring is neatly organized and easily identifiable. It's also a huge time saver. Can easily save two hours (or more) when doing a typical installation.
The pre-built Control Center has the LED Controller and power connections mounted to a PVC board. The power connections make it simple to connect your battery power as well as the LED strip power leads via a terminal blocks mounted to the board. Simply strip the end of the battery lead cable and LED strip power leads, push them into the terminal block and tighten the screw. This design also makes trouble shooting easier. The board has four 2" stand offs with plexi-glass mounted on top which keeps the components protected. You can read more about this option on the LED CONTROL CENTER product page. We include some photos below. The LED Control Center option is only available when an LED Controller is ordered.
POWERING YOUR UNDER-GLOW LIGHT SYSTEM
This Under-Glow light kit will work on a wide variety of trailers: from cargo trailers to food trailers to car haulers to utility trailers to horse trailers; only to name a few. The lights don't care what type of trailer they're attached to. As long as you have 12vdc power available (or 120vac to 12vdc power converter), they'll work. This kit provides the LED light strips and related command/control functionality you select. We do NOT however include a trailer / tow vehicle wiring harness with this kit. Why? Because there are too many variations and configurations possible. For example, if you're mounting this light kit to a trailer that has its own on-board power source – such as a generator common with food trailers – then the power connection to the LEDs can be done within the trailer itself. It's straight forward. However, for the vast majority of trailer under-glow installations the only 12vdc power available (at least with sufficient amperage to support a trailer under-glow light kit) will need to come from the tow vehicle itself. To do so will require a wiring harness of some type from the tow vehicle to the trailer. We assume the installer of this light kit has the knowledge to do this. Depending on the light configuration, a simple 4 or 5 way trailer male/female plug/harness is all you need although we'll typically install the PHILLIPS STA-DRY 7 WAY plug system regardless (see photos below). These plugs and related cables can be purchased online or at any trailer accessory shop. If you purchased a multi-color under-glow kit with a wireless LED controller, we strongly suggest mounting the LED controller inside the trailer itself and pulling 12vdc power from the tow vehicle to that controller. Just make sure you size your cabling appropriately for the amperage draw. Unless you absolutely know what you're doing (EG. have done the amperage calculations, have sized the wiring accordingly and are aware of the potential LCM error issues of the tow vehicle) DO NOT use the tow vehicle's existing truck to trailer wiring harness to power and/or control this light system. Run a separate cable from the tow vehicle to the trailer.
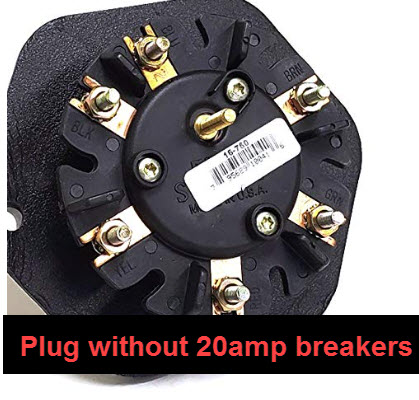
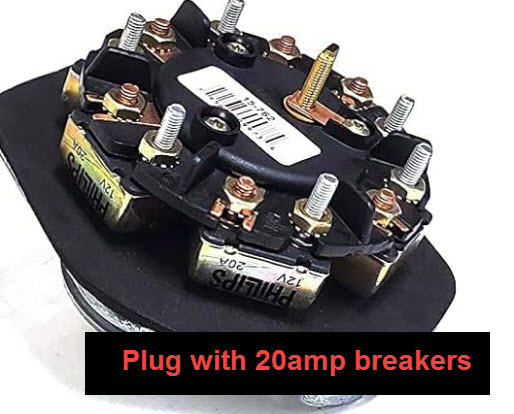
If you're going to be powering your trailer Under-Glow light system using a tow vehicle, we like to use the Phillips STA-DRY Nose Box with 7 Way Plug system for the harness. We like it because it's easy to install on both the trailer and tow vehicle, it's easy to service and widely available just about anywhere. Plus, it's heavy duty. The base and plug are separate parts. The base is available in both 2.5" and 3.5" (16-775) depths. The plug is available with built in 20amp breakers (15-762) (per pin) and without (15-760). So lots of flexibility. While the standard Sta-Dry plug is 7 way, nothing says you have to use all 7 pins. There have been many times when we only used 2 of those pins (12vdc + and 12vdc-).

WHAT IS RGB + AMBER (RGBA)?
RGBA is a LED strip format Boogey Lights® developed. It is available in both our Low Profile and Heavy Duty LED strip formats. The RGBA led strip includes our core RGB tri-chip technology using a 5050 RGB LED with the addition of a fourth 2835 diode that is AMBER. Designed primarily for motor vehicle applications, that fourth AMBER diode can be wired to a separate switch on the dash (or tied into a relay to work with existing running lights) that allows you to quickly and easily turn on just the AMBER leds. Then, for those who want the flexibility to be able to display up to 16 million color combinations using the RGB tri-chip, they can do that too. RGB + A provides the best of both worlds. Single color amber plus RGB tri-chip multi-color. The product photo carousel of this product page includes a close-up view of the LED strip design and wiring diagram. Note that due to the addition of that fourth diode, the RGBA strips are a little wider than our standard tri-chip RGB and single color LED strips. Also, the power lead wires use five conductor vs four. For additional information including product specs, click the SPECS navigation tab on this product page.
WHAT IS RGB + WHITE (RGBW)?
On the RGBW led strip, in addition to RGB, you get one extra diode which is Warm White. That warm white diode has a Kelvin temperature of 2400 which means it has a yellowish look giving it a warmer, softer, candle like look (see photo below). That fourth diode on the RGBW led strip can be wired directly to our GEN2 LED Controller which supports RGBx LEDs. As an option, you could also wire that fourth diode to a completely separate on/off switch. Your choice. You could also use the Quick-Switch feature with this fourth diode too.
WHAT IS DUAL COLOR?
The Dual Color LED configuration uses our RGBA LED strip but instead of pairing that LED strip with an RGB LED controller (to mix up to 16 million different color combinations), we hard wire a combination of one, two or all three of the RGB diodes (red, green or blue) along with the AMBER diode to two on/off switches. One switch operates the primary color diode(s). The other switch operates the amber diode. There are a total of seven Dual Color configuration options: RED+AMBER, GREEN+AMBER, BLUE+AMBER, MAGENTA+AMBER, YELLOW+AMBER, CYAN+AMBER, WHITE+AMBER. With a Dual Color configuration you don't need an LED Controller. Instead, you only need two switches (and relays); one to control each color. The primary color is chosen from the available dual color drop down list. The secondary color is always amber. Note: The Dual Color options includes one ON-OFF-ON 3 way toggle switch and two, 30 amp relays.
LED STRIP LENGTH LIMITATIONS
For our LOW PROFILE LED strip, the maximum length of a single LED strip is 16' (300 LEDs). They cannot be daisy chained together as you run a very real risk of fire and/or damaging the LED strips permanently. The laws of electricity won't allow it to go longer with today's commercially available technology using 12vdc power and super bright 5050 led chips. If your application requires longer than 16' (e.g. 20'), you have two options. One is to simply center the 16' LED strip in that 20' space. Boogey Lights are already very bright so for most folks, having enough light is never a concern. This is what most people do. That said, some prefer to have full coverage of the entire 20' area. In that case it's possible to cover that entire 20' span using two LED strips. In the case of a 20' span you can order two - 10' LED strips. Then, the two LED strips (totaling 20') are installed such that the two LED strips butt together; end to end, which gives the illusion of a single 20' long LED strip.
OTHER ITEMS YOU MAY NEED
No two installation scenarios are the same. Not everyone shares the same installation quality goals. Some folks are OK with twisting wires together, others want to solder them. Some folks are OK with running wires where they may be seen or unprotected to save money/time, others want a tidy, clean install without any wires showing. Some folks are OK with mounting their LED strips to whatever surface they can find, others want to take the time necessary to build out appropriate mounting surfaces to provide the best lighting effect on their vehicle. The point is it's not possible to provide all the materials necessary for all installation scenarios and quality goals. Our light kits provide the essential components needed for a high-quality, functioning lighting system. Installation of our light kit to your specific vehicle may however require additional items to make it look and fit the way you want. This is particularly the case with electrical wiring and mounting of LED strips. Before proceeding with your installation we suggest you consider THESE OTHER ITEMS.
DOT COMPLIANCE
The AMBER and RED single color LED strips are DOT COMPLAINT. They conform to applicable provisions of the Federal Motor Vehicle Safety Standard 108 requirements. Click the button below for more information on this issue.
Installation Information
IMPORTANT. You must have an understanding of 12vdc power. An essential skill with installation of any Boogey Lights LED products is knowing how to correctly wire the product to a 12vdc circuit. This includes understanding the importance of having a properly sized fuse at the power source, polarity, how to properly seal an electrical connection, using properly sized wire gauge for the load, measuring voltage and measuring the additional amperage draw you're adding. If you are uncertain or unfamiliar with any of these concepts, we urge you to ask someone who has the knowledge to assist you. Electricity is unforgiving.
INSTALL DOCUMENTATION
All of our installation documentation for this product (and all others) is available to download directly from our website (Click to download BYOK TRAILER UNDER-GLOW INSTALL DOCS). We encourage you to download this information and review before placing your order. That way you'll have a solid understanding of what is required (and no surprises). Here are some of the most important installation documents for this product. You will find ALL available documentation in our INSTALLATION RESOURCES SECTION.
LED STRIP MOUNTING
Where you mount the LED strips will depend on the number of LED strips ordered and the measurements you took before placing your order. Whether you ordered LOW PROFILE LED STRIPS or HEAVY DUTY LED STRIPS the mounting will be pretty much the same. If you don't have a smooth flat mounting surface where you want to mount the LED strips, you'll need to build out that mounting surface. For most trailer under-glow installations, we have to build out the mounting surface. In these situations we recommend using 1.5" x 1/8" aluminum or plastic flat stock (Mounting Supplies). It can usually be screwed, riveted or wire-tied to the bottom of the trailer and then the LED strips mounted to the smooth surface. In some situations you might need to use aluminum angle (Angle) if you're spanning open areas for rigidity. We have a video on our website showing this process. Here's the link: Creating a Smooth Mounting Surface.
With regard to placement, one option is to mount the LED strips 4" to 12" in from each side of your trailer. This placement will usually provide the best "glow" effect without seeing the LEDs when lit. Of course, this is a matter of personal preference and depends on available mounting locations. If in doubt, we recommend dry mounting an led strip in the location you're thinking and then, light that strip up using any 12vdc power source. See how the glow looks from a distance. There aren't any right or wrong answers here. All personal preference. Adjust as needed. This photo is from an under-glow installation on a semi-trailer but the concept is the same for any trailer that has support beams as shown in this photo.

12VDC POWER CONSIDERATIONS
Be mindful of the amount of amperage you're drawing through your lighting circuit and to not exceed the circuit component limitations. The amount of power (amps) you're pulling through the circuit will vary based on a combination of three factors: 1) The number of LEDs in the circuit, 2) the amount of copper wire in the circuit and 3) the input voltage to the circuit. The amperage ratings for our switches, controllers and LEDs assume 12.5 vdc input or less. If you're wiring your trailer lights to a tow vehicle that has a charging mechanism (e.g. alternator), the input voltage will likely increase when the engine is on; particularly as RPMs increase. If you're not using your Boogey Lights® while driving, you don't have to worry about this. If however you intend on using your Boogey Lights® will pulling your trailer (or with the tow vehicle's engine is running even though the trailer is stationary), you need to pay close attention to your amperage draw. Why? Because it's not unusual for an alternator to charge the battery at a rate of 13.5 to 14.5 vdc depending upon the vehicle. Increasing the input voltage to the LED Controller/LEDs will also increase the amperage draw of those LEDs because they'll burn brighter. Our LEDs will handle as much as 18vdc -- but in doing so, they'll get significantly brighter and pull more amps. For example, we've seen circuits that draw 17 amps when the engine is off and the input voltage is 12.5vdc but jump up to drawing 24 amps when the engine is on and RPMs increased. This is because the input voltage jumps to 14vdc when the engine is running.
For any lighting installation where you are powering your Boogey Lights® with the starter batteries of a motor vehicle that has an alternator (every motor vehicle does), you need to pay attention to the voltage and amperage draw when the vehicle is running. Generally speaking, you don't have to be concerned about this issue if you're not within 60% or more of the collective max amperage rating for all the components in your circuit. If however you're at or above that 60% rated load, we strongly suggest measuring actual amperage drawn for your installation to make sure it's fused and wired appropriately given the highest possible amperage draw when the alternator is charging the system at peak RPMs. If you have an over-voltage situation due to the alternator, there are a couple of solutions:
1) install a voltage regulator that will limit (reduce) the input voltage going to the lights to 12.5 vdc regardless of the alternator output voltage.
2) install a second fuse/relay circuit and balance the LED load between those two circuits. Doing so will effectively cut the load by 50% per circuit.
If you are unclear or don't understand the information in this section we strongly suggest asking someone who has experience with motor vehicle 12vdc power to assist you with designing your wiring circuit as well as assisting with the installation on-site. It's not something we can do for you remotely.
TOW VEHICLE LCM AWARENESS
If you are adding Boogey Lights® to your trailer that is being pulled by a tow vehicle and your intend on integrating those lights with your tow vehicle's / trailer's tail/turn/brake light system, you need to be mindful of your tow vehicle's Lighting Control Module (LCM) amperage limitations. Adding additional LEDs to your tow vehicle's lighting circuit may exceed your tow vehicle's rated amperage for that lighting circuit and throw an error (or shut down completely) because the LCM 'thinks' there is a problem with your electrical system due to the increase in amperage draw. It's a safety feature of most late model tow vehicles.
In these cases the easiest work around is to add an independent relay (3 or 4 relays depending on how your tow vehicle is setup) to the circuit to make them work. The relays draw milliamps and won't cause the LCM to error out. This problem is most likely to occur with pickup truck tow vehicles but it's possible to occur in a motor home too. If your tow vehicle is a pickup truck (particularly one built in the last 10 years) and you're adding more than 100 LEDs to the system, we suggest adding relays to your installation initially. Don't wait until after you do the install to find out your truck's LCM doesn't like the additional amperage draw you've just added. Here's a wiring diagram on how to wire a relay for 3 or 4 light circuits.
POWERING YOUR UNDER-GLOW LIGHT SYSTEM
This Under-Glow light kit will work on a wide variety of trailers: from cargo trailers to food trailers to car haulers to utility trailers to horse trailers; only to name a few. The lights don't care what type of trailer they're attached to. As long as you have 12vdc power available (or 120vac to 12vdc power converter), they'll work. This kit provides the LED light strips and related command/control functionality you select. We do NOT however include a trailer / tow vehicle wiring harness with this kit. Why? Because there are too many variations and configurations possible. For example, if you're mounting this light kit to a trailer that has its own on-board power source – such as a generator common with food trailers – then the power connection to the LEDs can be done within the trailer itself. It's straight forward. However, for the vast majority of trailer under-glow installations the only 12vdc power available (at least with sufficient amperage to support a trailer under-glow light kit) will need to come from the tow vehicle itself. To do so will require a wiring harness of some type from the tow vehicle to the trailer. We assume the installer of this light kit has the knowledge to do this. Depending on the light configuration, a simple 4 or 5 way trailer male/female plug/harness is all you need although we'll typically install the PHILLIPS STA-DRY 7 WAY plug system regardless (see photos below). These plugs and related cables can be purchased online or at any trailer accessory shop. If you purchased a multi-color under-glow kit with a wireless LED controller, we strongly suggest mounting the LED controller inside the trailer itself and pulling 12vdc power from the tow vehicle to that controller. Just make sure you size your cabling appropriately for the amperage draw. Unless you absolutely know what you're doing (EG. have done the amperage calculations, have sized the wiring accordingly and are aware of the potential LCM error issues of the tow vehicle) DO NOT use the tow vehicle's existing truck to trailer wiring harness to power and/or control this light system. Run a separate cable from the tow vehicle to the trailer.
If you're going to be powering your trailer Under-Glow light system using a tow vehicle, we like to use the Phillips STA-DRY Nose Box with 7 Way Plug system for the harness. We like it because it's easy to install on both the trailer and tow vehicle, it's easy to service and widely available just about anywhere. Plus, it's heavy duty. The base and plug are separate parts. The base is available in both 2.5" and 3.5" (16-775) depths. The plug is available with built in 20amp breakers (15-762) (per pin) and without (15-760). So lots of flexibility. While the standard Sta-Dry plug is 7 way, nothing says you have to use all 7 pins. There have been many times when we only used 2 of those pins (12vdc + and 12vdc-).
TRAILER DIAGRAM LAYOUTS