


Freightliner Cascadia Interior LED Light Kit
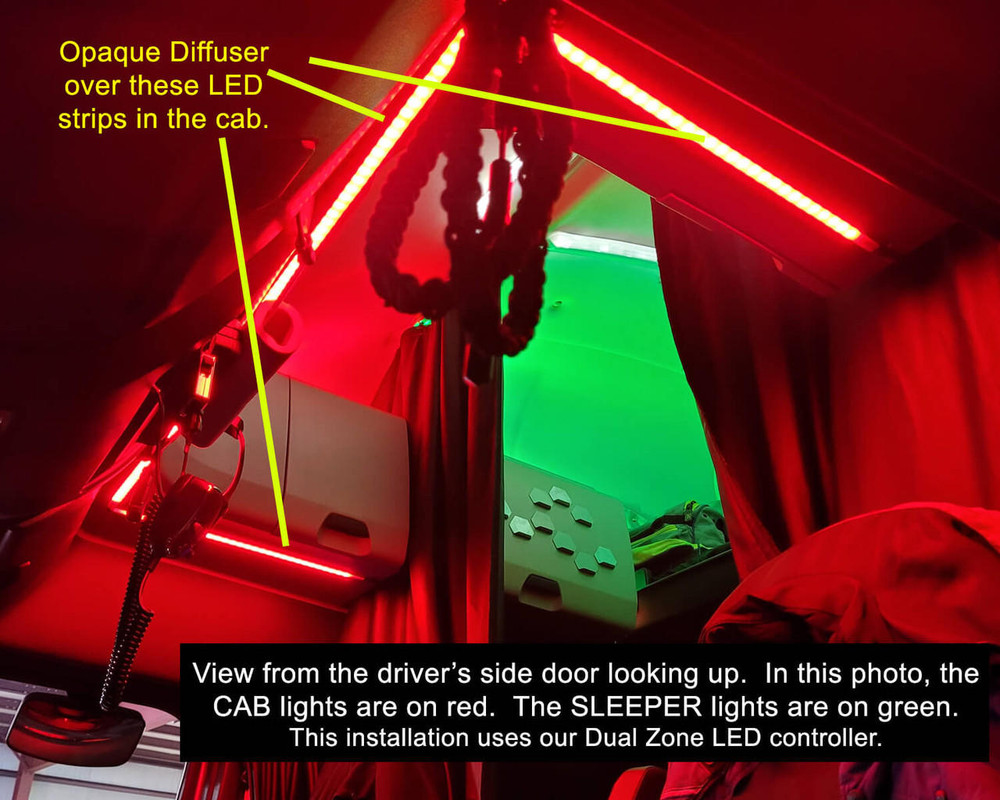
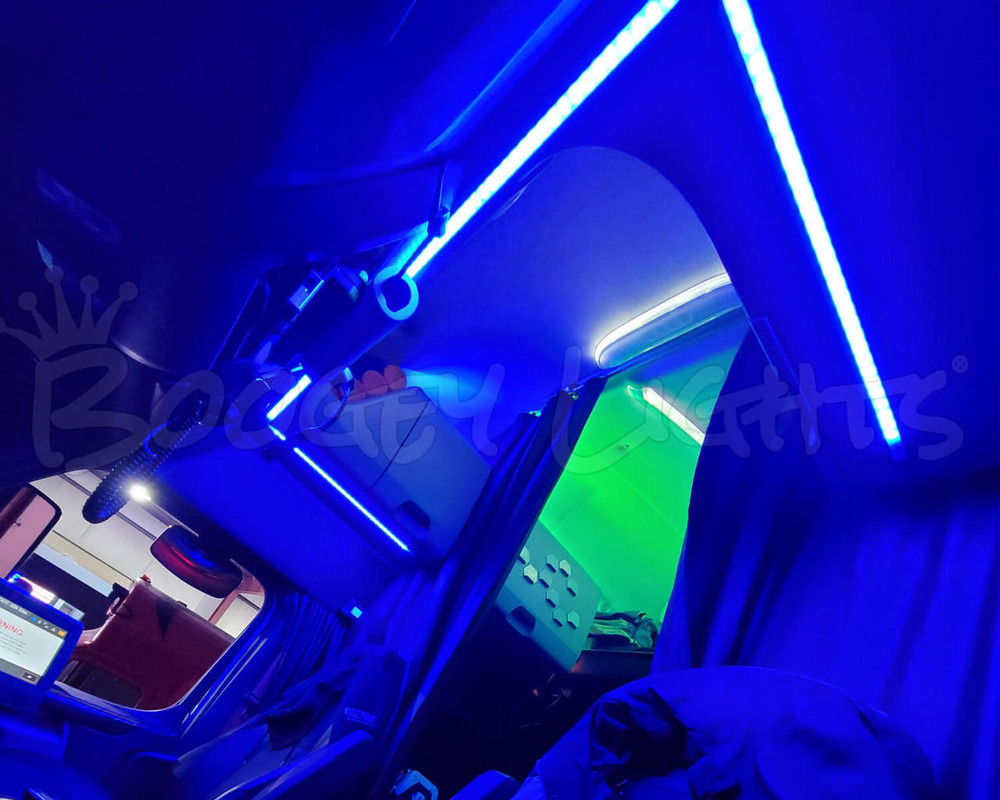
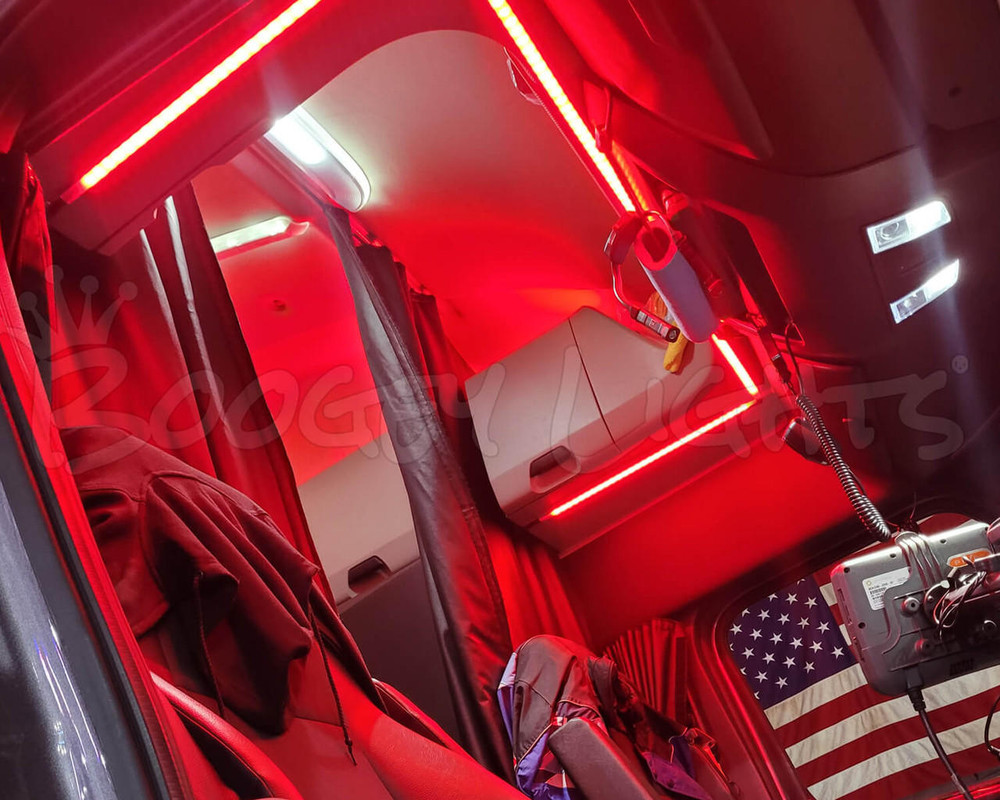
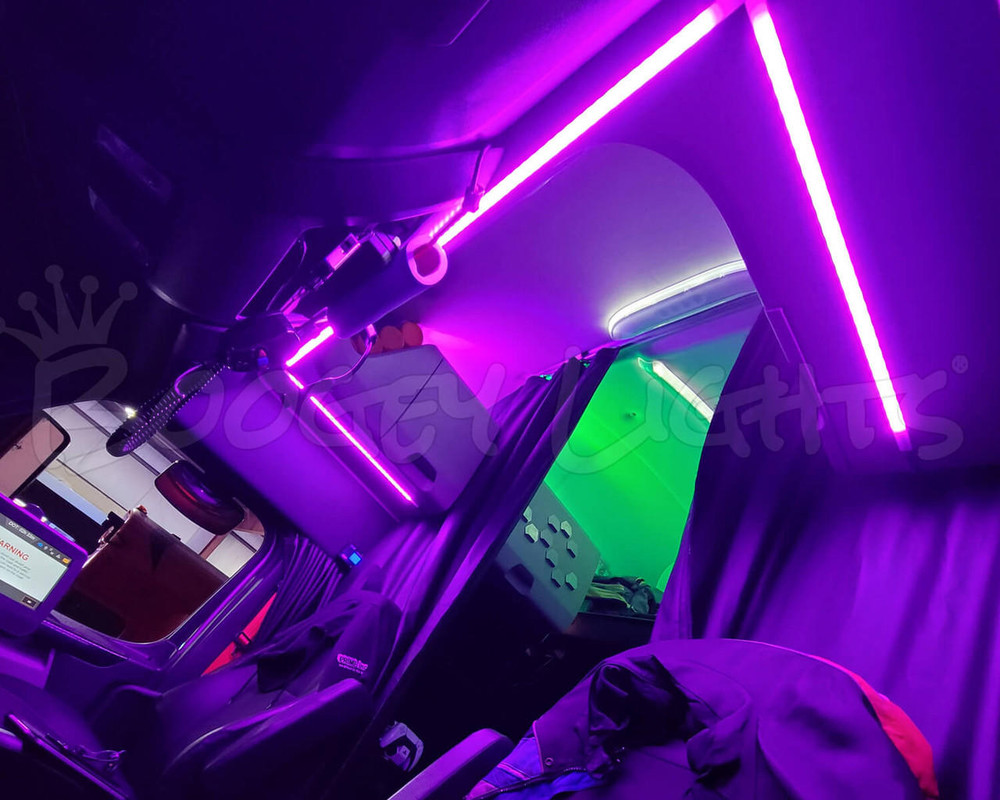
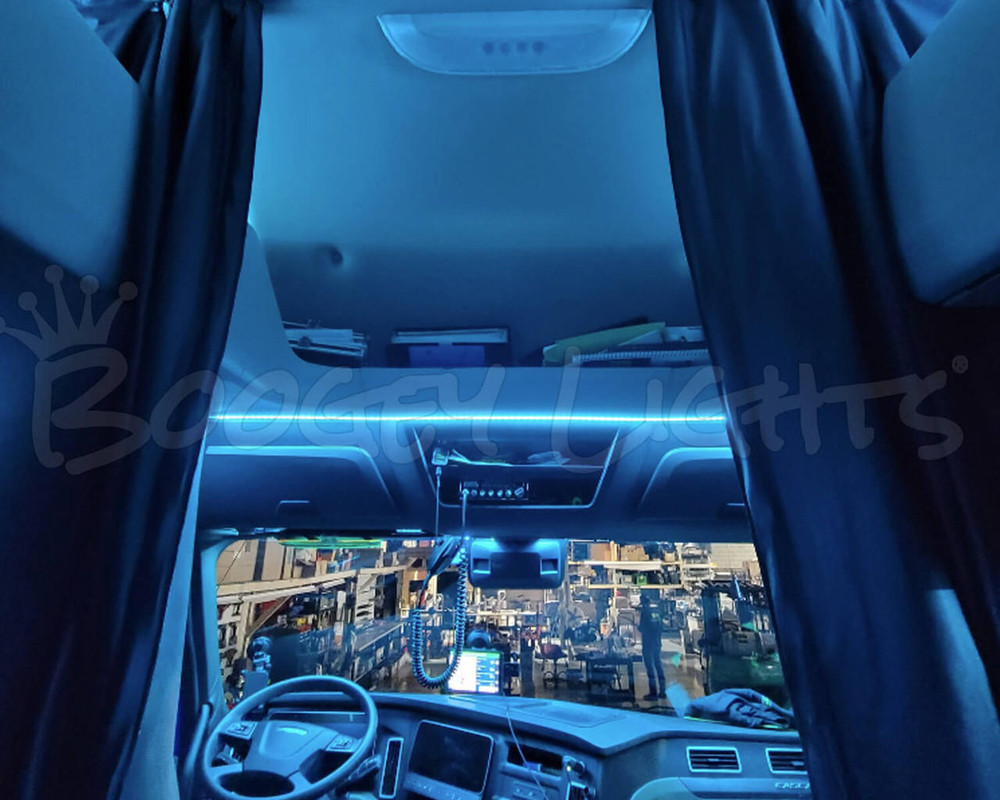
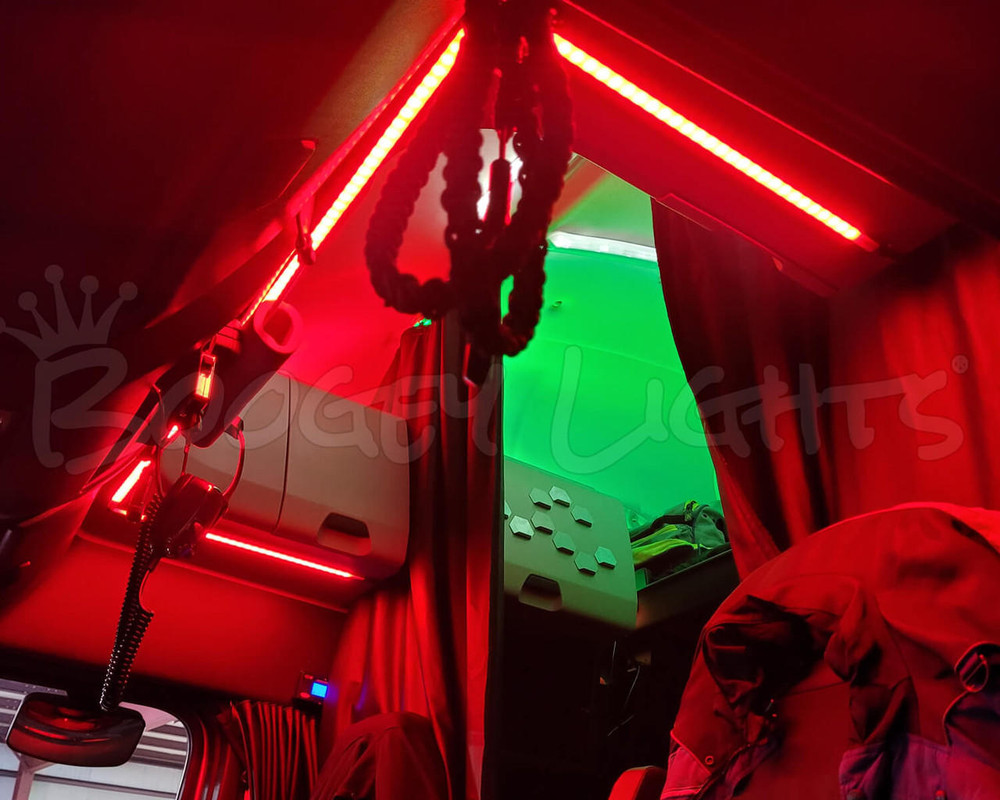
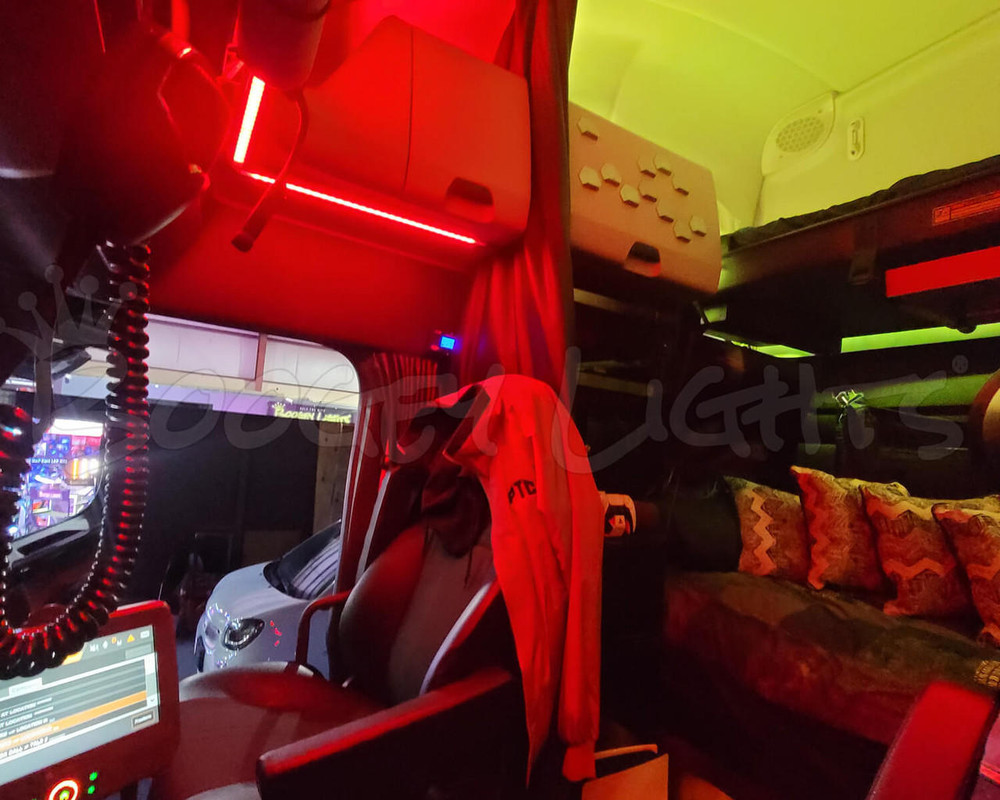
Light up the inside of your Freightliner Cascadia with this BOOGEY LIGHTS® LED Light kit. Designed for the Freightliner Cascadia GEN2 (2018 or newer) truck, this light kit lights up both the CAB area and the SLEEPER area. Available in single color and multi-color versions. The cab component includes three LED strips with aluminum channel and diffuser which makes for a professional installation. The sleeper component includes four LED strips. These strips are mounted on top of the storage cabinets shining upward; two on each side of the truck. This product uses our high-performance Low Profile surface mounted tri-chip LEDs. There are a total of 264 LEDs. We offer a number of switching and controller options including the option to use a dual zone LED controller providing indpendent control over each lighting zone: For example, Zone 1 = cab lights. Zone 2 = sleeper lights. In this configuration the LED controller is mounted in the drivers side closest. See photos in the photo carousel above. Scroll down to see a video of this light kit installed in a 2024 Freightliner Cascadia.
To see up-close photos of the LED strip materials we use, click on the button below. For detailed specifications of these strips, click on the SPECS navigation tab on this product page.
LED Color Options
This light kit is offered in eight single color options (see list below) and in three multi-color configurations: RGB, RGBW (RGB + warm white) and RGBA (RGB + amber). If installing single color LEDs you'll need a switch of some kind. We offer a couple of options. For multi-color installations, we offer a couple of LED controller options depending on the type of RGB led strip you select. You'll find a more detailed discussion on these switch and controller options in the SWITCHING section on this product page.
Single color simply means the LED strip is one color all the time. The color cannot be changed. The color you choose is the color you get. Multi-color means you can change or select different colors.
SINGLE COLOR
- Red
- Green
- Blue
- White (6000k, aka 'cool white')
- Orange
- Amber
- Pink
- Magenta (Hot Purple)
MULTI-COLOR
- RGB
- RGBW (RGB + White, 2400k) See explanation below of this LED chip version.
- RGBA (RGB + Amber) See explanation below of thie LED chip version.
Any of the RGB selections will display these 7 colors using the hand held RF wireless remote: Red, Green, Blue, White / 6000k, Light Blue, Lime Green/Yellow, Hot Pink/Purple. In addition, using the Bluetooth APP and your smartphone, you can custom mix up to 16 million color combinations.
All of the multi-color RGB options require an LED controller to operate. The advantage of RGB over a single color LED strip is that RGB gives you the ability to change colors as well as access other features such as dimming, flashing, breathing and color blending. With the bluetooth interface, you can save favorite color/feature sets as well as program 2 or 3 color rotation sequences. More detail about these advanced features can be found on this product page.
Make your selection from the LED COLOR OPTION drop down. Click on the KELVIN SCALE button below for more information on the difference in color temperature.
What is RGBW? On the RGBW led strip, in addition to RGB, you get one extra diode which is Warm White. That warm white diode has a Kelvin temperature of 2400 which means it has a yellowish look giving it a warmer, softer, candle like look (see photo below). That fourth diode on the RGBW led strip is often wired to an existing OEM switch allowing you to turn on just the warm white diode with the flip of a switch. Other options include adding a dimmer switch or even another LED controller just to operate that fourth warm white diode.
What is RGBA? On the RGBA led strip, in addition to RGB, you get one extra diode which is AMBER. That fourth diode on the RGBA led strip is often wired to an existing OEM switch allowing you to turn on just the AMBER diode with the flip of a switch. Other options include adding a dimmer switch or even another LED controller just to operate that fourth warm white diode.
SWITCHING OPTIONS
Here is an overview of each switching and controller option offered.
Single Color Switching Options
If you're purchasing Single Color LEDs, at minimum you'll need a way to turn them on and off. Some customers may want the ability to dim the lights too. We offer the following switching and control options for single color LEDs. You'll find photos of each of these switches in the product photo carousel above.
- No switches (provide your own). Select this option if you already have a means by which to switch the lights on/off. Just be aware of the circuit capabilities of your existing switch. This light kit contains about 270 LEDs which on full power brightness will draw about 3.75 amps.
- Wired ON/OFF Toggle Switch. Select this option if you want a simple ON/OFF hard wired toggle switch to turn the lights on and off. As basic as it gets.
- RF Wireless ON/OFF only. Select this option if you want a simple wireless ON/OFF remote control (Key Fob style) to turn the lights on and off (no dimming or brightness control). Max amperage is 5 amps. If your installation is greater than 5amps, be sure to add a relay.
- RF Wireless ON/OFF/DIMMING control. Select this option if you want a wireless remote control (M7 style) to operate the led strip. The wireless remote has a hand held control that allows you to turn the lights on, off and dim. In addition, you can strobe and breath the lights too. Bluetooth control is included as well. This controller is rated at a maximum amperage of 10 amps..
Multi-Color Switching Options
Multi-color LEDs require an LED Controller to operate. All of the LED controllers offered are our latest Generation 2 (aka GEN2 or G2) LED Controllers. They are combo controllers meaning they offer both RF wireless and Bluetooth control. They will work with RGB, RGBA and RGBW Boogey Lights LEDs. You are read more about all of the features of these new GEN2 LED Controllers by click on the CONTROLLER Navigation Tab on this product page. The Multi-Color Controller Options Are:
- GEN2 Super. This is a single zone LED controller that will power up to 900 LEDs. It includes our new G2 M7 RF 15 button wireless remote. This controller can be operated using either the RF wireless remote OR your smart phone and our free bluetooth APP. This controller will power up to 5 diodes: RGB 3 diodes and up to 2 additional diodes (e.g. RGBA, RGBW ) if so desired. This controller measures 4-1/4" x 2-1/4" x 7/8".
- GEN2 Heavy Duty (Single Zone). This is a SINGLE ZONE LED controller that will power up to 1800 LEDs. It includes our new G2 M7 RF 15 button wireless remote. This controller can be operated using either the RF wireless remote OR your smart phone and our free bluetooth APP. This controller will power up to 5 diodes: RGB 3 diodes and up to 2 additional diodes (e.g. RGBA, RGBW) if so desired. This controller measures 5.5" long x 3.25" wide and 1.5" high. Note that the overall length to accommodate room for wires is 7.5".
- GEN2 Heavy Duty Dual Zone. This is a DUAL ZONE LED controller that will power up to 3000 LEDs; 1500 per zone. It includes our new G2 M7 RF 15 button wireless remote. It can be operated using either the RF wireless remote OR your smart phone and our free bluetooth APP. This controller offers TWO distinct lighting zones. This controller will power up to 5 diodes on each Zone: RGB 3 diodes and up to 2 additional diodes (e.g. RGBA, RGBW) if so desired. Measures 5.5" long x 3.25" wide and 1.5" high. Note that the overall length to accommodate room for wires is 10". If you want to operate the CAB and SLEEPER lights independently, choose this option.
VIDEO
Here's a short video of this light kit installed in a 2024 Freightliner Cascadia.
OTHER ITEMS YOU MAY NEED
No two installation scenarios are the same. Not everyone shares the same installation quality goals. Some folks are OK with twisting wires together, others want to solder them. Some folks are OK with running wires where they may be seen or unprotected to save money/time, others want a tidy, clean install without any wires showing. Some folks are OK with mounting their LED strips to whatever surface they can find, others want to take the time necessary to build out appropriate mounting surfaces to provide the best lighting effect on their vehicle. The point is it's not possible to provide all the materials necessary for all installation scenarios and quality goals. Our light kits provide the essential components needed for a high-quality, functioning lighting system. Installation of our light kit to your specific vehicle may however require additional items to make it look and fit the way you want. This is particularly the case with electrical wiring and mounting of LED strips. Before proceeding with your installation we suggest you consider THESE OTHER ITEMS.
WILL BOOGEY LIGHTS® WORK WITH OTHER BRANDS?
The short answer is probably not. All Boogey Lights® RGB LED strips are COMMON CATHODE LEDS. They share a common ground and will only work with positively switched controllers. Most LED strips on the market today are COMMON ANODE because the controller technology used to power them is less expensive to manufacture. However they're not nearly as bright and are an overall inferior design when compared with COMMON CATHODE LEDs. For more information, click the button below.
WHY BOOGEY LIGHTS®?
Unlike most every other light kit out there, these light kits are ACCENT LIGHT KITS. When mounted properly, you'll never see the LED lights themselves. You'll only see the glow from the LEDs. If you're interested in learning more about WHY Boogey Lights are different than any other LED lighting system on the market, click here: WHY BOOGEY LIGHTS . We do a deep dive into the ten differences between Boogey Lights® and all the others.
INSTALLATION INFORMATION
IMPORTANT. You must have an understanding of 12vdc power. An essential skill with installation of any Boogey Lights LED products is knowing how to correctly wire the product to a 12vdc circuit. This includes understanding the importance of having a properly sized fuse at the power source, polarity, how to properly seal an electrical connection, using properly sized wire gauge for the load, measuring voltage and measuring the additional amperage draw you're adding. If you are uncertain or unfamiliar with any of these concepts, we urge you to ask someone who has the knowledge to assist you. Electricity is unforgiving.
INSTALL OVERVIEW
Installation of this light kit typically takes 3 to 5 hours depending on whether it's single color or multi-color, single zone or dual zone as well as your familiarity with the construction of the interior of the truck. Multi-color installations tend to take longer because the LED controller needs to be wired into the system. Here's an overview of the install process:
CAB AREA. For the CAB area there are three LED strips which form a "U" shape. One long strip across the front of the cab and then one on each side (one on driver's sides, one on passenger's side); all strips shining downward. We include photos of these three LED strips in the photo carousel of this product page. Because these LED strips are in plain view, we prefer to install the aluminum channel with diffuser to the bottom of truck's overhead storage using rivets and then, install the three LED strips into those aluminum channels. The plastic diffuser snaps into the channel once the LED strip is mounted. It makes for a professional and clean looking installation. Plus, for the long LED strip, the aluminum channel spans a seam in the truck's overhead storage bin making for a smooth, flat mountable surface for the LED strip which protects the strip from damage. We prefer to rivet the aluminum channel to the bottom of the plastic storage bins but you could also use 3M VHB tape or similiar to secure the aluminum channels to the truck. Each LED strip has it's own power lead. The power lead for the two side LED strips run up around the back of the storage bin (in front of the curtin). The power lead for the longer LED strip needs to have a hole drilled through the bottom of the storage bin (plastic) AND the top of the storage bin. We use an 8" drill bit to do this. All power leads connect to the power lead feeder cable (which connects to the controller or switch/power source inside the driver's side closet) on top of the storage bins.
SLEEPER AREA. For the SLEEPER area there are four LED strips total. Two on each side of the truck. These LED strips mount directly to the top of the storage bins on each side of the truck shining upward. They can be mounted directly to the plastic; no aluminum channel required. The power leads for the LED strips on the passenger's side of the truck will need to be connected to the power source/controller which is in the driver's side closet. You have two options here. First option is to run the power lead feeder cable through the headliner over top and down to the driver's side closet. This is our preferred option for DUAL ZONE lighting however can be a little tricky to do. The second option is to run those two power leads forward toward the front of the truck where they connect up with the power leads from the CAB lights. This only works well if you're using one lighting zone where both the CAB and SLEEPER lights are running on the same lighting zone. If you're doing a DUAL ZONE installation, you can still run the power leads forward however you'll need to run a second power lead feeder cable forward from the driver's closet where the dual zone LED controller will be mounted that will meet up with the two power leads for the passenger's side Sleeper LED strips.
POWER, SWITCHING, CONTROLLER. We mount the LED CONTROLLER in the driver's side closet. This is where all of the power leads from the LED strips connect together. For 12vdc power, you have two or three options. If the truck has an inverter, you can usually pull 12vdc power directly from the 12vdc inputs coming from the batteries to the inverter. The inverter is usually mounted underneath the bed which makes access easy from the driver's side closet. If the truck doesn't have an inverter, our next choice is to connect directly to the truck's batteries. To do this we drill a hole in the floor and access the battery box that way. Of course, all connections are fused as close to the power source as we can get it. The last option is to pull 12vdc power from one of the existing cigarette lighter outlets built in to the truck. To be clear, we do not recommend this option. The reason is that this lighting system will pull 3-4 amps of power. Most cigarette lighter outlets are rated at 5amp. If you wire these LED lights to an existing cigarett lighter outlet, that circuit will in most cases be maxed out; you can't use it for anything else. Lots of guys don't pay attention to this of course and wonder why they're blowing fuses all the time. Not only is this annoying but constantly over-loading an electrical circuit can be dangerous; risk of fire. If you're installing single color LEDs, you'll need to mount a switch of some type. If you're using a hard wired toggle on/off switch, we'll typically mount it on the outside of the driver's closet wall facing the rear of the truck where the other switches are located. If you're using a wireless on/off/diming switch, the control component itself will mount inside that closet (just like the LED CONTROLLER in a multi-color install would be) and use the wireless remote to operate the lights from anywhere in the truck.
ONLINE DOCUMENTATION
All of our installation documentation for this product (and all others) is available to download directly from our website. We encourage you to download this information and review before placing your order. That way you'll have a solid understanding of what is required (and no surprises). Here are some of the most important installation documents for this product. You will find ALL available documentation in our INSTALLATION RESOURCES SECTION.
- Freightliner Cascadia Interior LED Light Kit
- Know your power consumption
- What you need to know before mounting your LED strips
- DOWNLOAD the GEN2 LED Controller Operating Manual & Wiring Diagrams
- DOWNLOAD the GEN2 Bluetooth Operating Manual
- DOWNLOAD the GEN2 M7 RF Wireless Remote Operating Information
You may also want to check out our section of HOW-TO VIDEOS which many customers find helpful with deciding how they want to install their Under-Glow lights.