


CARGO VAN Interior LED Lighting
Super Bright Interior Work Space Lighting for CARGO VANS
Super bright 12vdc workspace lighting is here! Our impressively bright surface mounted hi-intensity flexible LED strips are ideal for cargo vans. With more super-bright LEDs per inch than any other surface mounted LED strip on the market, our LED strips are built tough for mobile workspace lighting applications.
Be sure to scroll down into this product page for important details including FAQs, configuration specifics, product options, specifications, installation docs and more.
READ THIS BEFORE ORDERING!
Successful installation requires reading the written installation directions. While our How-To Videos offer helpful overviews, they do not replace the detailed documentation. Reading the instructions carefully is essential for proper fit, function, and long-term performance. Most support calls and warranty claims we receive stem from customers who don't read this information. Please take our advice and read the directions. We promise, you'll be happy with the results if you do.
PRODUCT HIGHLIGHTS
While Single Color dimmable WHITE LEDs are by far the most popular for workspace applications, our surface mounted LED strips are available in additional solid colors including RED, GREEN, BLUE, ORANGE and our dual color REDW (RED + WHITE -- see details below on this dual color option). In addition, we offer an RGB, RGBW and RGBA multi-color version where you can change the color using a wireless remote control (or your smartphone and our free Android or IOS APP). Built with two ounce copper PCB, the brightest 5050 LEDs available and 1.2mm of genuine 3M® VHB double sided tape, these LED strips are super easy to install yet made tough for motor vehicle applications. While our hi-performance super bright LED light strips are available in varying lengths we've put together this interior led light kit to provide the components needed to fit some of the most common sized cargo vans from 8' to 14'.
Single Color vs RGB (Multi-Color)
While most mobile work space lighting is white, nothing says it has to be that way. With an RGB led strip you can have the best of both worlds. With RGB, you can control your lights with a wireless remote control OR your smartphone and our bluetooth APP. For RGB one of the colors available is WHITE ... but so too are many other colors (up to 16 million if you want to get technical). One important caveat: RGB white is not as bright as Single Color white. The reason is that in an RGB LED there are three diodes: red, green and blue. Mixing equal parts red + green + blue creates the color white. In a single color LED, all three diodes are the same color. So in a single color white LED, there are three white LEDs which is much brighter than an RGB led mixed to show white. If you're for the absolute brightest white you can get for your trailer, go with single color white. If however you want to be able to change the colors from time to time, go with RGB. Just be aware that the RGB version of 'white' isn't as bright as the single color version. You'll notice too we offer RGBW and RGBA. See details about these two RGB options further down in this product page.
SWITCHING OPTIONS
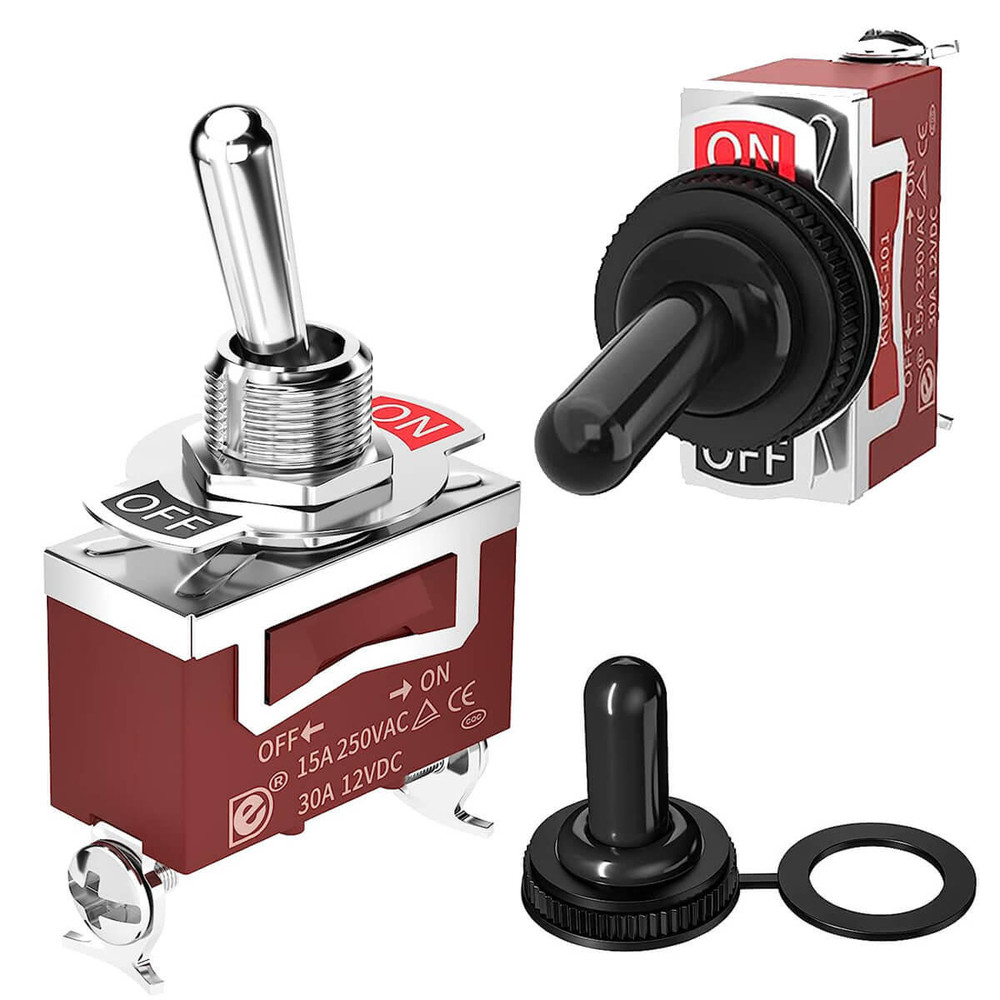
Single Color: Most mobile work space lighting is single color white because it's the brightest light available. For single color lights you're going to need an on/off switch at minimum. Some prefer to add a dimmer switch too. It ultimately depends on your setup. We offer optional switches for single color: ON/OFF Toggle Switch, ON/OFF Wireless RF remote control (with relay) and ON/OFF Dimmer Switch. Photos of each are in the product photo carousel.
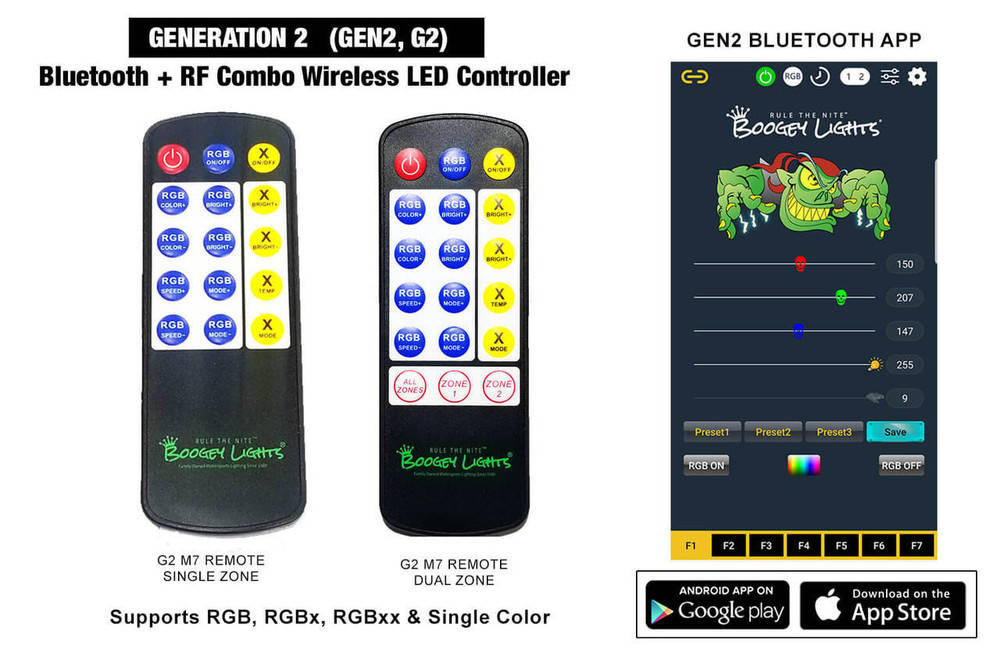
RGB / Multi-Color: For RGB led lighting an LED Controller is needed to operate the lights. The controller is what operates the lights. If you're purchasing RGB leds, you'll need to also purchase an LED Controller from the available list of LED Controllers. Make sure you select the LED Controller that matches the capacity rating for the number of LEDs you're purchasing. All of the RGB controller options presented are our latest GEN2 (G2) LED Controller. You can find more detail about these new GEN2 LED Controllers by clicking on the CONTROLLERS navigation tab appearing on this product page.
In addition to providing a wireless on/off capability, the LED controllers offered allow you to control your lights with your Bluetooth enabled smart phone and our free smart phone APP (Android and IOS) OR your choice of the included RF wireless remotes. With the included RF remote you can change between 7 colors and functions of on/off, blending, strobing, breathing, flashing, fading and dimming. You can also use your Bluetooth enabled smart phone to create that custom look with over 16 million different color combinations plus three pre-sets. The BLUETOOTH navigation tab on this product page provides significantly more information about the Bluetooth integration. The CONTROLLERS navigation tab on this product page has significantly more detail about these RGBx Controller options.
VIDEO
Quick video submitted by a customer using Boogey Lights® interior white lights for lighting inside his cargo van.
WHAT IS RGBW & RGBA?
This light kit is offered in seven single color options and in three multi-color configurations: RGB, RGBW (RGB + warm white) and RGBA (RGB + amber).
RGBW: On the RGBW led strip, in addition to RGB, you get one extra diode which is Warm White. That warm white diode has a Kelvin temperature of 2400 which means it has a yellowish look giving it a warmer, softer, candle like look (see photo below). That fourth diode on the RGBW led strip can be wired directly to our GEN2 LED Controller which supports RGBx LEDs. As an option, you could also wire that fourth diode to a completely separate on/off switch. Your choice. You could also use the Quick-Switch feature with this fourth diode too.
RGBA: On the RGBA led strip, in addition to RGB, you get one extra diode which is AMBER. That fourth diode on the RGBA led strip can be wired directly to our GEN2 LED Controller which supports RGBx LEDs. As an option, you could also wire that fourth diode to a completely separate on/off switch. Your choice. You could also use the Quick-Switch feature with this fourth diode too.
WHAT IS REDW?
REDW is a new type of LED strip we designed. It uses our single color RED tri-chip technology with the addition of a fourth diode that is WHITE (6500 Kelvin). Designed primarily for motor vehicle tail-turn-brake applications, that fourth WHITE diode can be wired to the reverse light signal. The remaining three RED diodes are wired such that one diode connects to the running light circuit, one to the brake circuit and one to the turn signal. For interior lighting applications the REDW light strip can be used for situations where you want the option of functional bright white but also red light which doesn't ruin night vision particularly which driving. Another application for REDW lighting is for emergency, wrecker or recovery vehicles that need to flash red and white. In this scenario the REDW LED strip is often paired with our Single Color Strobbing / Flashing LED Controller.
MOUNTING SURFACE OPTIONS
The low profile surface mounted LED strips used in this product need to be mounted on a smooth, flat, rigid, straight surface. And, the strips cannot span multiple mounting surfaces. Not all cargo van ceilings have one continuous smooth, flat and straight surface. In many situations we have to build out that mounting surface. To do that you have a number of options. This product offers the following 4 options:
1. Aluminum Flat Bar. This aluminum flat bar is 1.5" wide and 1/8 thick (6' long). We typically rivet this to the ceiling and then mount the LED strip to the aluminum flat bar.
2. Plastic Flat Bar. An alternative to the aluminum flat bar. It's 1.5" wide and 1/8 thick (6' long).
3. Mini T12 Aluminum Channel. A step up from the aluminum or plastic flat bar this aluminum channel is not only sturdier but also dresses up the installation particularly if you order the channel with the optional diffuser. This aluminum channel is designed to work with both our Single Color and RGB LED strips (will not work with RGBA or RGBW).
4. Mini T12 Aluminum Channel PLUS Plastic diffuser. Includes both the aluminum channel plus the plastic diffuser. These aluminum channels and the optional opal diffuser make for a very clean and professional look in situations where the LED strips are in plain view. The diffuser gives off a nice glow lighting effect too.
SHIPPING NOTE: We limit the lengths of these mounting surfaces to 6' (6.5' for the Mini T12) so they can be shipped via UPS. The product pricing for this product will automatically change based on the LED lengths you select. If you want longer lengths of the aluminum flat bar, you can usually purchase up to 12' of aluminum flat bar at a local metal supply company. We provide these mounting surfaces here as a convenience only to our customers
ALUMINUM CHANNEL INSTALL OPTION
For those who want to dress up the installation, we offer aluminum channels and difusers. They make for a professional looking installation. The channels typically are screwed (or riveted) to the ceiling of the van (or side walls) and then the LED strip attaches to the channel with the optional difuser snapping in over top. You can read more about this installation option by visiting this ALUMINUM CHANNEL product page.


KNOW YOUR POWER CONSUMPTION
Be mindful of the amount of amperage you're drawing through your lighting circuit and to not exceed the circuit component limitations. The amount of power (amps) you're pulling through the circuit will vary based on a combination of three factors: 1) The number of LEDs in the circuit, 2) the amount of copper wire in the circuit and 3) the input voltage to the circuit. The amperage ratings for our switches, controllers and LEDs assume 12.5 vdc input or less. If you're wiring your lights to a vehicle that has a charging mechanism (e.g. alternator), the input voltage will likely increase when the engine is on; particularly as RPMs increase. It's not unusual for an alternator to charge the battery at a rate of 13.5 to 14.5 vdc depending upon the vehicle. Increasing the input voltage to the LED Controller/LEDs will also increase the amperage draw of those LEDs because they'll burn brighter. For example, we've seen circuits that draw 17 amps when the engine is off and the input voltage is 12.5vdc but jump up to drawing 24 amps when the engine is on and RPMs increased. This is because the input voltage jumps to 14vdc when the engine is running. You can VIEW AMPERAGE DATA HERE for all Boogey Lights® LED Lighting products.
VIDEO: HOW TO ADD OVER-HEAD LIGHTING
In this 2 minute video we show you how we install Boogey Lights® LEDs for over-head lighting on this cargo trailer. The same concept applies to installing on a cargo van.
USING 3M ADHESION PRIMER
To achieve the full adhesive strength of the 3M® tape affixed to the back of each strip 3M® Adhesion Promoter (aka Primer) must be applied to the mounting surface first. This is an important step to ensure a secure bond. The 3M® Adhesion Promoter creates a chemical bond between the tape and the mounting surface such that the LED strip will stay stuck (at least until you decide you want to remove it). Using any other solvent such as rubbing alcohol or acetone is not the same thing as using 3M® Adhesion Promoter. While these solvents will help clean the surface, they do not prime the surface. There is a difference. 3M® Adhesion Promoter is included with this kit although you may elect to purchase more if you'd like.
OTHER ITEMS YOU MAY NEED
No two installation scenarios are the same. Not everyone shares the same installation quality goals. Some folks are OK with twisting wires together, others want to solder them. Some folks are OK with running wires where they may be seen or unprotected to save money/time, others want a tidy, clean install without any wires showing. Some folks are OK with mounting their LED strips to whatever surface they can find, others want to take the time necessary to build out appropriate mounting surfaces to provide the best lighting effect on their vehicle. The point is it's not possible to provide all the materials necessary for all installation scenarios and quality goals. Our light kits provide the essential components needed for a high-quality, functioning lighting system. Installation of our light kit to your specific vehicle may however require additional items to make it look and fit the way you want. This is particularly the case with electrical wiring and mounting of LED strips. Before proceeding with your installation we suggest you consider THESE OTHER ITEMS.
CCT & THE KELVIN SCALE
Color temperature is a method of describing the color characteristics - warmth or coolness - of a white light source. Commonly referred to as the Correlated Color Temperature (CCT), it's a gauge of how yellow or blue a white light source appears to the human eye. The spectrum of color temperature is assigned numerical values, measured in degrees of Kelvin (K), on a scale of 1,000 to 10,000. Most Kelvin temperatures for modern lighting applications however fall somewhere on a scale of 2000K to 6500k. The color temperature of a light source lets us know what the look and feel of the light produced will be.
On the low end of the scale, from 2000K to 3000K, the light produced is often referred to as a "warm white", "soft white" or sometimes called a "candle white". It ranges from orange-ish to yellow-ish white in appearance. This kind of light is inviting, comfortable and relaxing.
In the middle of the scale, from 3100K to 4500K, the light produced is often referred to as a "neutral white" or "natural white". Light sources within this range will emit a more neutral white light and may even have a slightly blue tint. This kind of light is bright, vibrant and clean appearing.
At the top end of the scale, from 4600K and above, the light produced is referred to "cool white", "bright white", "pure white" or "day white". Light sources in this range will have a blue-ish white tint to them. The higher the number, the more blueish it will appear. This kind of light will appear crisp, invigorating and energetic. It's most commonly used for workspace lighting.
Will Boogey Lights® Work with Other Brands?
The short answer is probably not. All Boogey Lights® RGB LED strips are COMMON CATHODE LEDS. They share a common ground and will only work with positively switched controllers. Most LED strips on the market today are COMMON ANODE because the controller technology used to power them is less expensive to manufacture. However they're not nearly as bright and are an overall inferior design when compared with COMMON CATHODE LEDs. For more information, click the button below.
Configurations
Mobile Work Space Lighting Configuration Options
The default configuration is designed to provide two rows of LED lighting mounted either high up on the two longest side walls (towards the point where the side wall meet the ceiling) shining inward OR mounted to the ceiling itself 12 to 18 inches in on each side shining downward. For best illumination we recommend coverage of at least 80% of the cargo van's length. So for example, if you have a 12' long cargo van, the minimum we'd suggest is 10' of LED lighting on each side (centered on the walls or ceiling ) to flood the area with light. Of course you can go the full length but in our experience it's not a requirement for adequate workspace lighting. 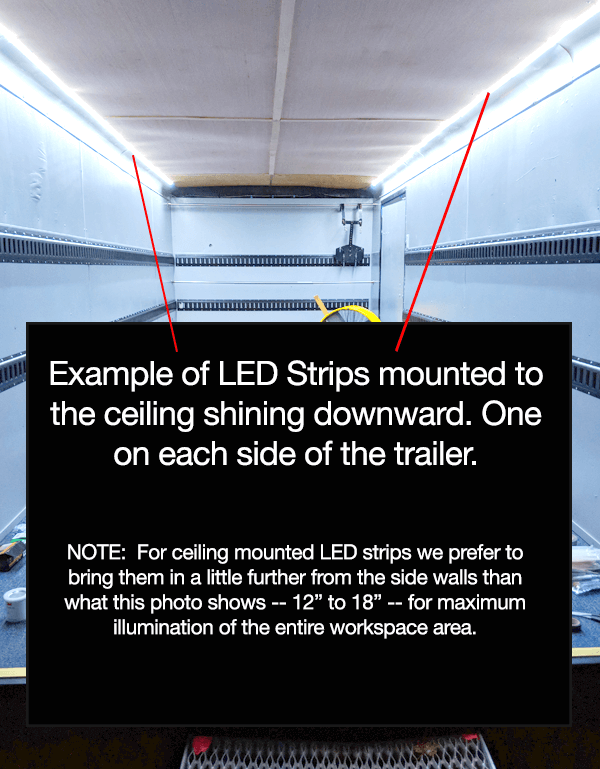
This Cargo Van LED Interior Light kit can be purchased in the following configurations:
- Two 8' LED strips (288 LEDs). One on each side.
- Two 10' LED strips (360 LEDs). One on each side.
- Two 12' LED strips (438 LEDs). One on each side.
- Two 14' LED strips (510 LEDs). One on each side.
- Four 4' LED strips (288 LEDs). Two on each side OR mount them side to side (instead of length wise)
All flexible LED strips come on a roll with a 15' power lead attached to them. Additional power lead feeder cable may be needed to complete the installation which is an option offered. For single color lighting you only need 2 conductor stranded cable (18 to 20awg is recommended) which you can usually purchase locally too.
Installation
You can DOWNLOAD THE INSTALLATION GUIDE for this product directly from our website.
There is no set installation configuration. Your cargo van and imagination are the only limits (well, and your budget). Here are some things to keep in mind when designing and installing our Hi-Intensity LED Strips.
- Our Hi-Intensity LED strips can be cut every 3 LEDs to accommodate shorter runs. Just make sure you are cutting them where marked AND that you seal the cut end to keep moisture out.
- The maximum length of one Boogey Lights® Hi-Intensity strip is 16'. Multiple 16' strips CAN NOT be daisy chained together. If you want to do a run longer than 16', you can butt two strips together to get the desired length. See diagram below.
- If you're using our mutli-color LED strips, the maximum number of 16' LED strips that can be powered at one time depends on which controller you're using. Our Heavy Duty controller will power at least six 16' LED strips. That said, it's possible to add additional controllers and manage those controllers with one RF remote. Lots of possibilities. The limitation ultimately comes down to your power source.
- If you're using our single-color LED strips, make sure you are not over-loading the circuit they are attached to. As with all lighting solutions, each LED strip should be properly fused. If for any reason there is a dead short in the strip, you want the power to that strip to be cut off to avoid over-heating and potentially burning. A 16' LED strip contains 300 LEDs. On full brightness white, will draw about 3.3 amps assuming 12.5vdc power input. That amperage draw will increase at higher voltages. You can VIEW AMPERAGE DATA HERE.
- For multi-color LED strip installations, be mindful of where your power source is located as well as where you will be mounting the controller. The power lead for each Hi-Intensity strip needs to connect directly to the controller at your power source. Knowing where your controller will be mounted in relation to where the LED strip will be placed will determine how much power lead cable is needed on each LED strip.A 16' LED strip contains 300 LEDs. On full brightness white, will draw about 3.3 amps assuming 12.5vdc power input. That amperage draw will increase at higher voltages. You can VIEW AMPERAGE DATA HERE.
- The only way to ensure the LED light strip stays stuck to is to make sure you prepare the surface in accordance with the directions. This includes making sure the mounting surface is smooth and free from oil, wax or other solvents. This light kit includes 3M Adhesion Primer. Be sure you use it. It's absolutely critical the surface be prepared using this 3M® promoter and that you follow the directions provided with every light kit.
- The length of power lead between the LED light strip and the power source absolutely impacts the brightness and power consumption of the light strip. This is an important concept to keep in mind when designing your setup. For power lead lengths longer than 15 feet (and less than 76'), we recommend using 20 gauge power lead wire which we offer for sale on our website. The lower the gauge number, the thicker the cable. The thicker the cable, the less power loss there is over longer distances.
- If you want a cleaner installation, we offer aluminum channels with optional diffusers that snap on top of the channels. The aluminum channels can either be screwed to the surface our you use 3M VHB tape (with promoter). Once the channel is mounted to the surface, the LED strip will then affix to the aluminum channel with the diffuser snapping in on top. It makes for a very clean installation. We offer a number of styles of aluminum channels for this purpose.
Installation Example
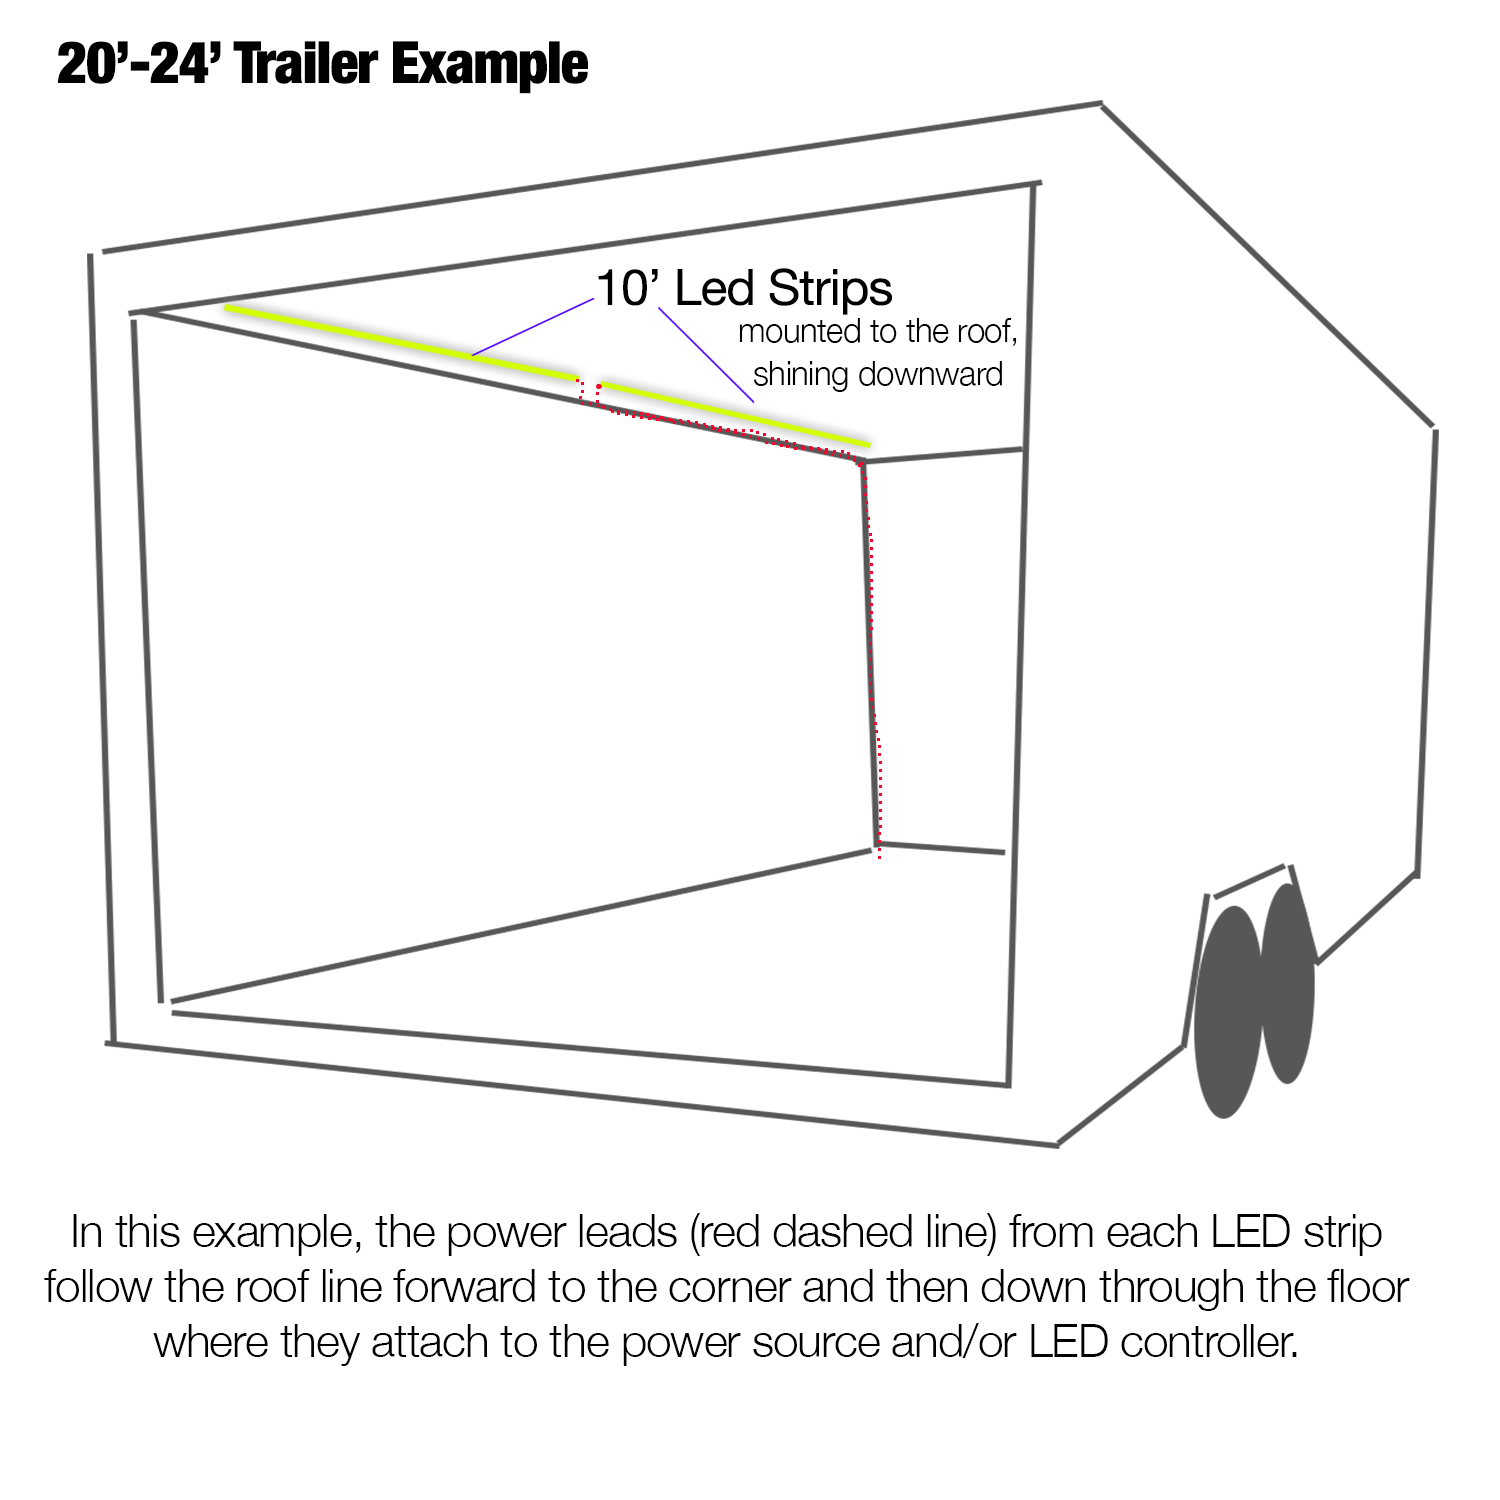
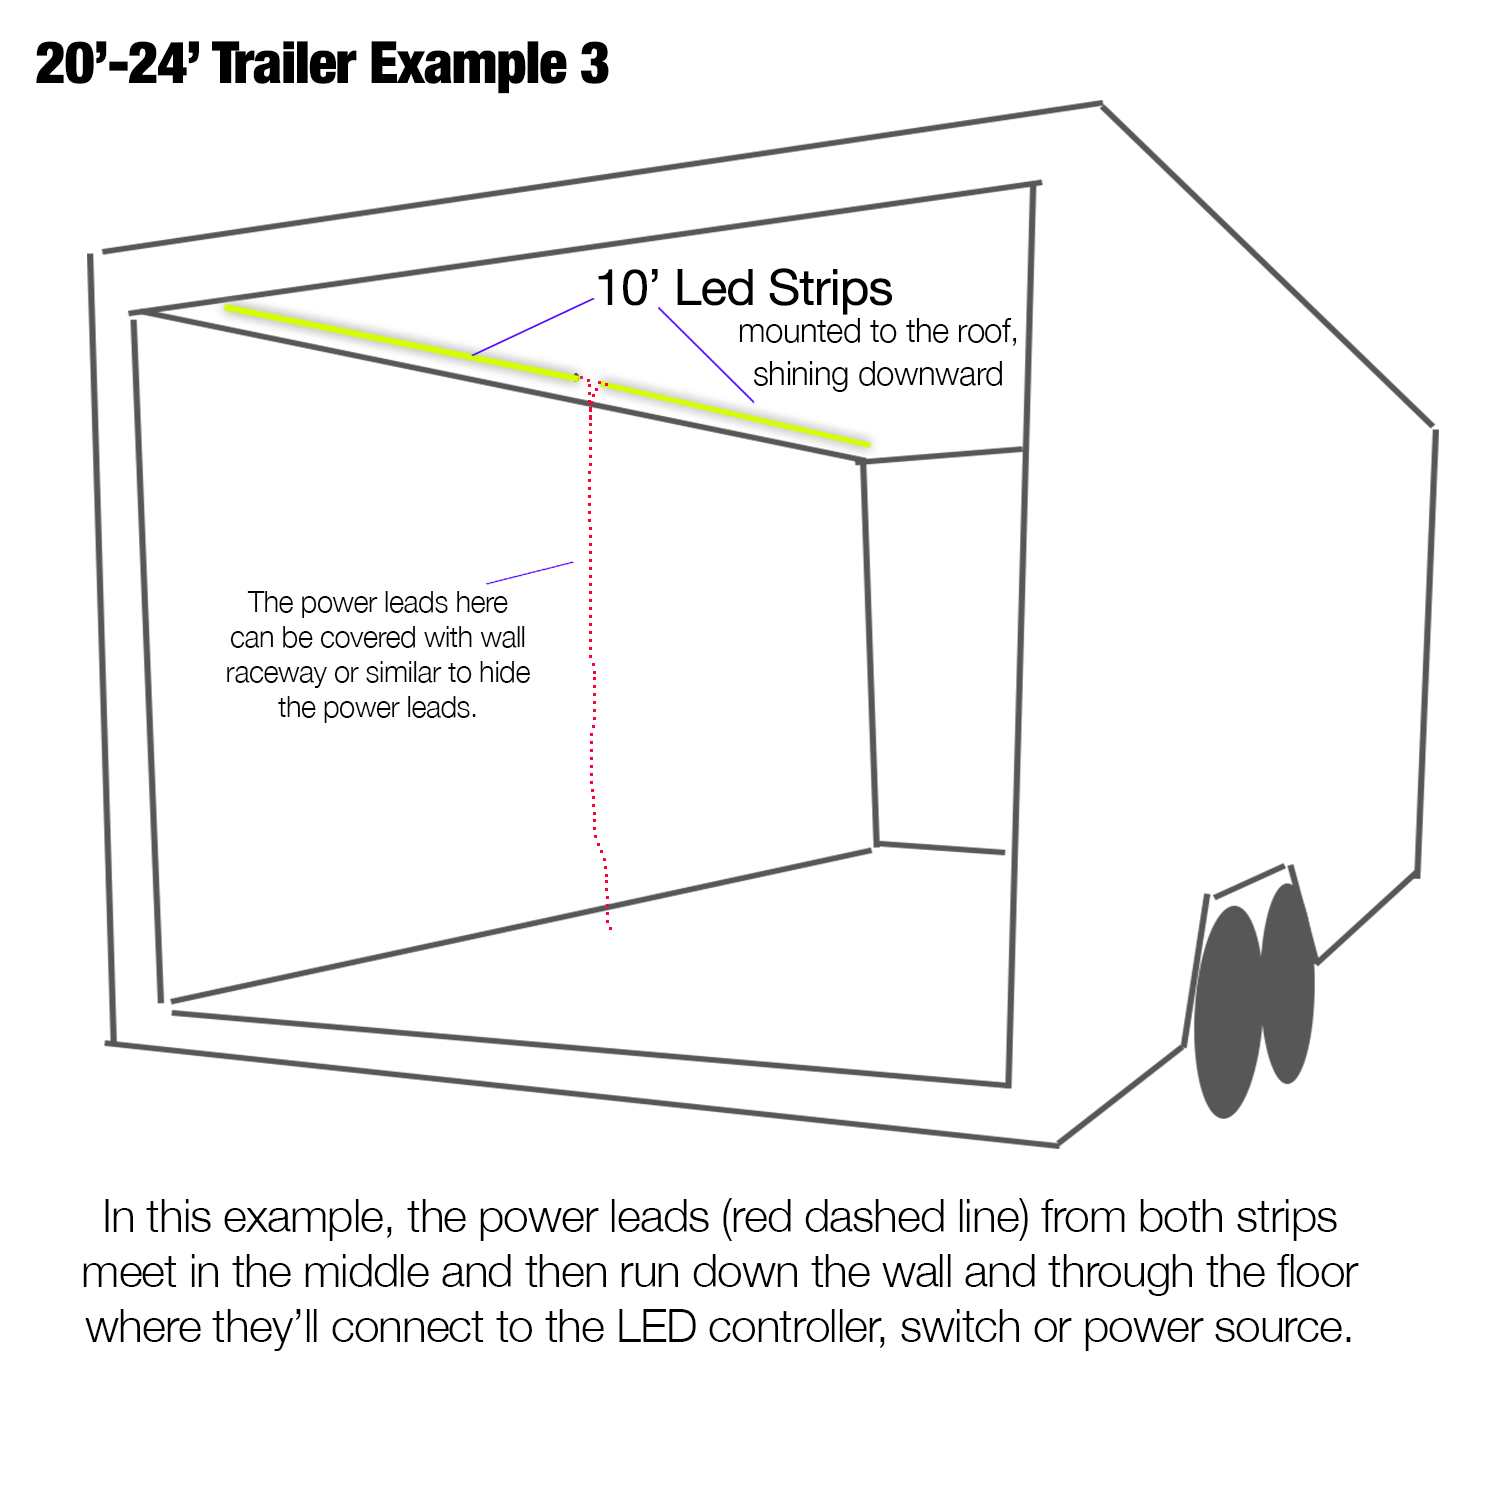
In this hypothetical example we have a 20' to 24' long cargo trailer but the concepts are the same in a Cargo Van. We want to install LED lighting on the roof shining downward. This diagram shows mounting and wiring placement. On each side of the trailer there are two 10' LED strips mounted to the ceiling about 12" from the side wall.The two power lead ends (the red-dashed line) come together in the middle (splice into one single cable OR continue as two separate cables) and then follow the roof line forward to the front wall where the power lead then drops down in the corner through the floor where it will connect to the LED controller, switch or power supply. Another way to do this would be to mount both LED strips with their power lead ends facing forward. The front LED strip would immediately drop the corner. The rear LED strips would follow the roof line up to the corner and drop down. Either method will work. Another option would be have both power leads meet in the middle (like our drawing shows below) but have them drop straight down to the floor instead of going forward following the roof line. In this scenario the power leads can be hidden with wall cable raceway. You could also us some corner duct wall cable raceway to hide the cables that run down the corner. To fasten the power leads along the roof line, we like to use 3M VHB tape (be sure to use 3M Adhesion Primer first) or zip tie mounts. There are a number of options to secure the power lead wire to the roof line. Of course you would need to repeat the same process for the other side of the trailer.