


Food Trailer Side Light Kit
Maximize the Attention! Ideal for Food Trucks, Food Trailers, Concession Trailers
The perfect solution for lighting up the side of your food trailer, food truck or concession trailer to attract attention. Will fit trailers up to 32' long. While it's intended to be used on the serving side of the trailer, nothing says you can't use it on the driver's side too. This kit is available in both single color (9 colors options) and multi-color (4 variations: RGB, RGBW, RGBW65, RGBA). White provides excellent functional workspace lighting to illuminate the serving area. Multi-color is ideal if you want to be able to change colors based on the event to attract attention. Single color LEDs only require an on/off switch (or dimmer). The multi-color LEDs require an LED controller to operate.
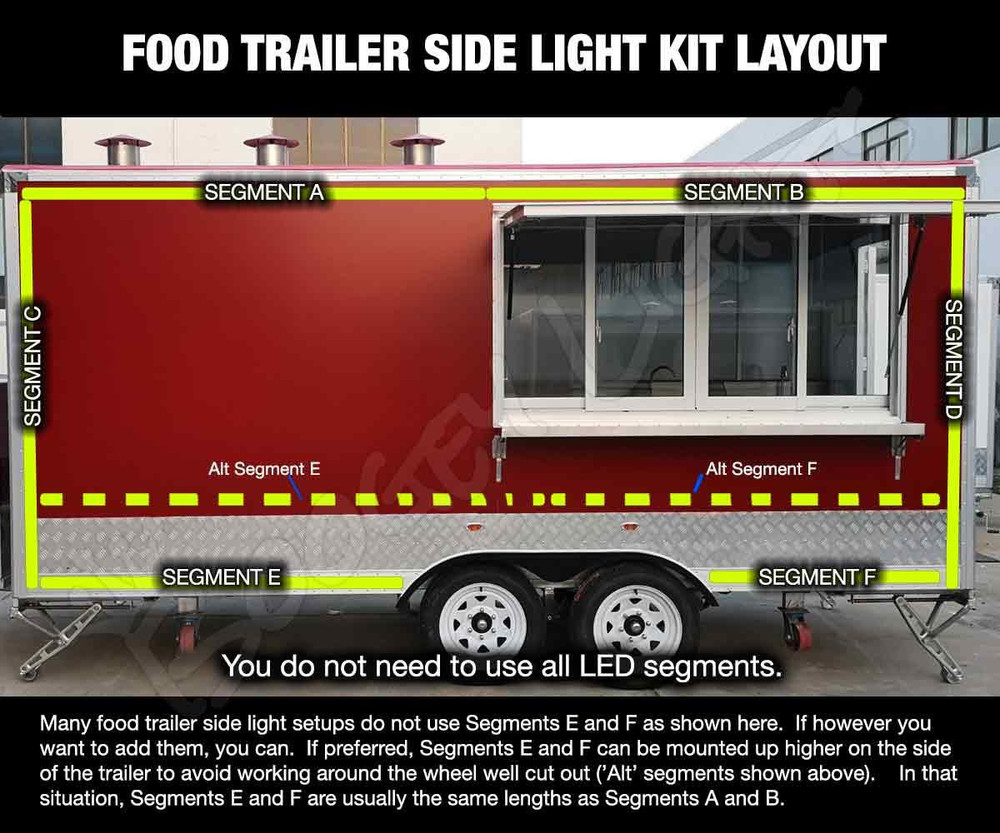
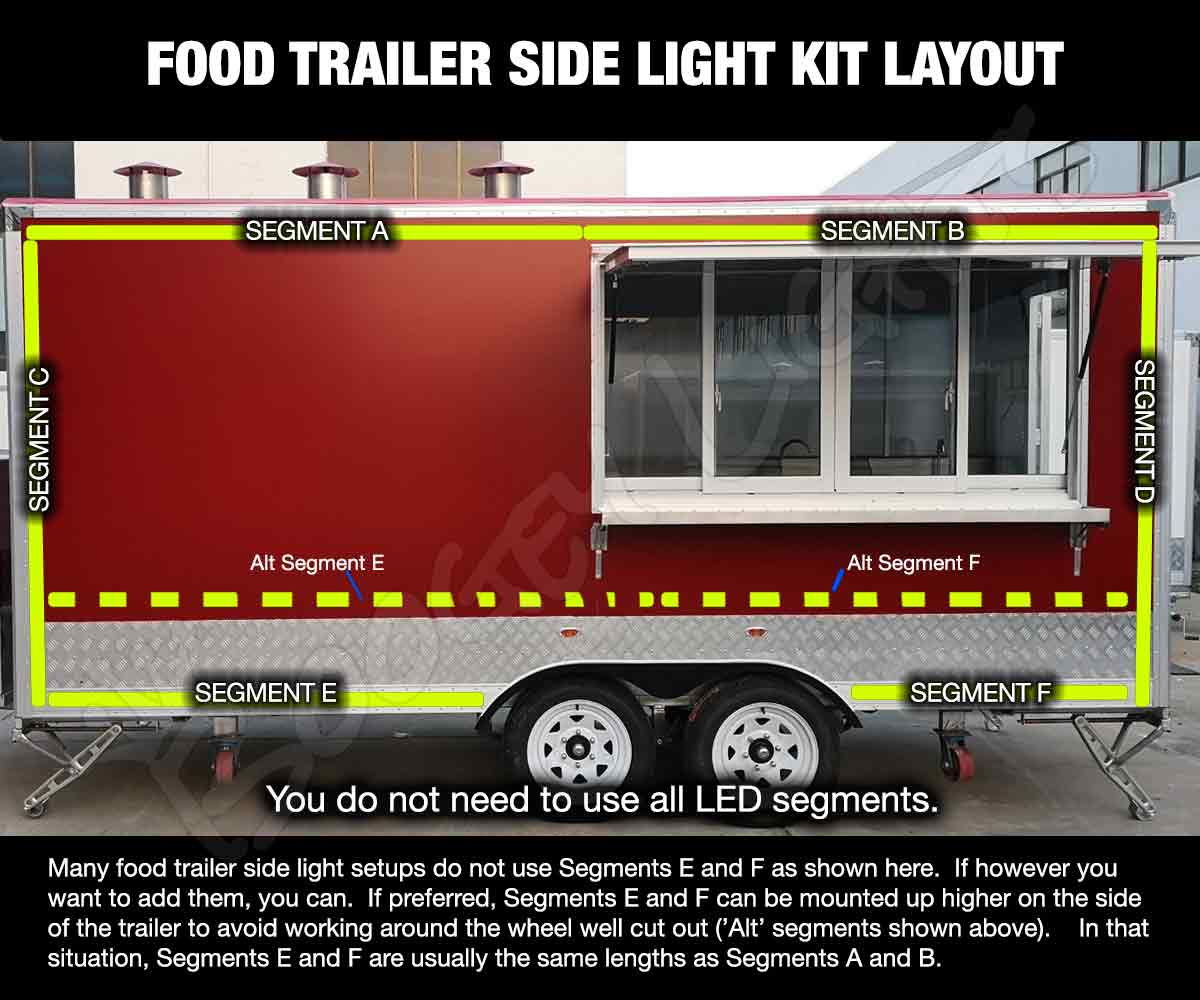
Our high performance super-bright low profile surface mounted LED strips have more LEDs per inch than comparable strips on the market. Each LED strip comes with a 22awg, 15' power lead hard wired to one end. While these lights are native 12vdc for use on motor vehicles, you can also power them with the optional 120vac to 12vdc power converter. We suggest purchasing the optional Aluminum Channel with plastic diffuser. Doing so protects the LED strips and makes for a professional look. As shown on the layout diagram, there are a total of six possible LED segments: A, B, C, D, E and F. The maximum length of a single LED segment is 16' which is why there are two segments (A, B) available across the top and two segments (E, F) across the bottom. Doing so will accomodate trailers up to 32' long. You do not however have to use all segments. If for example your trailer is 12' long, you don't need Segments B and F. Note too that many food trailer customers will use just the top (Segments A and B) and two sides (Segments C and D); they skip segments E and F. Totally up to you. Ultimately though, this kit can be ordered with just one strip length if you want. Details about how to configure this product, specifications and options are below. Be sure to scroll down and read them.
READ THIS BEFORE ORDERING!
Successful installation requires reading the written installation directions. While our How-To Videos offer helpful overviews, they do not replace the detailed documentation. Reading the instructions carefully is essential for proper fit, function, and long-term performance. Most support calls we receive stem from customers who don't read this information. Please take our advice and read the directions. We promise, you'll be happy with the results if you do.
FAQS | Frequently Asked Questions
While we encourage you to read all of the information presented on this product page (including the information on the navigation tabs), below are some of the most frequently asked questions we get about this product. In many cases, the answers to these FAQs will refer you to other sections of this product page for more details on the topic.
I have a 14' trailer and want one LED strip across the top of the trailer. How do I order just one?
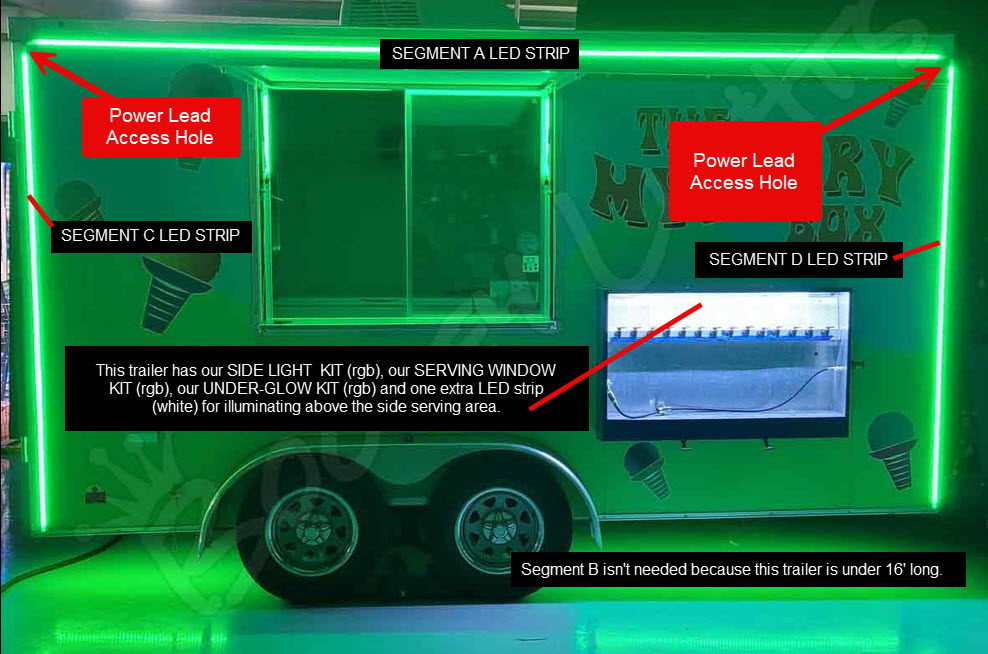
For what it's worth, most people do not order all six LED strips for food trailer side lighting applications. The typical installation is three (or four depending on the trailer length) strips. For trailers 16' or under, most people will order Segments A, C and D. For trailers longer than 16', they order Segments A, B, C and D. If you scroll through the photo gallery on this product page you can see some examples of what others have done.
I see you offer three different versions of WHITE. How do I know which version to choose?
I love the idea of being able to change the color displayed based on the event I'm working to attract attention. If I purchase the multi-color configuration can I still get white as one of the colors?
What is the difference between RGB, RGBW, RGBW65 and RGBA?
Will your Multi-Color RGB/RGBx LED Strips work with other brands of LED Controllers?
Do I need an LED Controller to operate?
Can I power these using my 120vac outlet?
Where can I find information on how to install this Low Profile LED Strip?
Where can I find amperage data for this product?
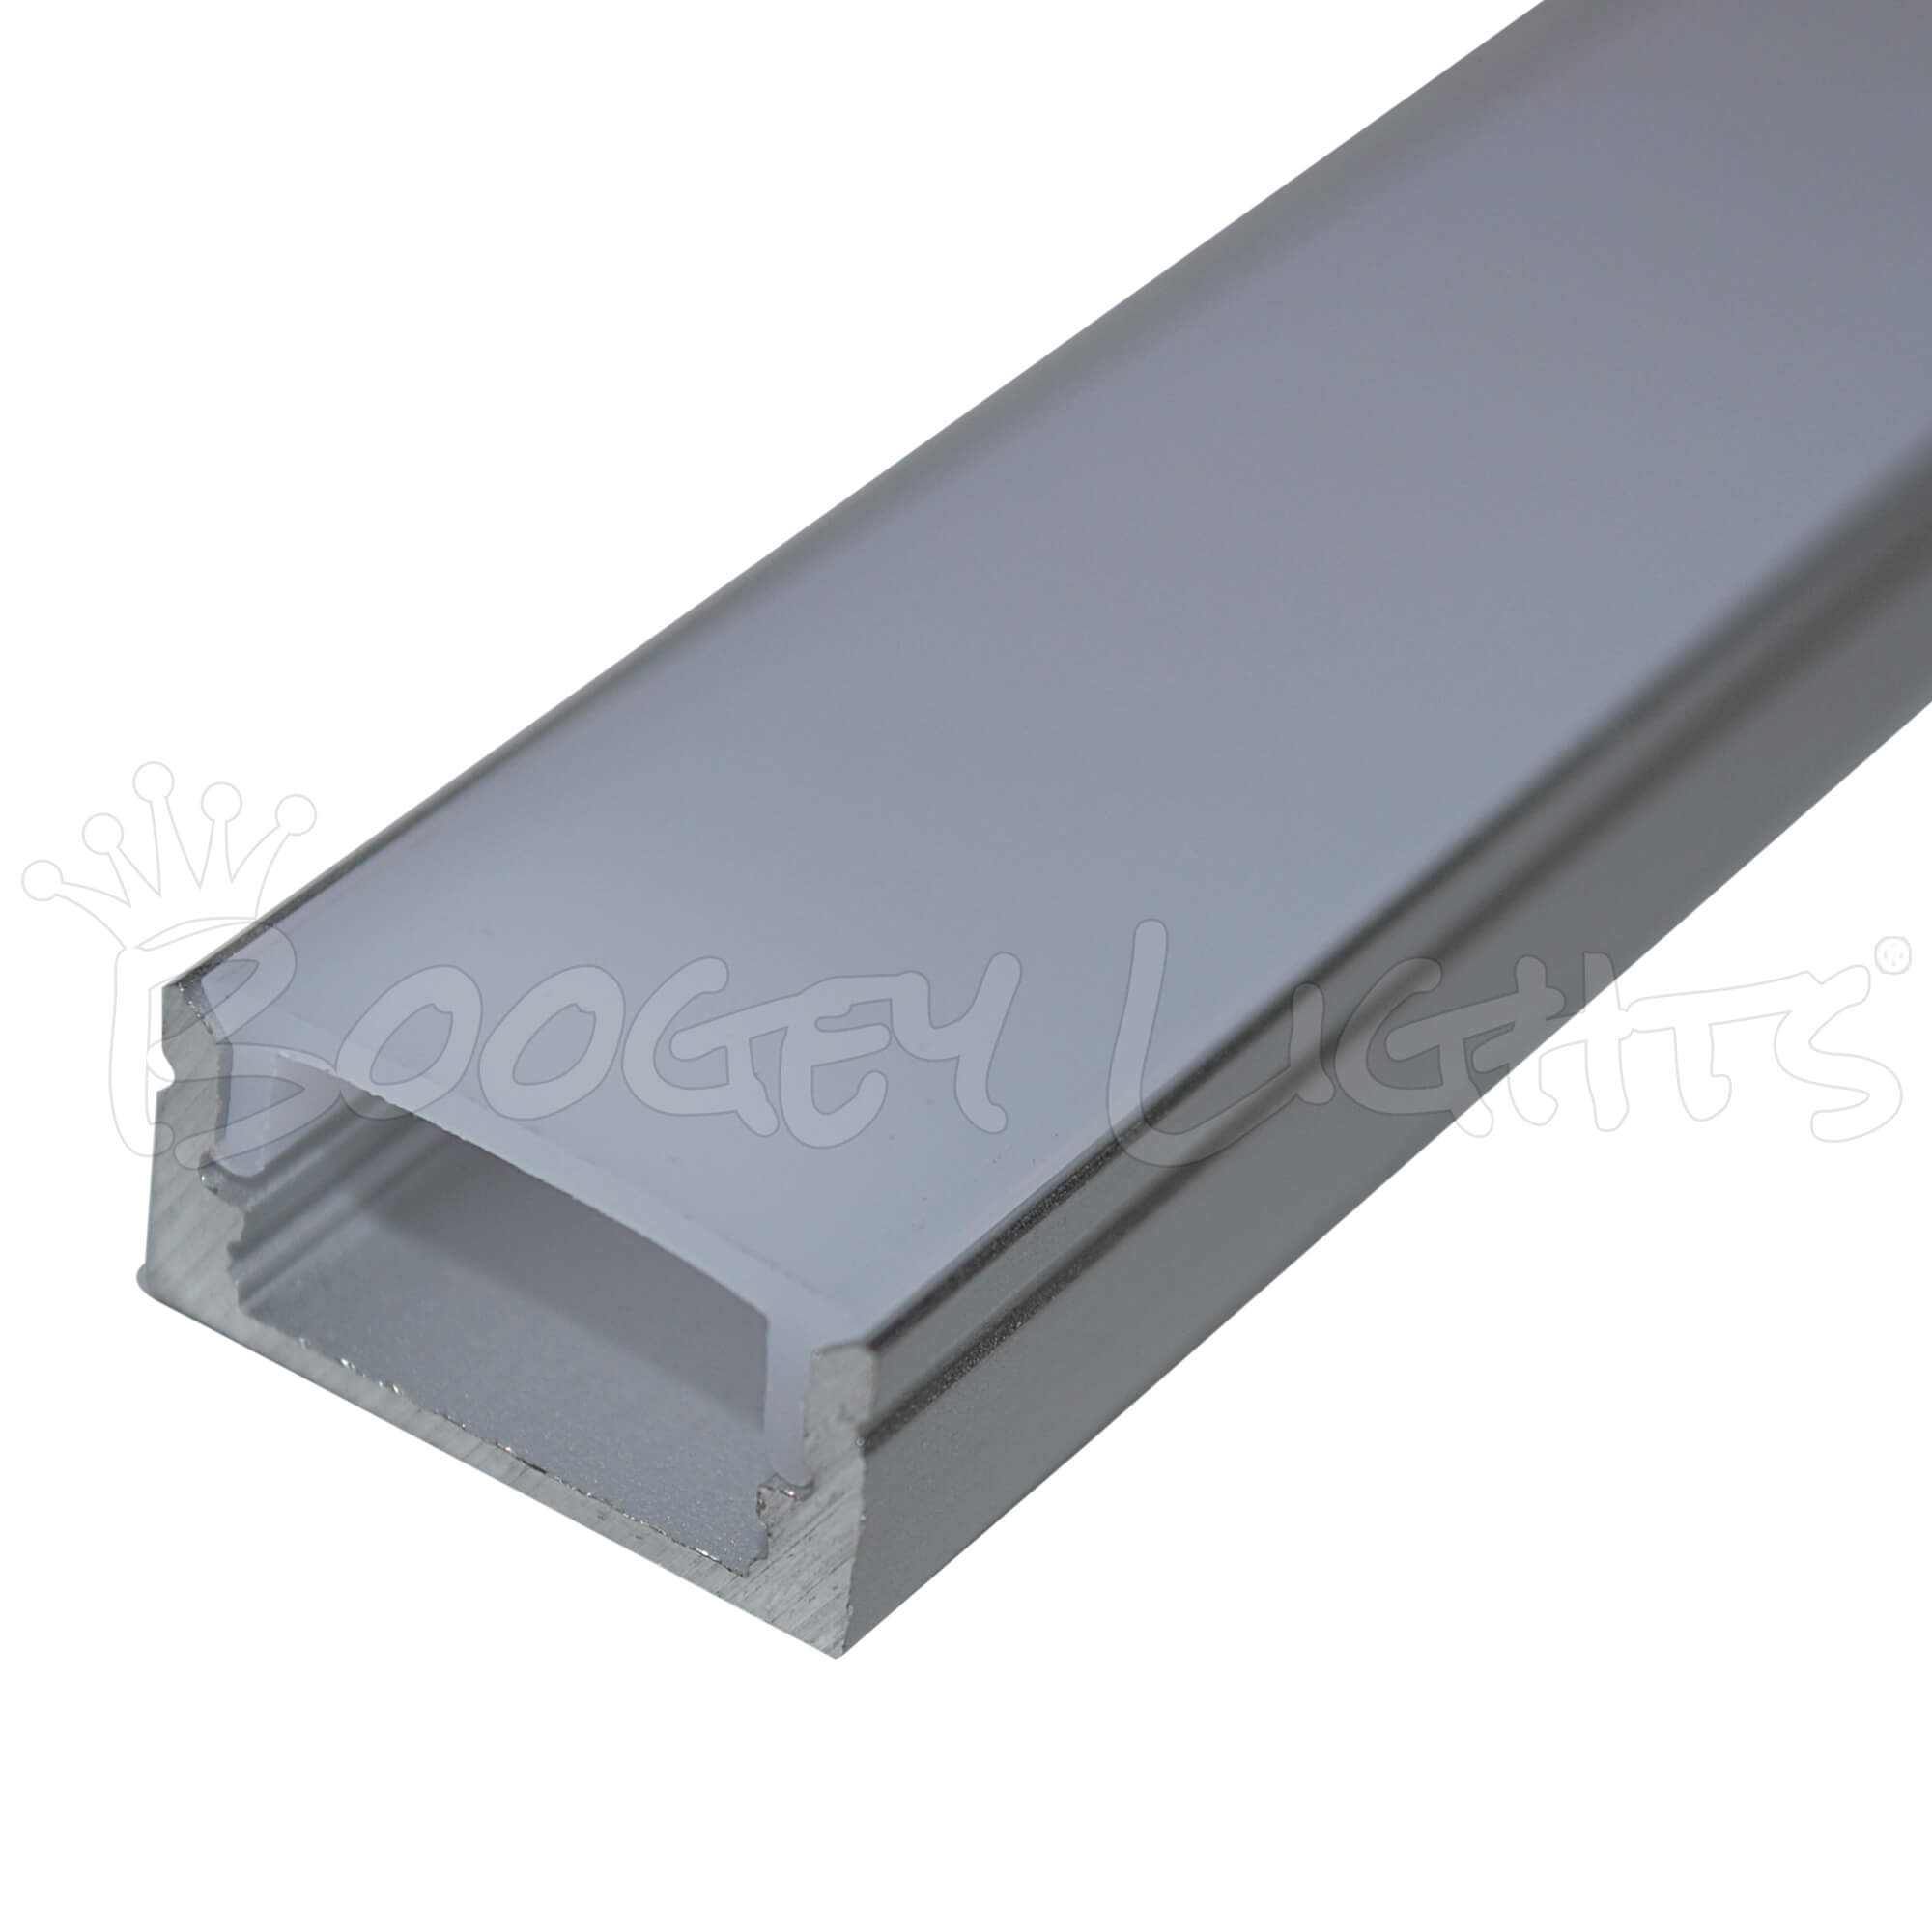
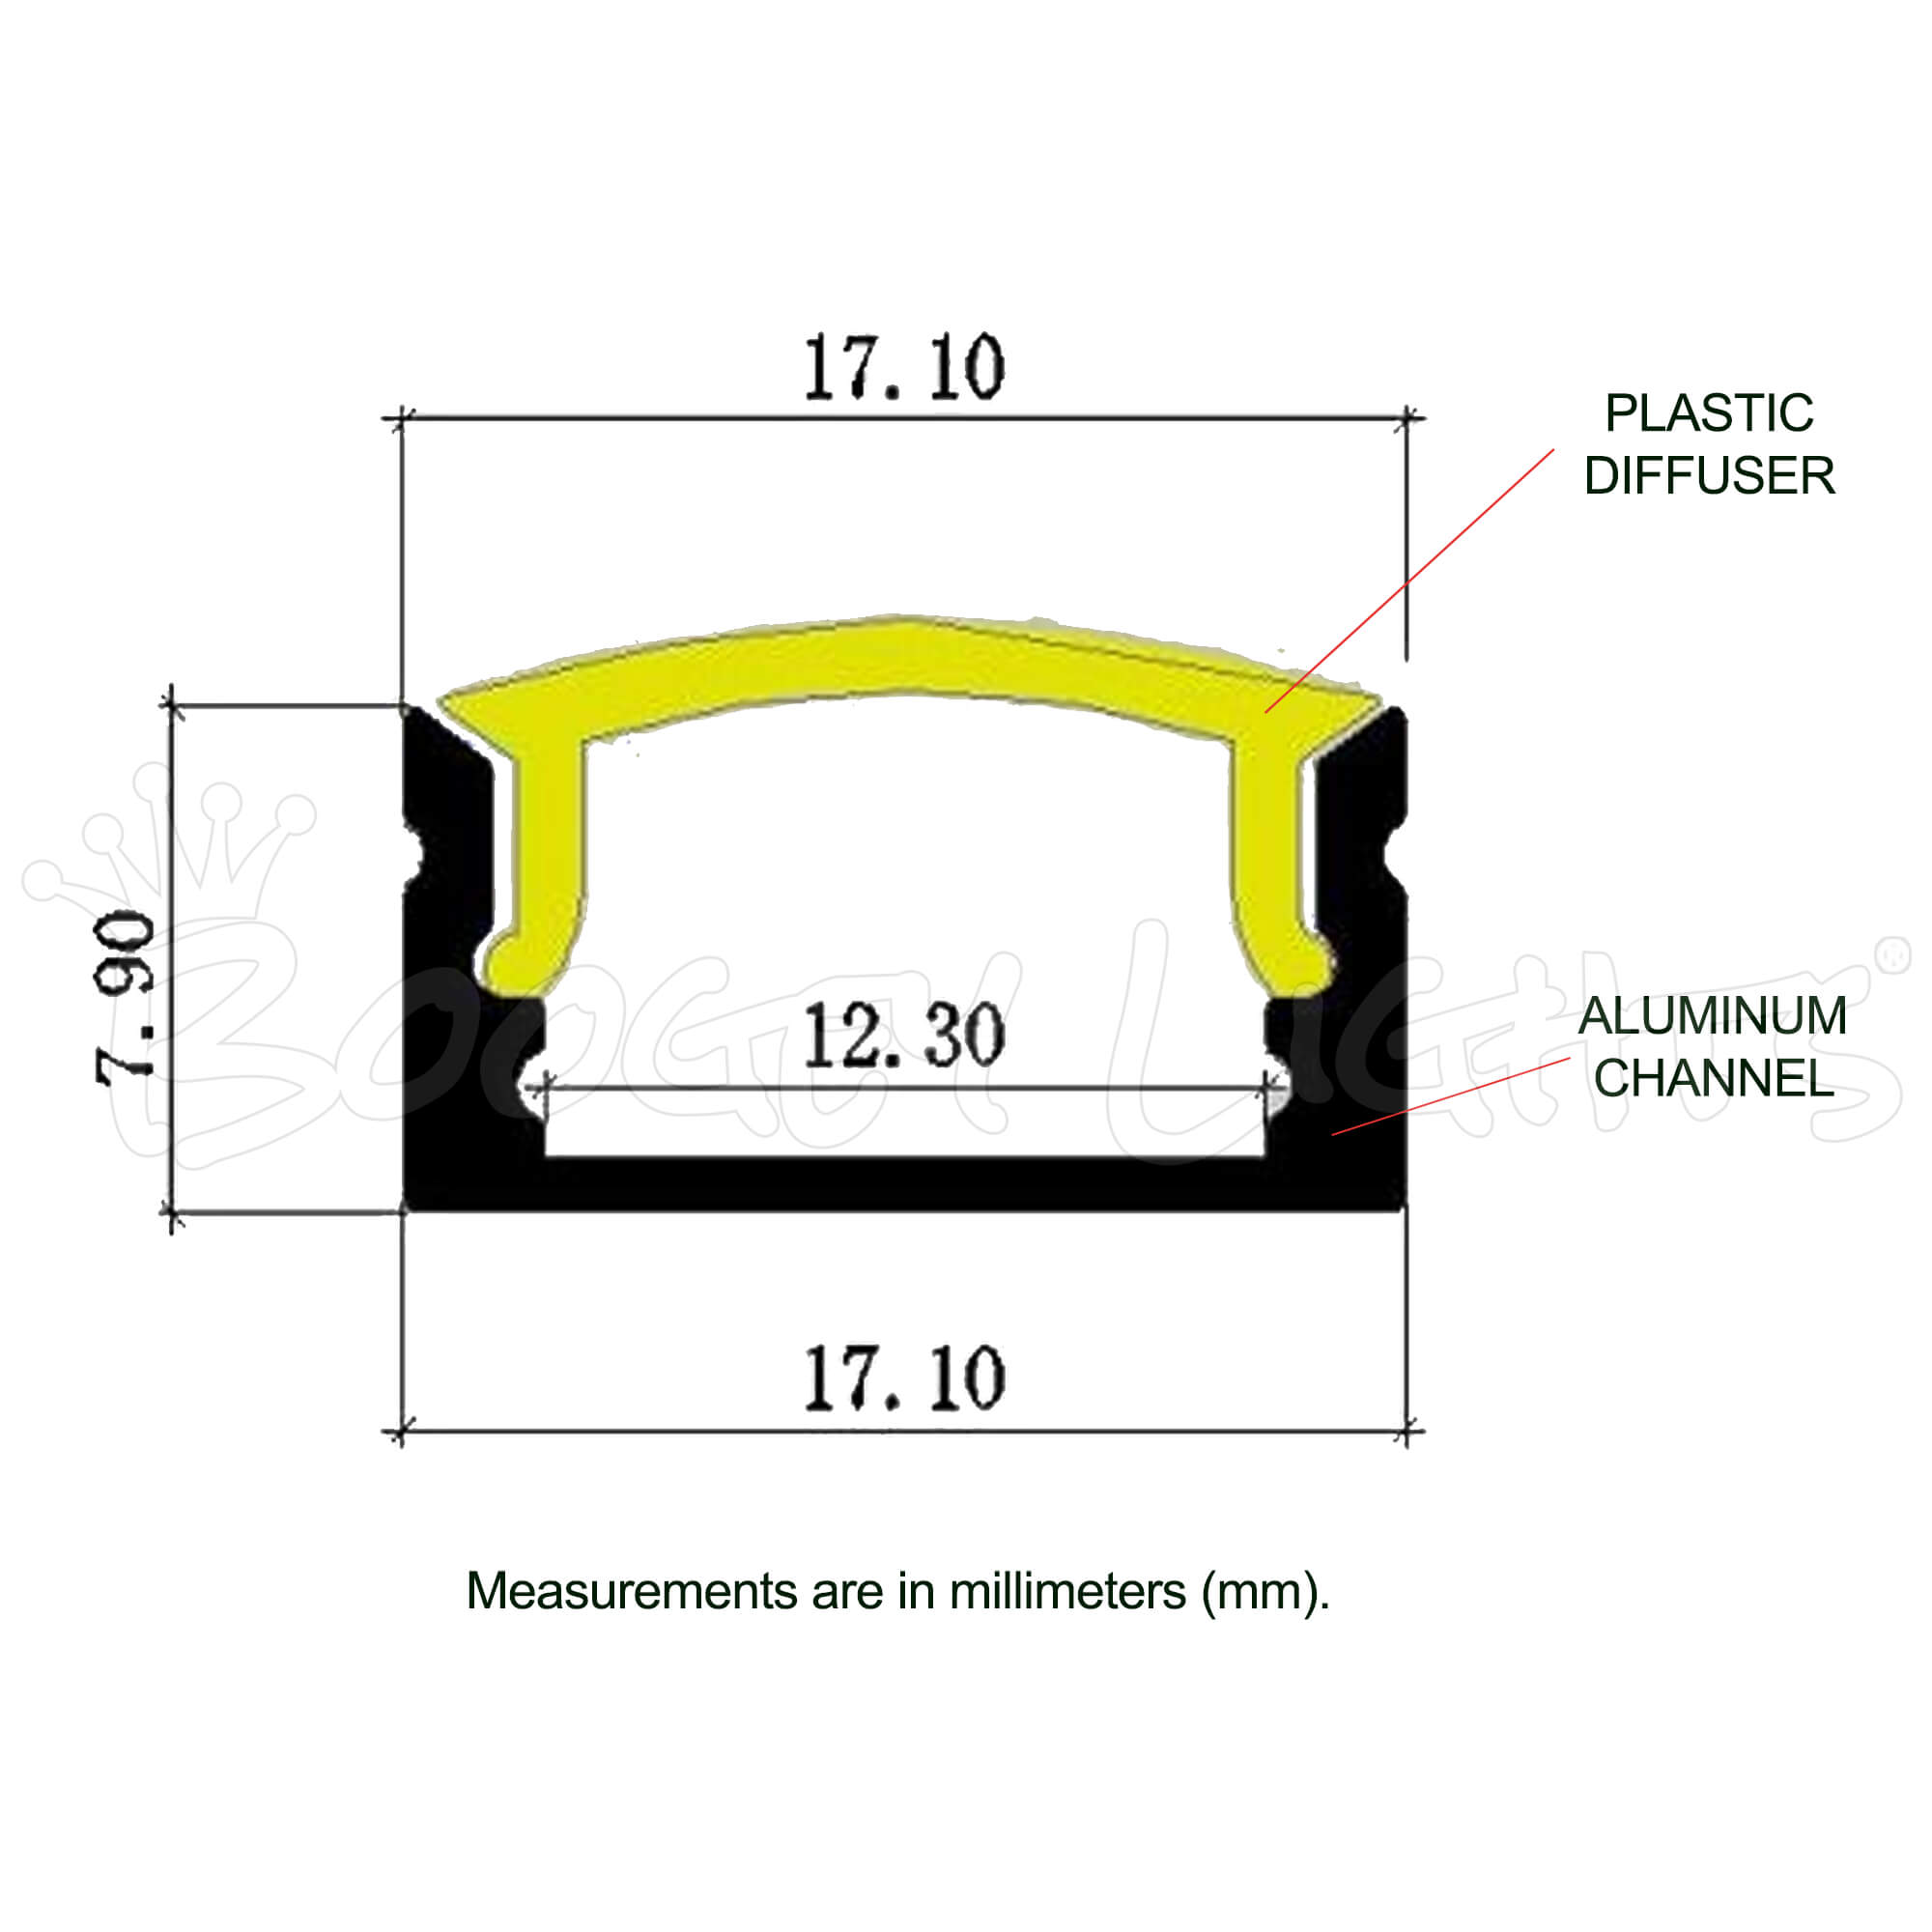
Why would I want to mount these inside an Aluminum Channel?
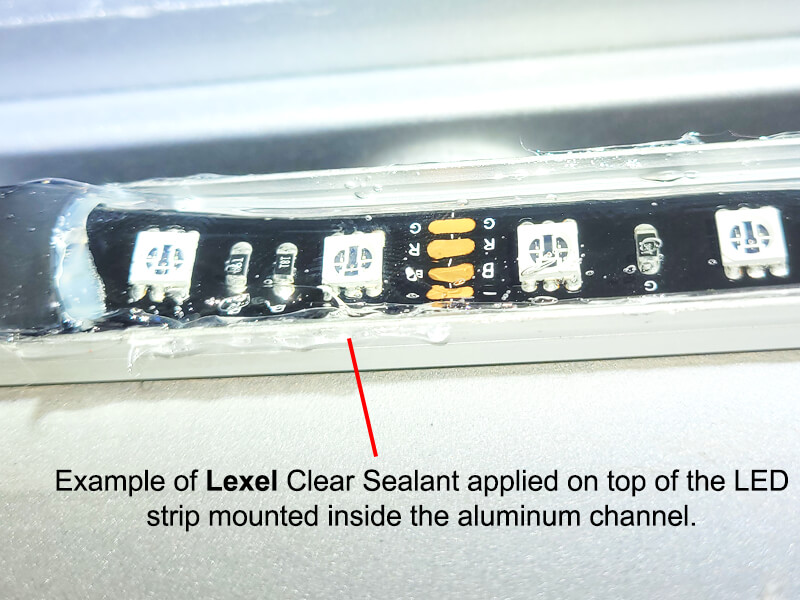
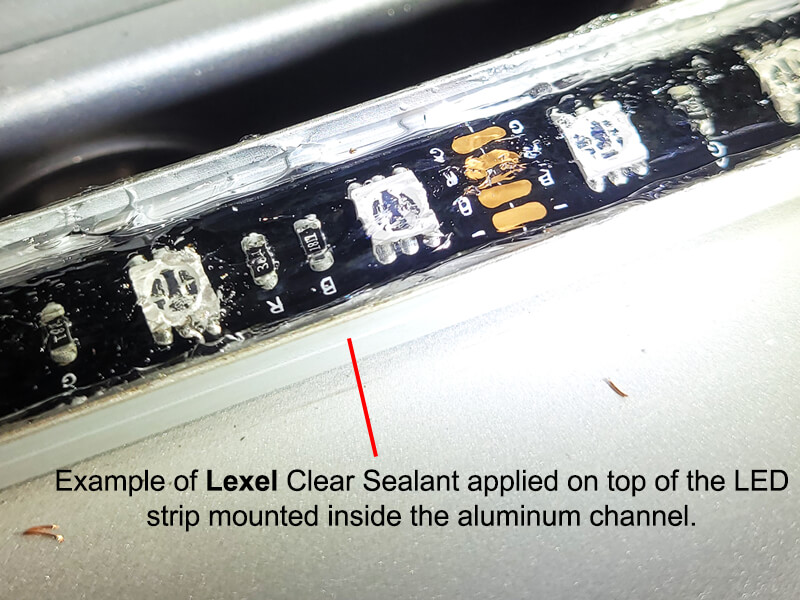
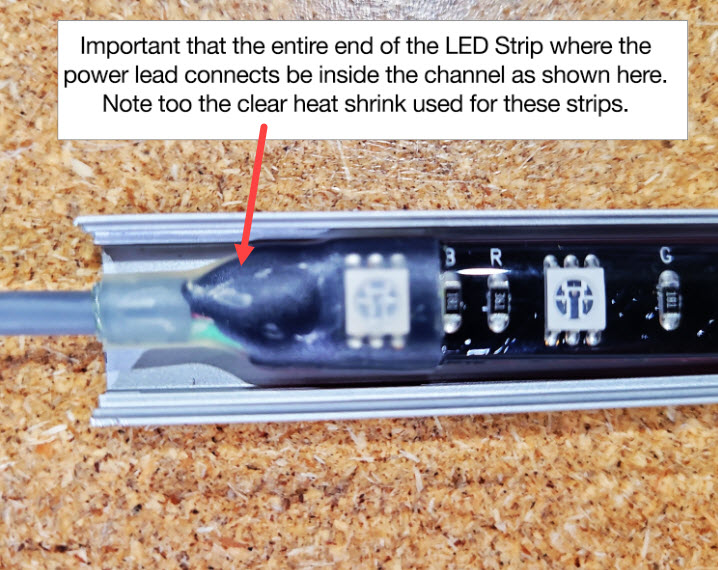
If you're going to be mounting our Low Profile LED strip inside the aluminum channel, be sure to select 'YES' on the question where asked in the product options. When we know the Low Profile LED strip will be mounted inside an Aluminum Channel with the Plastic Diffuser on top we only add one layer of clear heat shrink at the point where the power lead attaches to the LED strip. This is because the connection is less bulky (easier to seal inside the channel) plus the clear heat shrink allows the first diode to be seen. Be sure to scroll down and read the sections titled, 'Aluminum Channel + Plastic Diffuser Mounting' AND 'Mounted Inside an Aluminum Channel?' for important information about this option.
Can I order longer Power Lead lengths?
What is your Return Policy for this product?
Where can I find the specifications for this product?
Will the 3M VHB TAPE hold this LED Strip in place?
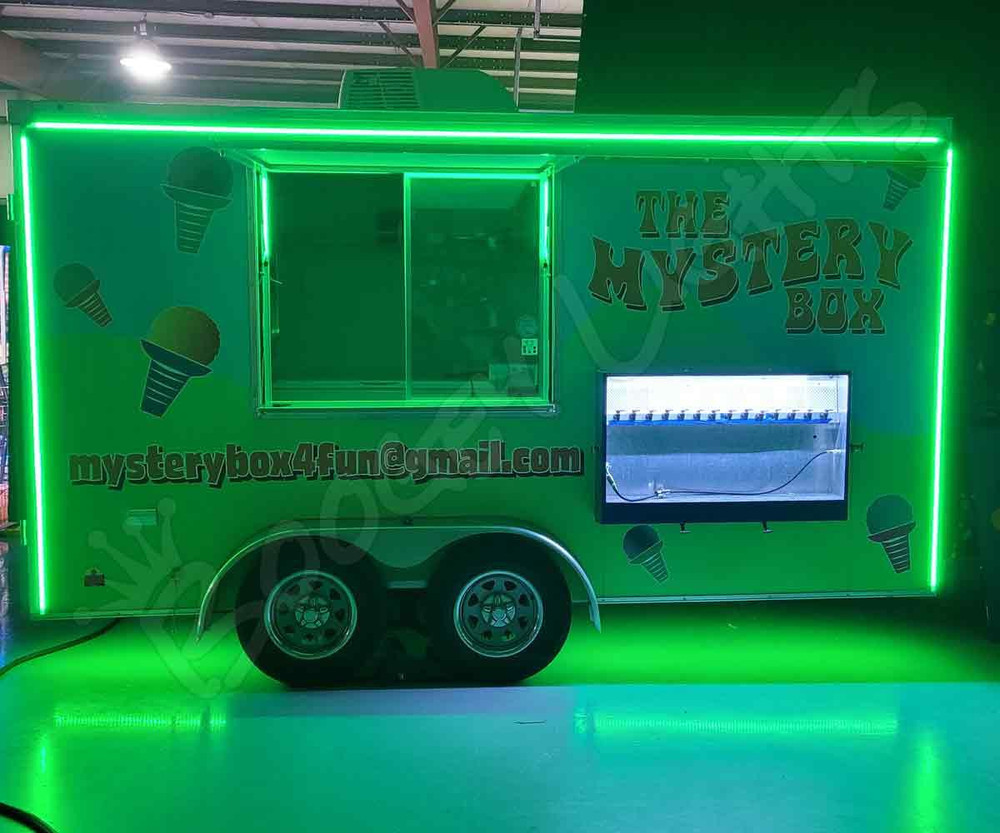
Do you have photos of what the various LED colors look like when lit?
One word of caution. Truth is, it's not possible to accurately describe what a specific LED color looks like or take a picture of it. Why? Because there are a number of factors that impact how a particular LED color appears to the human eye. For starters, it's important to understand that Boogey Lights® are accent lights. With only a few exceptions, our lighting systems are designed to be hidden from view. When installed properly, you'll never see the LED diodes/lighting fixtures themselves. You'll only see the glow reflecting off the surrounding surfaces coming from the LEDs. That means the color of the surface the LEDs are mounted to coupled with the color of the surfaces surrounding the LEDs will directly impact how the human eye perceives the color being reflected. A white surface for example will tend to brighten the color whereas a darker surface will tend to darken the color. Real word scenario: If the LEDs are shining downward on black pavement, the light reflecting off that black pavement will appear different than if on concrete which is a lighter material So for example, the LED color green will tend to look more like a "light green" when shining off of lighter color surfaces and more like a "dark green" when shining off of darker color surfaces. Same LEDs, same diodes but the human eye perceives the color reflected differently based on the color of the surrounding reflective surfaces.
When in doubt, dry mount. If you are looking for a specific color or are very picky about the LED color look you're trying to achieve, we strongly suggest dry mounting the LED strip in the location you're looking to light up and then powering up that strip temporarily with a 12vdc power source. That way you can see how the glow looks for your specific lighting product before committing to a specific LED color. It's really the only way to know how the light will appear.
Do you have LUMENS data for this product?
Product Highlights
BOOGEY LIGHTS® Low Profile LED strips are impressively bright. Built with two ounce copper PCB, the brightest 5050 LEDs available and 1.2mm of genuine 3M® VHB double sided tape, these LED strips are made tough for use outdoors on vehicles and other motor sports applications. The LEDs are completely sealed against the elements. They're IP65 rated. They are heat resistant, waterproof and easily cleaned for maintenance free operation. The soft, gel-like strips provide maximum flexibility and a clean and sleek appearance. Their low profile design makes them easy to fit into tight spaces and yet are incredibly bright; nothing brighter on the market. These Low Profile LED strips are dim-able when used either with a Boogey Lights® LED controller or wired LED compatible dimmer switch.
They're available on black PCB in varying lengths ranging from 3 (2") to 300 LEDs (16'). The default configuration has one 15' power lead hard wired to the end of the strip.
Our Low Profile LED strips used in this product can be cut every 3 LEDs. See details on how to cut our LOW PROFILE LED strips here. If you want longer power leads, we offer additional power lead length options. If you are going to "daisy chain" LED strips together, make sure you do not exceed the maximum of 300 LEDs in a single run. This is super important as you not only void our warranty by doing so but you run the very real risk of starting a fire.
The single color and RGB Low Profile LED strips are 10mm (~3/8") wide x 4mm (~3/16") high. The RGBx Low Profile LED strips are 12mm (~1/2") wide x 4mm (~3/16") high. There are approximately 18.3 LEDs per foot (300 / 197" x 12) - although we suggest rounding up to 19 per foot when doing amperage calculations. Amperage Data is based on the LED color displayed. Scroll down for the Amperage Chart. It's also available on the SPECS navigation tab of this product page.
Power Lead Length: This product's power lead wire is 15' long and is hardwired to one end of each LED Strip segment. The wire gauge is 22awg. If you need to go longer than 15' on the power lead we always suggest using 18AWG cable ( POWER LEAD WIRE ) to extend where needed versus using longer runs of 22AWG. 18AWG is thicker which means the voltage drop won't impact brightness for distances under 50'. Plus, resistance is lower so amperage can be increased. If you're confused on these concepts, we urge you to seek assistance from someone who can help you with designing your lighting system. Wire gauge selection, wire lengths, amperage draw and power source voltage/amperage/charging rates are important considerations when designing your lighting system. NOTE: There are NO CONNECTORS on these power leads. Each power lead has bare wire on the other end (2, 4 or 5 conductors depending on the product). All connections are hard wired. This is by design.
Boogey Lights® RGB, RGBW and RGBA LEDs are common cathode LEDs. They share a common ground and will only work with positively switched LED controllers. Most third party led controllers are negatively switched controllers and will not work with Boogey Lights RGB, RGBW or RGBA. If you order any of the RGB LED strips listed here you will need a positively switched LED controller to operate. .
RETURN POLICY EXCEPTION. This product is considered to be a custom product. We build these LED strips to the lengths/colors you specify in the order. It is not eligible to be returned for a refund. STORE CREDIT only. Be sure to read our RETURN POLICY for details.
Available Product Options
LED Color Option
Controller Configuration
SINGLE COLOR LED SWITCHING OPTIONS
- None. Select this option if you are going to provide your own single color switching mechanism. Simple 12vdc on/off switches are widely available at any auto parts store, home goods store or online. Just make sure you purchase a switch that can handle the amperage.
- On/Off Toggle Switch. This is a simple on/off toggle switch. Rated for up to 25amps.
- On/Off RF Wireless Switch. This is an RF wireless on/off switch with key fob. Rated for up to 5amps. If your lighting application exceeds 5amps, you can use a heavy duty relay. In this case the on/off wireless switch opens/closes the relay (milliamps) and the amperage power runs through the relay. See wiring diagram on the relay product page.
- Dual Zone HD RF Wireless Controller. This is our DUAL ZONE, single color controller. It's an RF wireless single color controller capable of handling up to 1500 LEDs per zone (3000 LEDs total) at 20 amps per zone. Each zone can be operated independently or together. Details are on the product page linked.
MULTI-COLOR LED CONTROL OPTIONS
- Single Zone HD RF Wireless + Bluetooth. This LED controller is the single zone Heavy Duty version of our GEN2 Bluetooth + RF Combo multi-color LED controller. This controller will handle up to 1800 RGBx LEDs. It is the default command/control selection for any of the RGB(x) LED color selections. Details are on the product page linked.
- Dual Zone HD RF Wireless + Bluetooth. This LED controller is the dual zone Heavy Duty version of our GEN2 Bluetooth + RF Combo multi-color LED controller. This controller will handle up to 3000 RGBx LEDs in each zone (1500 per zone). Each zone can be operated independently or together. Details are on the product page linked.
- I already have a GEN2 Boogey Lights controller. Select this option if you already have a Boogey Lights LED controller (e.g. Under-Glow light kit) and will be operating this side light kit with that same controler. If so, just be sure to confirm amperage.
PCB Color
Power Lead Length
Define the Segments (A, B, C, D, E or F) You Want
Segment A LED Length
Segment B LED Length
Segment C LED Length
Segment D LED Length
Segment E LED Length
Segment F LED Length
Mounted Inside an Aluminum Channel?
Add Aluminum Channel w/Diffuser
NOTE: If using the Aluminum Channel with RGBW, RGBW65 or RGBA (aka 'RGBx)', you need to be especially careful during the installation of the LED strip to the channel. Why? The width of the channel is just 1mm wider than the width of the RGBx LED strips. Using too much force to push the LED strip into the channel (and snapping the plastic diffuser on top) can damage the LED strip which is not covered under warranty.
Add Power Converter
Add LEXEL Clear Sealant
We like LEXEL over others in that it dries clear (doesn't impact the amount of light the LED chips emit) and most importantly, it's petroleum based. A petroleum based sealant is required so the material will adhere to the Low Profile LED strip coating. A water based sealant will absolutely not work. One 10.5 ounce tube will go a long way. Highly recommend.
NOTE: We provide this product as a convenience to customers. We are not the manufacturer. You can purchase this product elsewhere for less.
How to Order
- Decide where and how you are going to mount the LED strips. And, how many LED strips you need. For side lighting, most people will mount the LED strips inside aluminum channel with diffuser over top and are multi-color.
- Once you know where you're going to mount the LED strips, you need to take measurements of those locations. Keep in mind the LED strip MUST be mounted flat against a single continuous mounting surface, in a straight line; it cannot bend around a radius or corners. Plus, the entire strip needs to be stuck to the mounting surface and not span across mounting surfaces. If you do, the strip will almost certainly fail in the spot that isn't affixed firmly to the mounting surface or, the point at which is spans across the two mounting surfaces. If you are going to mount the LED strips inside an aluminum channel, it's important to leave 1.5" - 2" on each end of the LED strip for the power lead. The point where the LED strip and power lead meet need to be inside the aluminum channel. We show photos of this in the section titled 'Aluminum Channel + Plastic Diffuser Mounting' below.
- Determine the LED color you want to use and how you are going to operate the lights. Single color are straight forward. They only require an on/off switch. Multi-color is more complicated as they require an LED controller. You'll need to determine how you're going to operate your server window lights. The CONTROLLER CONFIGURATION section provides more detail on this.
- Determine how you're going to power your service window lights. Are you going to wire directly to 12vdc or do you have 120vac power available? If 120vac, you're going need to purchase a 120vac to 12vdc power converter.
- Once you have answered the above questions, you're ready to place your order.
Multi-Color Require an LED Controller
The RGB, RGBW and RGBA multi-color Low Profile LED strips available on this product require a positively switched LED controller to operate. They are designed to work with our GEN2 COMBO LED CONTROLLER. You'll notice that when you select any of the RGB/RGBx LED colors the product page will adjust to select our Single Zone Heavy Duty RF Wireless + Bluetooth Combo LED controller. There's also a Dual Zone HD controller version too. The Single Zone HD controller will power up to 1800 LEDs. The Dual Zone HD controller will power up to 3000 LEDs (1500 per zone). More info on these LED controller options is below. If you have our Under-Glow light system installed, you can probably use the same LED controller to power all of the LEDs which is why we offer the 'I already have a Boogey Lights GEN2 Controller' option on the Controller Configuration drop down. Just make sure you do not exceed the specified maximum load.
Note that Boogey Lights® Low Profile RGB/RGBx LEDs are common cathode LEDs. They share a common ground and will only work with positively switched LED controllers. Most third party LED controllers are negatively switched controllers and will not work. Scroll down on this product page and read the section titled 'WILL THESE WORK WITH OTHER LED CONTROLLERS?' for more information on this topic.
LED Controllers: Single Zone, Dual Zone?
For the three multi-color LED options, this kit offers both SINGLE ZONE and DUAL ZONE controller options. As the names suggest, a Single Zone controller has just one single lighting zone. All LEDs wired to the controller are on one zone. Whatever color or feature set you apply will be what you get on all leds. Pretty simple. With our Dual Zone controller, you can set up and operate two distinct lighting zones which can be operated and controlled individually or together. Many customers will install their full-perimeter under-glow system such that ZONE 1 controls the drivers side under-glow lights and ZONE 2 controls the front, rear and passenger's side under-glow lights. Why? If you find yourself camping in crowded campgrounds there may be situations where you want to turn off the driver's side under-glow lights (which faces the campers next to you) but leave the front, rear and passenger's side under-glow lights on. Of course there are other reasons too. Some customers will use ZONE 1 for the entire under-glow system and ZONE 2 for their awning (or slide out) lighting. Previously this type of configuration would require two different controllers. The point is that with the Duty Dual Zone LED Controller you have more flexibility as to how you want to control your Boogey Lights. On a Dual Zone controller each lighting zone is capable of supporting up to 1500 LEDs for a total of 3000 LEDs. It will work with your Android® or iOS® Smart phone. It will also work with the included M7 Style RF wireless remote.
Note: You'll notice we offer the option to order the RGB/RGBA/RGBW Under-Glow Light Kit without an LED CONTROLLER (select NONE). We do this assuming the user already has a Boogey Lights LED controller. Be aware that Boogey Lights multi-color LEDs require a positively switched controller to operate. As such, you cannot use another brand of LED controller. It must be Boogey Lights.
Details on features are below.
GEN2 LED CONTROLLERS
Bluetooth + RF Combo Wireless Control
The LED Controllers offered in this kit are our GEN2 Single Zone and Dual Zone Heavy Duty Bluetooth COMBO LED Controllers. COMBO means they can be operated using either the included M7 RF wireless hand held remote OR your Bluetooth enable smart phone (and our free APP). Both will work. The RGB version is capable of displaying 16 million different color combinations. The GEN2 RGBx version can display even more color combinations depending on the type of LED strips connected to them. In addition, lighting effects on the Bluetooth controller are significantly more controllable in terms of speed and intensity. Each color and lighting effect is controlled by "sliders" or a color square on your smart phone screen so you can adjust the speed and intensity to get the lighting the way you want it.
Key Features & Capabilities
- Our GEN2 LED Controllers are based on the Bluetooth 5 chip set family which provide fast response times and the best possible RF/Bluetooth transmission distance.
- The SUPER and HEAVY DUTY GEN2 Controller can support Single Color, RGB, RGBx and RGBxx LED strips with both RF and Bluetooth control.
- The HEAVY DUTY controller versions include two antennas: a screw-on 2" stubby antenna and an extended magnetic mount antenna with 15' of wire for optimal reception on any vehicle.
- Use the included RF wireless remote to quickly turn on/off/dim your Boogey Lights. You can also select up to 7 different preset colors using the RF remote as well as access 7 different lighting features.
- Use your smart phone to operate your Boogey Lights®: On, Off, Dimming, Color Selection, Brightness, Speed, Color Programming, Timers
- Adjust the color sliders or color square to select the color you want.
- Access additional lighting features (e.g. strobing, flashing, breathing, morphing) modes using the 7 Function Keys.
- Save your favorite lighting configuration using Pre-Sets
- Countdown Timer and a 24 hour On/Off Timer function
- Quick-Switch feature for use with RGBx LED strips.
- Password protection to stop others from connecting to your LED controller.
- Programmable Color Rotation mode offers the ability to program the controller to display two or three colors of your choice and then rotate those colors in sequence.
- Assign a 'nick name' to your controller so you can easily find it when scanning.
- Set the APP to auto-connect to your LED controller every time you launch the APP on your phone
- DOWNLOAD the GEN2 LED Controller Operating Manual & Wiring Diagrams
- DOWNLOAD the GEN2 Bluetooth Operating Manual
- DOWNLOAD the GEN2 M7 RF Wireless Remote Operating Information
- VIEW the GEN2 LED Controller Series Product Page
- VIEW the GEN2 BLUETOOTH APP Information Page
Aluminum Channel + Plastic Diffuser Mounting
If you're purchasing the LOW PROFILE LED Strip and you intend on mounting the LED strip in plain view such as on the side of a food trailer facing outward, we suggest mounting the LED strip inside this ALUMINUM CHANNEL with PLASTIC DIFFUSER on top. Why? Because they protect the LED strip from a direct strike AND provide a professional looking installation. Not only does the aluminum channel and diffuser protect the LED strip the opaque plastic diffuser gives off a nice glow lighting effect too. The Mini T12 Aluminum Channel is a low profile design that can be mounted just about anywhere. It has an anodized finish (electrostatic sprayed) which provides maximum protection against the elements. They're ideal for harsh indoor or outdoor use to protect the LEDs. The channel can be mounted any number of ways including adhesive tape, rivets or screws. We typically rivet the channel to the surface where possible. Then, the LOW PROFILE LED strips fit nicely into the channel using the 3M tape already affixed to the back of Boogey Lights LED rolls. The diffuser completes the installation by snapping into the channel. On outdoor installations we advise adding some Lexel to the ends of the channel as well as on the sides to seal it. Read more about using these Low Profile LED strips inside Aluminum Channels here. And if you are going to be using our LOW PROFILE LED strips with an aluminum channel/diffuser, be sure to select 'YES' on the question re: "Mounted Inside an Aluminum Channel?" on the product options. Details as to why this is important below.
Mounted Inside an Aluminum Channel?
If you're going to be mounting this Low Profile LED strip inside our Aluminum Channel with the Plastic Diffuser on top, it's important to select YES. Why? When we know the Low Profile LED strip will be mounted inside an Aluminum Channel with the Plastic Diffuser on top we only add one layer of clear heat shrink at the point where the power lead attaches to the LED strip. This is because the connection is less bulky (easier to seal inside the channel) plus the clear heat shrink allows the first diode to be seen. We normally will use two layers of heat shrink but it makes the connection bulkier and the second layer uses black adhesive heat shrink which covers up the first diode. See photo below of what we are referring to. Read more about using these Low Profile LED strips inside Aluminum Channels here
NOTE: If using this Aluminum Channel with RGBW, RGBW65 or RGBA (aka 'RGBx)', you need to be especially careful during the installation of the LED strip to the channel. Why? The width of the channel is just 1mm wider than the width of the RGBx LED strips. Using too much force to push the LED strip into the channel (and snapping the plastic diffuser on top) can damage the LED strip which is not covered under warranty.
Add LEXEL Clear Sealant?
We like LEXEL over others in that it dries clear (doesn't impact the amount of light the LED chips emit) and most importantly, it's petroleum based. A petroleum based sealant is required so the material will adhere to the Low Profile LED strip coating. A water based sealant will absolutely not work. One 10.5 ounce tube will go a long way. Highly recommend.
NOTE: We provide this product as a convenience to customers. We are not the manufacturer. You can purchase this product elsewhere for less.
What is RGB?
RGB stands for RED, GREEN, BLUE. Each LED chip on the strip contains three diodes: One Red. One Green. One Blue. When paired with an LED controller, the mixing of those three primary colors can create up to 16 million different color combinations. For example, equal parts RED + GREEN + BLUE = WHITE (bright white, 6000 Kelvin temp). RGB leds are the most common leds due to their versatility in creating so many different color combinations.
Single Color vs Multi-Color
Single Color LEDs will always be brighter than multi-color. If you're looking for the absolute brightest LED, Single Color is what you want. Why? All of our RGB and Single Color LEDs use a 5050 tri-chip LED. Each 5050 LED has three LED diodes. In a RGB LED those three diodes are red, green and blue. When combined with an LED controller the mixing of those three colors will produce up to 16 million different color combinations. For example, using an RGB LED chip mixing equal parts red + green + blue will produce WHITE (6000 Kelvin temp.) In a single color tri-chip LED there are also three LED diodes however all three of those LEDs are the same color. Because there are three diodes of all the same color, the light will be brighter. Of course you only get one color with a Single Color LED so there are trade offs. Important to note that 5050 LED chips are the brightest available. So even an RGB LED Chip will produce a very bright light. In fact, most people find they need to dim them. We rarely have a customer tell us the lights are not bright enough. And in the cases where they do, it's because they don't have sufficient power to support the amperage load (and the lights dim).
White LEDs: 6000K, 4000K or 2400k?
Color temperature is a method of describing the color characteristics - warmth or coolness - of a white light source. Commonly referred to as the Correlated Color Temperature (CCT), it's a gauge of how yellow or blue a white light source appears to the human eye. The spectrum of color temperature is assigned a numerical value, measured in degrees of Kelvin (K), on a scale of 1,000 to 10,000. Most Kelvin temperatures for modern lighting applications however fall somewhere on a scale of 2000K to 6500K. The color temperature of a light source lets us know what the look and feel of the light produced will be.
We offer three different Kelvin temperatures of WHITE as follows: COOL WHITE (6000K), SOFT WHITE (2400K) and NATURAL WHITE (4000K).
Cool White (aka Bright White) is the most popular and is by default what we ship the most. It's also the color of white that is created with RGB LEDs (mixing equal parts red + green + blue = cool white). It's excellent for functional lighting and is used the world over in offices, public places, warehouses and the like.
Soft White (aka Warm White or Candle White) is the second most popular since it provides a nice contrast to the Cool White. It's on the opposite end of the Kelvin scale with a 2400K temp. Soft White has a yellowish tint to it making it softer; easier on the eyes - not nearly as bright as Cool White though. It's great for creating ambiance but not functional lighting. You'll notice we offer an RGBW product that includes RGB + one diode of this soft white color which provides both Cool White and Soft White options (along with RGB of course). It's our most popular Multi-Color LED strip for this reason.
Lastly, we offer a Natural White (aka Neutral White) which has a Kelvin temp of 4000. This shade of white is middle of the road - half way between Soft White and Cool White. We offer it in a single color only. See below images to help demonstrate the differences.


What is RGB + WHITE (RGBW)?
On the RGBW led strip, in addition to RGB, you get one extra diode which is Warm White. That warm white diode has a Kelvin temperature of 2400 which means it has a yellowish look giving it a warmer, softer, candle like look (see photo below). That fourth diode on the RGBW led strip can be wired directly to our GEN2 LED Controller which supports RGBx LEDs. As an option, you could also wire that fourth diode to a completely separate on/off switch. Your choice. You could also use the Quick-Switch feature with this fourth diode too.
What is RGB + WHITE65 (RGBW65)?
On the RGBW65 led strip, in addition to RGB, you get one extra diode which is Bright White 6500K. That extra bright white diode has a Kelvin temperature of 6500 which means it's a very bright white. That fourth diode on the RGBW65 led strip can be wired directly to our GEN2 LED Controller which supports RGBx LEDs. As an option, you could also wire that fourth diode to a completely separate on/off switch. Your choice. You could also use the Quick-Switch feature with this fourth diode too. Some customer prefer the bright white over the warm white.
What is RGB + AMBER (RGBA)?
RGBA is a new type of LED strip we designed. It includes our core RGB tri-chip technology with the addition of a fourth diode that is AMBER. Designed primarily for motor vehicle applications, that fourth AMBER diode can be wired to a separate switch on the dash that allows you to quickly and easily turn on just the AMBER leds which meets DOT compliance regulations. Then, for those who want the flexibility to also be able to display up to 16 million other color combinations using our RGB LED Controller, they can do that too. RGB + A provides the best of both worlds. Note that due to the addition of that fourth diode, the RGBA LED strip is wider than our standard tri-chip LED strips. They're 11/16" wide (vs 1/2" for the tri-chip strips). For additional information including product specs, click the SPECS navigation tab on this product page.
Other Items You May Need
No two installation scenarios are the same. Not everyone shares the same installation quality goals. Some folks are OK with twisting wires together, others want to solder them. Some folks are OK with running wires where they may be seen or unprotected to save money/time, others want a tidy, clean install without any wires showing. Some folks are OK with mounting their LED strips to whatever surface they can find, others want to take the time necessary to build out appropriate mounting surfaces to provide the best lighting effect on their vehicle. The point is it's not possible to provide all the materials necessary for all installation scenarios and quality goals. Our light kits provide the essential components needed for a high-quality, functioning lighting system. Installation of our light kit to your specific vehicle may however require additional items to make it look and fit the way you want. This is particularly the case with electrical wiring and mounting of LED strips. Before proceeding with your installation we suggest you consider THESE OTHER ITEMS.
Videos
WHAT LED COLORS LOOK LIKE
Customers will often ask us to describe what a particular LED color looks like. Truth is, it's not possible to accurately describe what a specific LED color looks like. Why? Because there are a number of factors that impact how a particular LED color appears to the human eye. For starters, it's important to understand that Boogey Lights® are accent lights. With only a few exceptions, our lighting systems are designed to be hidden from view. When installed properly, you'll never see the LED diodes/lighting fixtures themselves. You'll only see the glow reflecting off the surrounding surfaces coming from the LEDs. That means the color of the surface the LEDs are mounted to coupled with the color of the surfaces surrounding the LEDs will directly impact how the human eye perceives the color being reflected. A white surface for example will tend to brighten the color whereas a darker surface will tend to darken the color. Real word scenario: If the LEDs are shining downward on black pavement, the light reflecting off that black pavement will appear different than if on concrete which is a lighter material So for example, the LED color green will tend to look more like a "light green" when shining off of lighter color surfaces and more like a "dark green" when shining off of darker color surfaces. Same LEDs, same diodes but the human eye perceives the color reflected differently based on the color of the surrounding reflective surfaces.
When in doubt, dry mount. If you are looking for a specific color or are very picky about the LED color look you're trying to achieve, we strongly suggest dry mounting the LED strip in the location you're looking to light up and then powering up that strip temporarily with a 12vdc power source. That way you can see how the glow looks for your specific lighting product before committing to a specific LED color. It's really the only way to know how the light will appear.
A Word of Caution. The below photos are of our LEDs when viewed directly. With a rare exception, these LEDs will never be used in this manner. They're almost always mounted in such a way that you'll only see the glow from the LEDs reflecting off another surface. Keep this in mind when viewing the below photos.
The Problem with Photographing LEDs. It's not possible to capture LED color hues and brightness levels with a digital camera and then accurately reproduce those colors in a photograph the way the human eye sees and the brain interprets those same colors in person. To show a more accurate color hue, the brightness levels of the photos below have been severally restricted. In person, the light coming from these LED strips will appear significantly brighter to the point at which you should not look at them directly.


3M ADHESION PRIMER IS REQUIRED
To achieve the full adhesive strength of the 3M® tape affixed to the back of each strip 3M® Adhesion Promoter (aka Primer) must be applied to the mounting surface first. This is an important step to ensure a secure bond. The 3M® Adhesion Promoter creates a chemical bond between the tape and the mounting surface such that the LED strip will stay stuck (at least until you decide you want to remove it). Using any other solvent such as rubbing alcohol or acetone is not the same thing as using 3M® Adhesion Promoter. While these solvents will help clean the surface, they do not prime the surface. There is a difference. 3M® Adhesion Promoter IS INCLUDED with this light kit in sufficient quantities to install all lights ordered. If you want to buy more (not necessary), it can also be purchased separately on our website in one ounce, two ounce and four ounce bottles.
RETURN POLICY
This product is considered a custom ordered product which may not be eligible to be returned - or if so, subject to additional fees and/or restrictions. Be sure to read our RETURN POLICY for details.
WILL THESE WORK WITH OTHER LED CONTROLLERS?
The short answer is probably not. More importantly, we do not provide technical support on installations that use other manufacturer's components with Boogey Lights® products. All Boogey Lights® RGB (and RGBx, RGBxx) LED strips are COMMON CATHODE strips with the controller technology being POSITIVELY SWITCHED. This means that Boogey Lights® LED strips share a common ground. The controller switches on/off the positive (hot) side of the circuit similar to how every motorized vehicle in the United States is wired. Just like your car, Boogey Lights® LED strips are only energized with power when they are in use. Without getting into the electrical weeds the advantage of this design is that it is more robust, more efficient, will last longer and provides a brighter glow. It also means there is less chance of the LED strip or controller shorting out, making it safer. Of course it costs more to build a controller that switches all three (or five in the case of RGBWW) of the positive channels of the circuit instead of the single negative channel. That's why most competitors use negatively switched controllers with common anode LED strips.
So if you're looking to pair Boogey Lights® LEDs with another manufacturer's controller (or vise versa), be sure you check with that manufacturer's specifications. It most situations it's unlikely they'll work with Boogey Lights®. Even if they do, be aware you're on your own in terms of technical support. Important to note too that attempting to use them with the wrong technology voids the warranty. Simply put, Boogey Lights® LEDs and Controllers are specifically built and designed to work with Boogey Lights® products.
THE KELVIN SCALE

IMPORTANT. You must have an understanding of 12vdc power. An essential skill with installation of any Boogey Lights LED products is knowing how to correctly wire the product to a 12vdc circuit. This includes understanding the importance of having a properly sized fuse at the power source, polarity, how to properly seal an electrical connection, using properly sized wire gauge for the load, measuring voltage and measuring the additional amperage draw you're adding. If you are uncertain or unfamiliar with any of these concepts, we urge you to ask someone who has the knowledge to assist you. Electricity is unforgiving.
Install Documentation
All of our installation documentation for this product (and all others) is available to download directly from our website. We encourage you to download this information and review before placing your order. That way you'll have a solid understanding of what is required (and no surprises). Here are some of the most important installation documents for this product. You will find ALL available documentation in our INSTALLATION RESOURCES SECTION.
- Food Trailer Side Light Kit Install Guide
- Installing Inside Aluminum Channel + Diffuser
- Installing Low Profile LED Light Strips
- Know your power consumption
- What you need to know before mounting your LED strips
- DOWNLOAD the GEN2 LED Controller Operating Manual & Wiring Diagrams
- DOWNLOAD the GEN2 Bluetooth Operating Manual
- DOWNLOAD the GEN2 M7 RF Wireless Remote Operating Information
- DOWNLOAD the SINGLE COLOR DZ Strobing/Flashing Controller Operating Manual & Wiring Diagram
You may also want to check out our section of HOW-TO VIDEOS which many customers find helpful with deciding how they want to install their Under-Glow lights.
Aluminum Channel + Plastic Diffuser Mounting
If you're purchasing the LOW PROFILE LED Strip and you intend on mounting the LED strip in plain view such as on the side of a food trailer facing outward, we suggest mounting the LED strip inside this ALUMINUM CHANNEL with PLASTIC DIFFUSER on top. Why? Because they protect the LED strip from a direct strike AND provide a professional looking installation. Not only does the aluminum channel and diffuser protect the LED strip the opaque plastic diffuser gives off a nice glow lighting effect too. The Mini T12 Aluminum Channel is a low profile design that can be mounted just about anywhere. It has an anodized finish (electrostatic sprayed) which provides maximum protection against the elements. They're ideal for harsh indoor or outdoor use to protect the LEDs. The channel can be mounted any number of ways including adhesive tape, rivets or screws. We typically rivet the channel to the surface where possible. Then, the LOW PROFILE LED strips fit nicely into the channel using the 3M tape already affixed to the back of Boogey Lights LED rolls. The diffuser completes the installation by snapping into the channel. On outdoor installations we advise adding some Lexel to the ends of the channel as well as on the sides to seal it. Read more about using these Low Profile LED strips inside Aluminum Channels here. And if you are going to be using our LOW PROFILE LED strips with an aluminum channel/diffuser, be sure to select 'YES' on the question re: "Mounted Inside an Aluminum Channel?" on the product options. Details as to why this is important below.
Mounted Inside an Aluminum Channel?
If you're going to be mounting this Low Profile LED strip inside our Aluminum Channel with the Plastic Diffuser on top, it's important to select YES. Why? When we know the Low Profile LED strip will be mounted inside an Aluminum Channel with the Plastic Diffuser on top we only add one layer of clear heat shrink at the point where the power lead attaches to the LED strip. This is because the connection is less bulky (easier to seal inside the channel) plus the clear heat shrink allows the first diode to be seen. We normally will use two layers of heat shrink but it makes the connection bulkier and the second layer uses black adhesive heat shrink which covers up the first diode. See photo below of what we are referring to. Read more about using these Low Profile LED strips inside Aluminum Channels here
Preparing the Mounting Surface
Since 1989 we have installed our high-performance accent lights on just about every possible type of motorsports vehicle known to man – motorcycles, cars, trucks, boats, RVs, bicycles, scooters, trailers, ATVs, airplanes, trains and golf-carts. The one thing all these applications have in common is they often operate in harsh environments where they are exposed to heat, vibration, cold, dust, dirt, wind and water. Experience has taught us the importance of properly preparing the mounting surface which includes using 3M® adhesion promoter. Most LED light kits we sell includes 3M® promoter (aka "primer"). It's essential the surface be prepared using this 3M® promoter and that you follow the directions provided. We strongly urge you to read these instructions and follow them completely. Do not cut corners. If you purchased an LED light strip that does not include this primer, we offer different size primer bottles for sale.
Using 3M Adhesion Primer
3M Promoter is a powerful adhesion primer. You don't need a lot to make it work. A single swipe with a clean dry cloth on the surface you're mounting the light strip to is all you need. Once you paint on the promoter you have at least an hour to mount the light strip, although we recommend proceeding immediately after painting the surface with the 3M Promoter. The primer instantly bonds the 3M tape on the back of the LED light strip to the mounting surface. Of course, be sure to first remove the red backing tape protecting the 3M adhesive strip secured to the back of the LED light strip. Then, once the exposed 3M tape on the LED strip touches a surface that has been treated with the 3M promoter, they will instantly bond together. You will not be able to break that bond without damaging the strip so make sure you have the placement where you want it the first time. There are no do-overs when using 3M Promoter and 3M VHB tape.
When mounting on the bottom of any vehicle we recommend making sure you are not mounting the strip in-line with the wheels or in areas that might be prone to a direct strike from road debris. While Boogey Lights® Hi-Intensity LED strips are made for motorsports applications, they will likely not survive a direct strike from a hard object. If you are concerned the LED strips might be hit by road debris due to their mounting location, we recommend using our Heavy Duty LED Strips which are better able to survive a direct strike from road debris.
If you're using our single-color LED strips, make sure you are not over-loading the circuit they are attached to. As with all lighting solutions, each LED strip should be properly fused. If for any reason there is a dead short in the strip, you want the power to that strip to be cut off to avoid over-heating and potentially burning.
Installing the Light Strip
The 3M adhesive we use on our light strips is SUPER strong. You do not need to press very hard to get them to stick. In fact, pushing too hard can damage the connector wires and LEDs embedded in the strip. Just a little light pressure is all it takes. Also, when affixing the light strip to the mounting surface DO NOT stretch, pull or twist the LED strip. Do not put tension on the strip itself. For example, do not allow either the power lead cable or the entire roll of LEDs to dangle while you're working on mounting the strip. The LED strip is not built to support lateral tension, twisting or bending. Simply unroll the LED strip in a straight line as you go lightly pressing the strip to the surface. The strip must be mounted flat against a contiguous mounting surface, in a straight line.
Really important too that the entire strip be stuck to the mounting surface and that you NOT attempt to span across multiple mounting surfaces. They must be mounted on a smooth, flat, continuous rigid mounting surface. Spanning two mounting surfaces on a vehicle that moves, flexes and vibrates will absolutely not work. The LED strip will fail and they will do so sooner rather than later; we can almost guarantee it. We know the temptation is there because it's easy/fast to do BUT you're going to be disappointed if you do. Mounting the LED strip across multiple surfaces will void the warranty as well. Also, do not attempt to mount the strip to follow a radius. The LED strip has to be mounted in a straight line. If you don't have a smooth, flat, contiguous mounting surface we recommend screwing or riveting 1.5" wide aluminum flat stock to the surface and then mount the LED strip to that flat stock. Also, do not attempt to mount the strip to follow a radius. Doing so will permanently damage the strip. The LED strip must be mounted in a straight line and flat.
Secure the Power Lead!
Secure the power lead firmly to the mounting surface. Do not allow the power lead to dangle, hang or move at or near the point where the power lead attaches to the led strip. This is very important. If you do, the led strip will almost certainly fail prematurely at or near that point which is not covered under warranty. The weight of that power lead coupled with the movement of the vehicle will eventually stress the connection point and cause the LED strip to fail. Securing the power lead to the mounting surface will stop that movement.
Amperage Data
Appropriately sizing the components in your lighting system is critical. Making sure your lighting system doesn't exceed the amperage ratings of each individual component is essential. Scroll down for our amperage data chart that details amperage draw per led for both our low profile and heavy duty led light series. We list amperage draws on two input voltages: 12.5vdc and 13.5vdc. If you're wiring your lights to a vehicle that has a charging mechanism (e.g. alternator), that input voltage will likely increase particularly as RPMs increase. It's not unusual for an alternator to charge the battery at a rate of 14 vdc depending upon the vehicle. Increasing the input voltage to the LED Controller/LEDs will also increase the amperage draw of those LEDs. We always suggest measuring actual amperage drawn for your particular installation to make sure it's fused and wired appropriately. If you are not familiar with DC electricity and how to measure both voltage and amperage draw, we urge you to seek the assistance of someone who does. Improperly sized circuits can cause fires and/or damage other electrical systems in your vehicle. Note: For our LOW PROFILE and HEAVY DUTY LED strips, there are approximately 18.3 LEDs per foot (300 LEDs / 197" x 12" per foot). For circuit planning purposes, we suggest rounding up to 19 per foot (or even 20) when doing amperage calculations. Always best to be conservative when doing electrical circuit calculations.
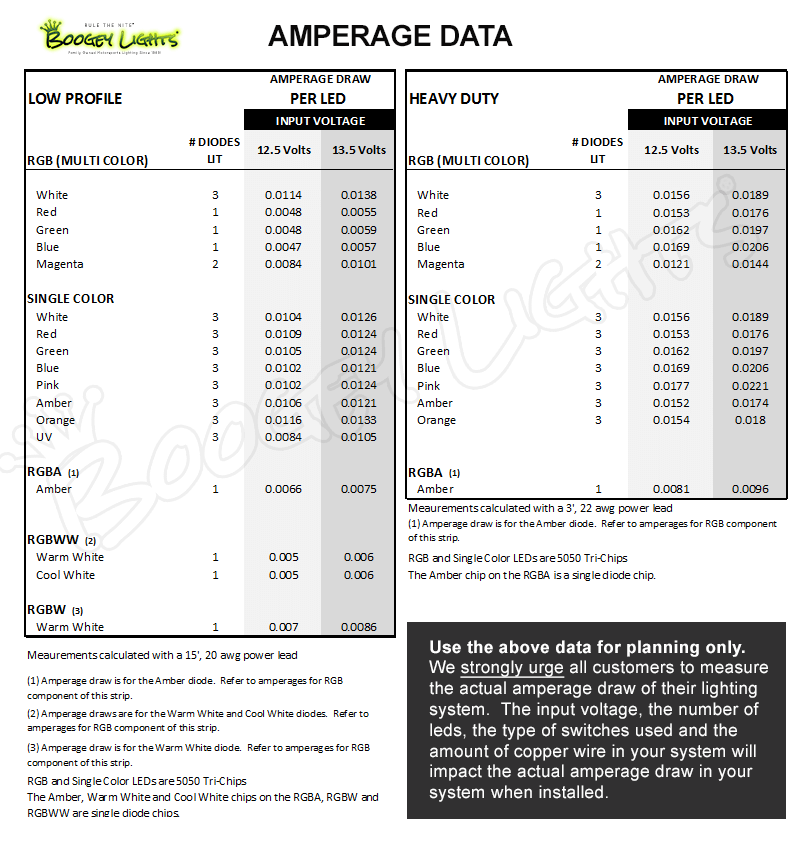
Number of LEDs per Foot
There are approximately 18.3 LEDs per foot (300 LEDs / 197" x 12" per foot). For circuit planning purposes, we suggest rounding up to 19 per foot (or even 20) when doing amperage calculations. Always best to be conservative when doing electrical circuit calculations.
