


Tail, Turn, Brake Add-On LED Light Kit for RVs
Improve the visibility of your RV's rear with Boogey Lights TAIL - TURN - BRAKE add-on led strips.
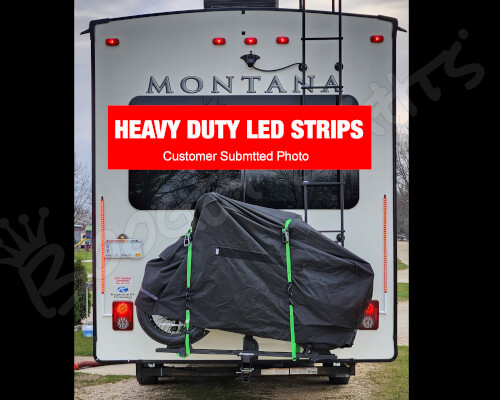
Have you looked at your rear recently? No, not that rear -- the rear of your RV! Are the tail, turn and brake lights clearly visible to those traveling behind you? Can drivers following you see your brake lights clearly? Do you have a bike rack or similar structure obscuring the view of your stock tail lights? Lots of fifth wheel and travel trailers have the bare minimum rear facing lights to meet DOT requirements. Many are mounted within 12-18" from the bottom of the RV. This makes them difficult to see by anyone other than the vehicle immediately following you. What about those vehicles a few cars back? Can they see them clearly? Probably not because the stock tail, turn, brake lights are usually hidden for drivers further back in the pack. Boogey Lights TAIL - TURN - BRAKE add-on led strips are an easy and inexpensive solution to improving the visibility of your RV's rear. SOLD AS A PAIR: One light kit - Two LED strips per kit. This is an ADD-ON tail-turn-brake light product. It is not intended to replace your existing factory installed tail-turn-brake lights.
JULY 2025: NEW PRODUCT CONFIGURATION. We have added the option to select either our HEAVY DUTY (HD) LED strips (the default) or use our LOW PROFILE (LP) LED strips. Why? Because the maximum length of our Heavy Duty (HD) led strips is 52". Some customers want to go longer. With our Low Profile (LP) led strips, we offer up to 12' in led strip length for this product. Historically we've only offered our HD led strips for these Tail-Turn-Brake light add on strips as they are more durable, are easier to install, less expensive overall and look better than the Low Profile (unless used with the optional aluminum channel.) Regardless of the LED Style you choose (HD or LP), both are simple 12vdc LED lights. There is no 'intelligence' built into the strip itself. Just the super bright tri-chip (or quad-chip if buying REDA/REDW) LED diodes in the color and length configuration you select. As basic as you can get. How you wire them to your 12vdc power source will determine how the LEDs behave.
HEADS UP! We urge you to read the information presented here before purchasing. Our product documentation is quite thorough. Product specs, an explanation of the available configuration options, 12vdc power considerations you should be aware of, wiring information, installation documentation and even a video on how to install are ALL on this product page. Chances are every question you have about this product (and more you didn't know you needed to know) are answered here. Be sure to scroll down, expand each text group section and read the information presented. Also, click on and read the information on the INSTALL INFO tab where we cover important installation considerations.
LED STYLE: Heavy Duty or Low Profile?
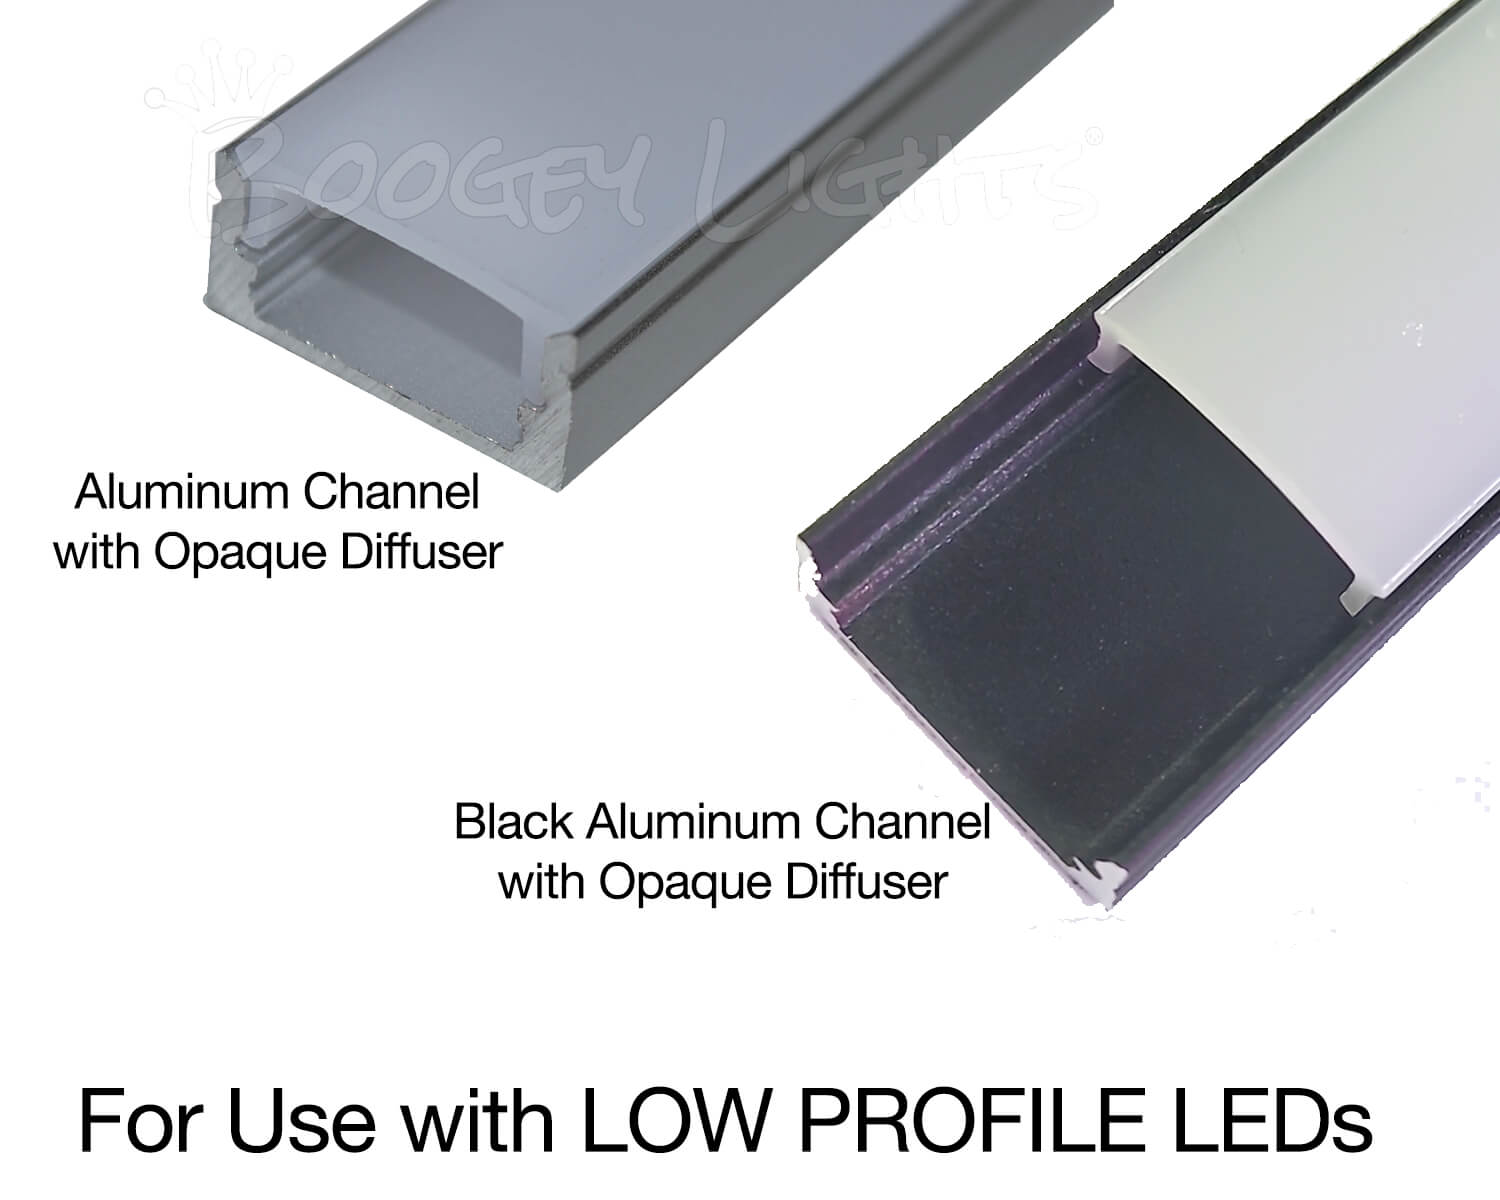
Starting in July 2025 this product is now offered in two LED Styles: Heavy Duty (HD) and Low Profile (LP). The default is our HEAVY DUTY (HD) strip which is the product we've offered for the past five years but you can change that default selection to our LOW PROFILE (LP). What's the difference? Boogey Lights® HEAVY DUTY (HD) LED STRIPS are just like the name says: heavy duty. They're IP67 rated and use the same super bright LEDs as our LOW Profile led strip however they're encased in an additional layer of PVC rubber for more protection. This makes them wider and taller than our low profile strips. They're also only available in five set lengths of 12", 22", 32", 42" and 52". While these work well for most applications, some people want longer tail-turn-brake light strips on the back of their RV. This is where our Low Profile strips come in. Boogey Lights® LOW PROFILE LED strips are thin; made for easy-to-conceal placement. They are IP65 rated. The RED low profile LED strip width is a little wider than 3/8" (10mm). The REDA and REDW is about 1/2" (12mm). Height is 3/16" (4mm). Lengths of the low profile LED strips vary based on the number of LEDs ordered but for this Tail-Turn-Brake light add on product they're available in one foot increments ranging from 2' to 12' - so the lengths are considerably longer than the Heavy Duty LED strips. Also, with the Low Profile LED strip we offer an optional aluminum channel with plastic diffuser which not only dresses up the installation considerably but protects the Low Profile LED strips better. If you decide to go with the Low Profile leds, we strongly suggest adding the alumunum channels. The LEDs will last much longer if you do (looks better too in our view!) Scroll down for more details on both our HD and LP led strips as well as the aluminum channel option for use with LP strips.

Heavy Duty LEDs | Product Features
Our HD Tail-Turn-Brake add-on led strips are based on our popular HEAVY DUTY LED STRIPS. The exact same product; just packaged in pairs and limited only to colors applicable to tail-turn-brake light applications to make it easier for consumers. Depending upon the length, each Heavy Duty LED Strip contains between 15 and 75 high-intensity super-bright 5050 tri-chip RED LEDs. No other Heavy Duty LED strip on the market today has more LEDs per foot than Boogey Lights®.
Sold as a PAIR. The PCB is black, created with 2 ounce copper and encased in black industrial grade PVC with 1.2mm of 3M® VHB tape affixed to the back.
The 3 diode RED versions are .5" wide. The 4 diode versions (REDA, REDW) are .75" wide. All are .25" high with five different lengths offered (see below). All include a 36" power lead. These LED strips do not have connectors on them. Just bare wire at the end so they can be used in a wide variety of applications. You can of course add your own connectors if you want but they're designed to be hard wired directly into the existing tail-turn-brake light assembly. Additionally, the end caps have a screw hole allowing these strips to be screwed to the mounting surface for additional holding power. The product photo carousel on this page shows photos of the lights.
They're offered in five different lengths and are easy to add to just about any fifth wheel, travel trailer or motor home. Here are the five available lengths:
- 15 LED Strip: 12.25" long x .5" wide x .25" high, 2.2 ounces
- 30 LED Strip: 22.25" long x .5" wide x .25" high, 3.1 ounces
- 45 LED Strip: 31.75" long x .5" wide x .25" high, 4.3 ounces
- 60 LED Strip: 41.25" long x .5" wide x .25" high, 5.4 ounces
- 75 LED Strip: 52.25" long x .5" wide x .25" high, 6.5 ounces
(The REDA and REDW versions are .75" wide.)
NOTE: These five fixed lengths are the only sizes offered. Maximum length for our Heavy Duty LED strips is 52.55" (75 LEDs). They cannot be made longer nor are they sold on rolls due to the strip design. If you need to go longer distances, use multiple strips OR change the LED STYLE to our Low Profile (LP) led strip (product features for the LP strip are below).
Each RED Heavy Duty LED strip has a 36", four (or 5) conductor power lead that makes it easy to tie into the existing tail lights.
The LED strip is secured to the back of the RV using the 3M VHB tape and 3M Adhesion Promoter. The mounting surface must be straight and flat. Also, if you want extra holding power there's a place to add a stainless steel screw on each end of the heavy duty LED strip. Installation time is about an hour total. 12VDC.
Did we mention they are SOLD AS A PAIR?
If you need to extend the power lead wires on these LED strips, we offer 4 conductor POWER LEAD WIRE too.
Low Profile LEDs | Product Features
Our Low Profile (LP) Tail-Turn-Brake add-on led strips are based on our popular LOW PROFILE LED STRIPS. The exact same product; just packaged in pairs and limited only to certain lengths and colors applicable to tail-turn-brake light applications to make it easier to order. Depending upon the length, each Low Profile LED Strip contains between 36 and 219 high-intensity super-bright 5050 tri-chip RED LEDs. No other LED strip on the market today has more LEDs per foot than Boogey Lights®.
Sold as a PAIR. The PCB is black, created with 2 ounce copper 1.2mm of 3M® VHB tape affixed to the back. 3M Adhesion Primer is included.
The 3 diode RED versions are about 3/8" wide. The 4 diode versions (REDA, REDW) are about 1/2" wide. All are 3/16" high with 11 different lengths offered. All include a 60" power lead. These LED strips do not have connectors on them. Just bare wire at the end so they can be used in a wide variety of applications. You can of course add your own connectors if you want but they're designed to be hard wired directly into the existing tail-turn-brake light assembly. The product photo carousel on this page shows photos of the lights. They're offered in 11 different lengths ranging from 2' to 12' .
Each Low Profile LED strip has a 60", four (or 5) conductor power lead that makes it easy to tie into the existing tail lights. The LED strip is secured to the back of the RV using the 3M VHB tape and 3M Adhesion Promoter. Installation time is about to hours total. All 12VDC.
Note: While you can purchase the Low Profile LED strip by itself, we strongly suggest adding the optional Aluminum Channel with Diffuser. Not only does this channel make for a more professional look, the channel with diffuser protects the Low Profile LED strip. The Low Profile LED strip is not as durable as our Heavy Duty LED strip.
Did we mention they are SOLD AS A PAIR?
If you need to extend the power lead wires on these LED strips, we offer 4 or 5 conductor POWER LEAD WIRE too.
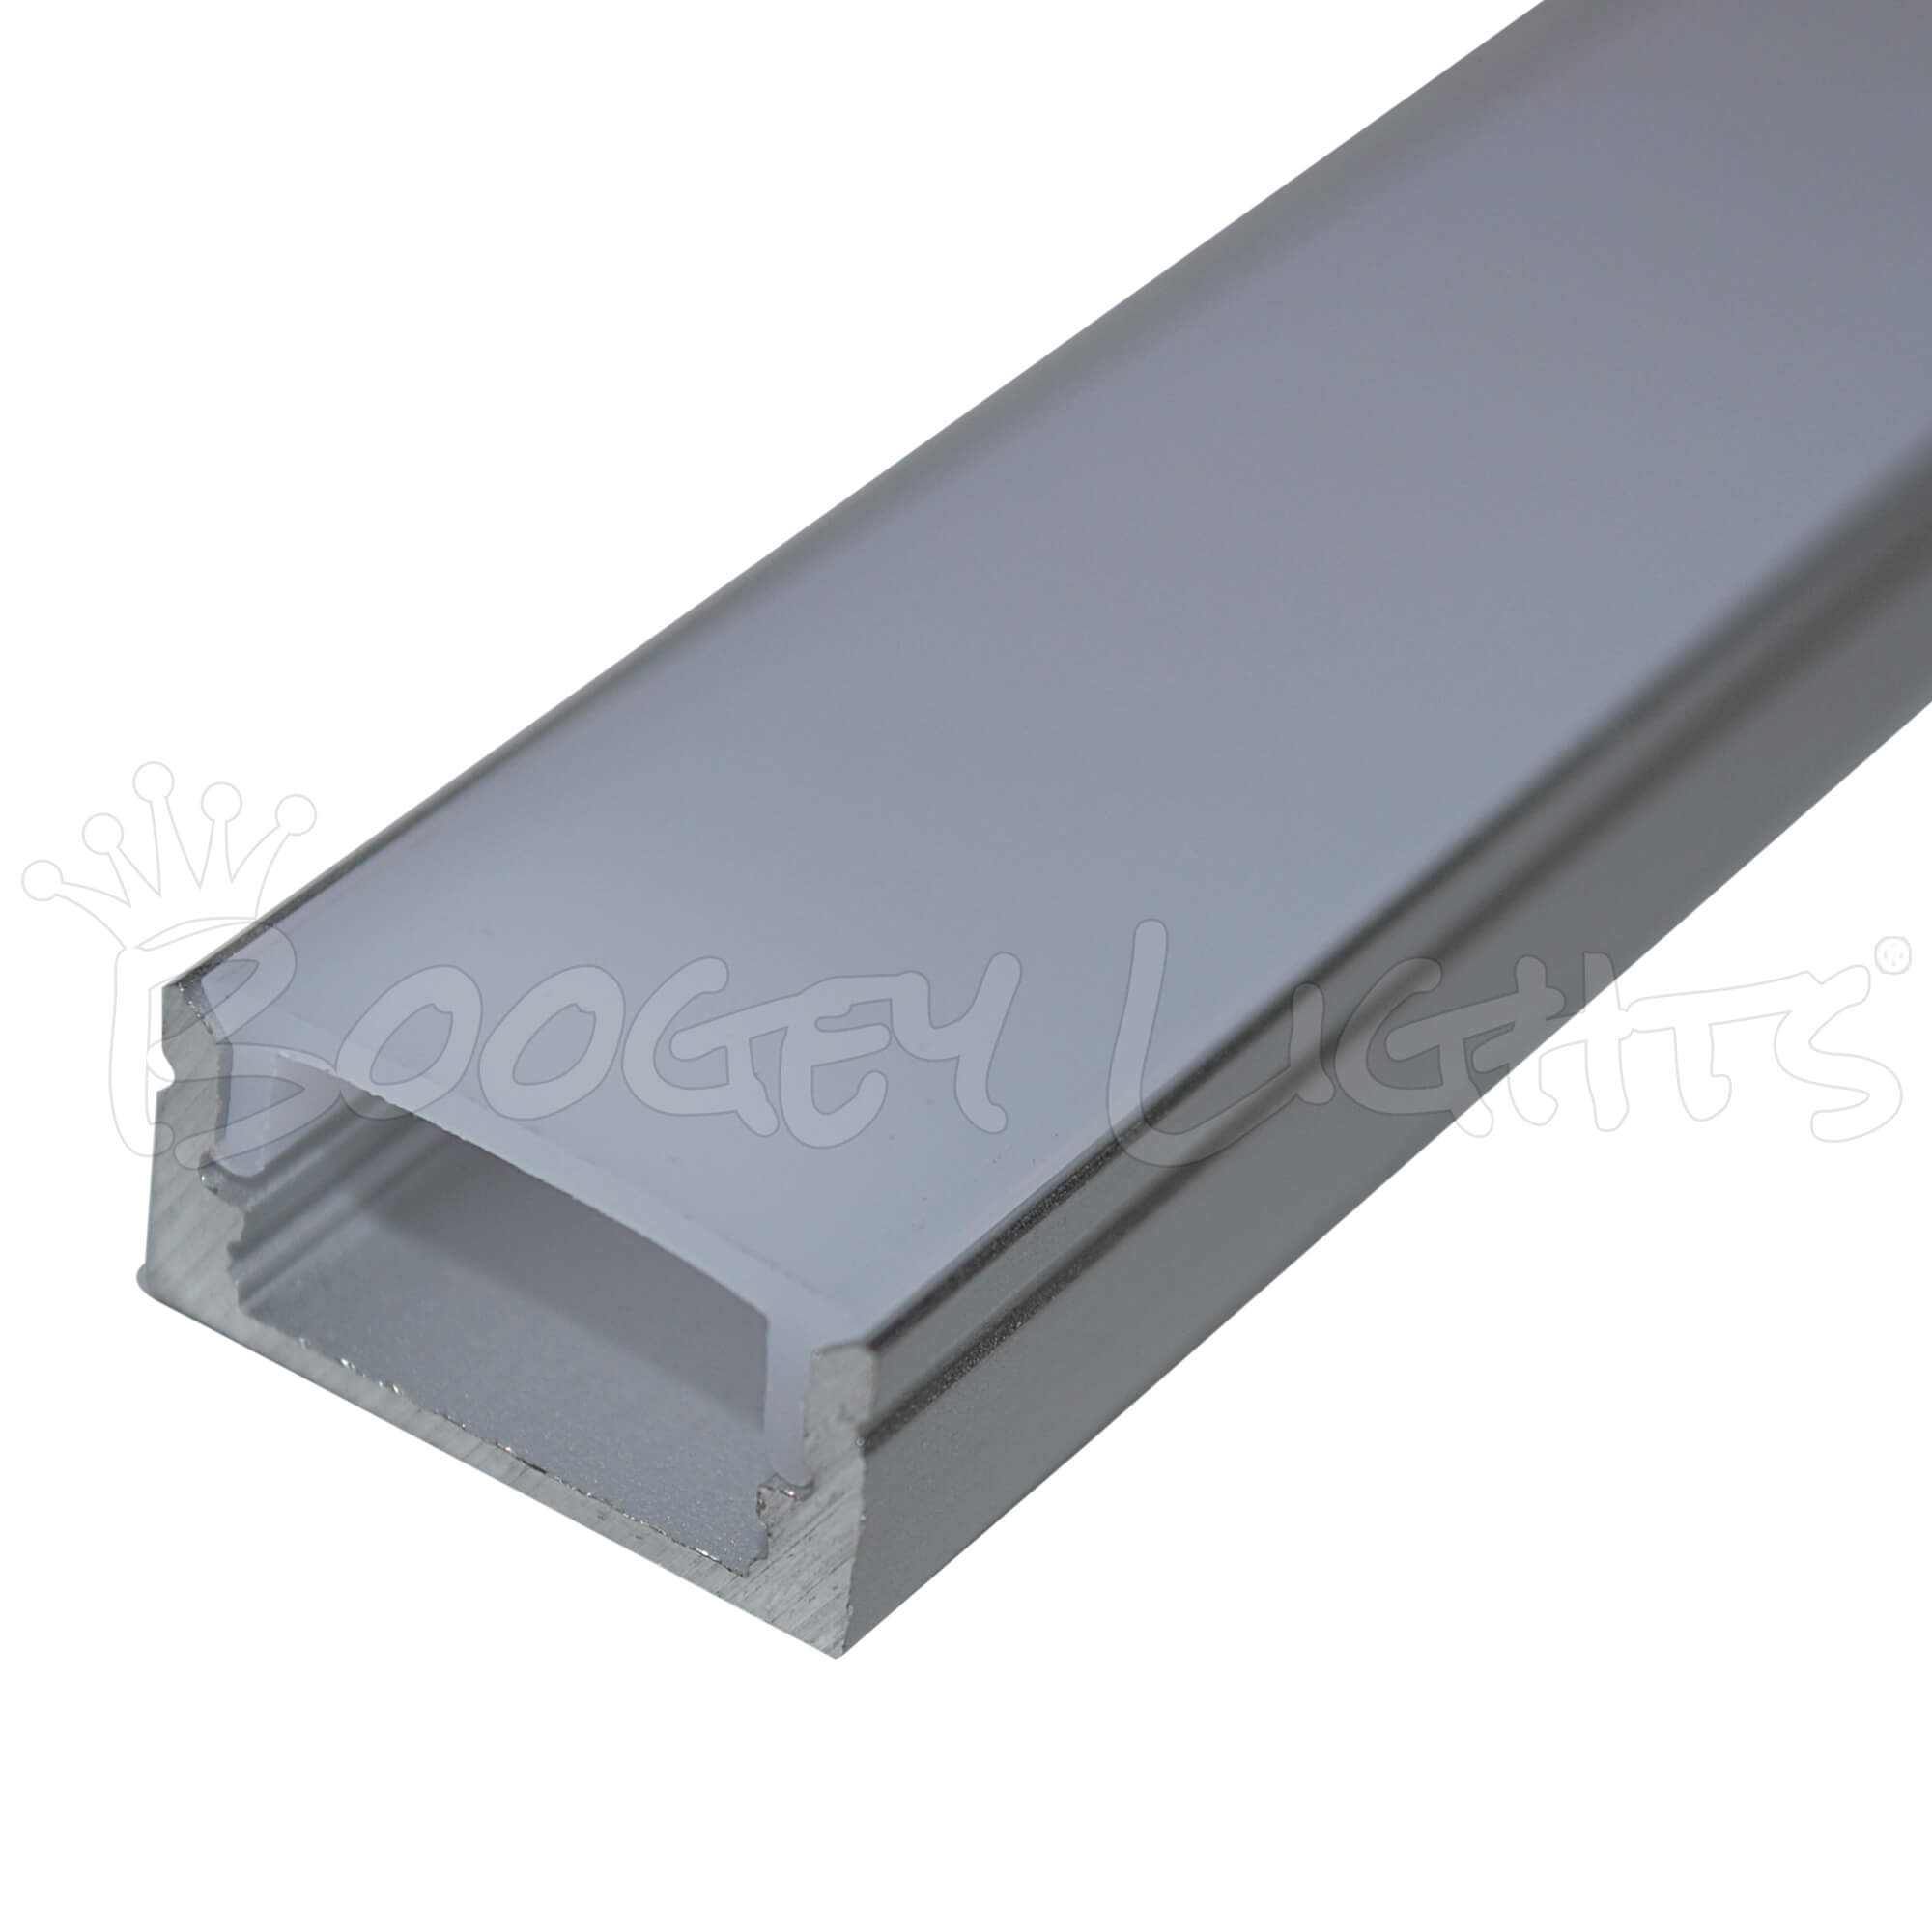
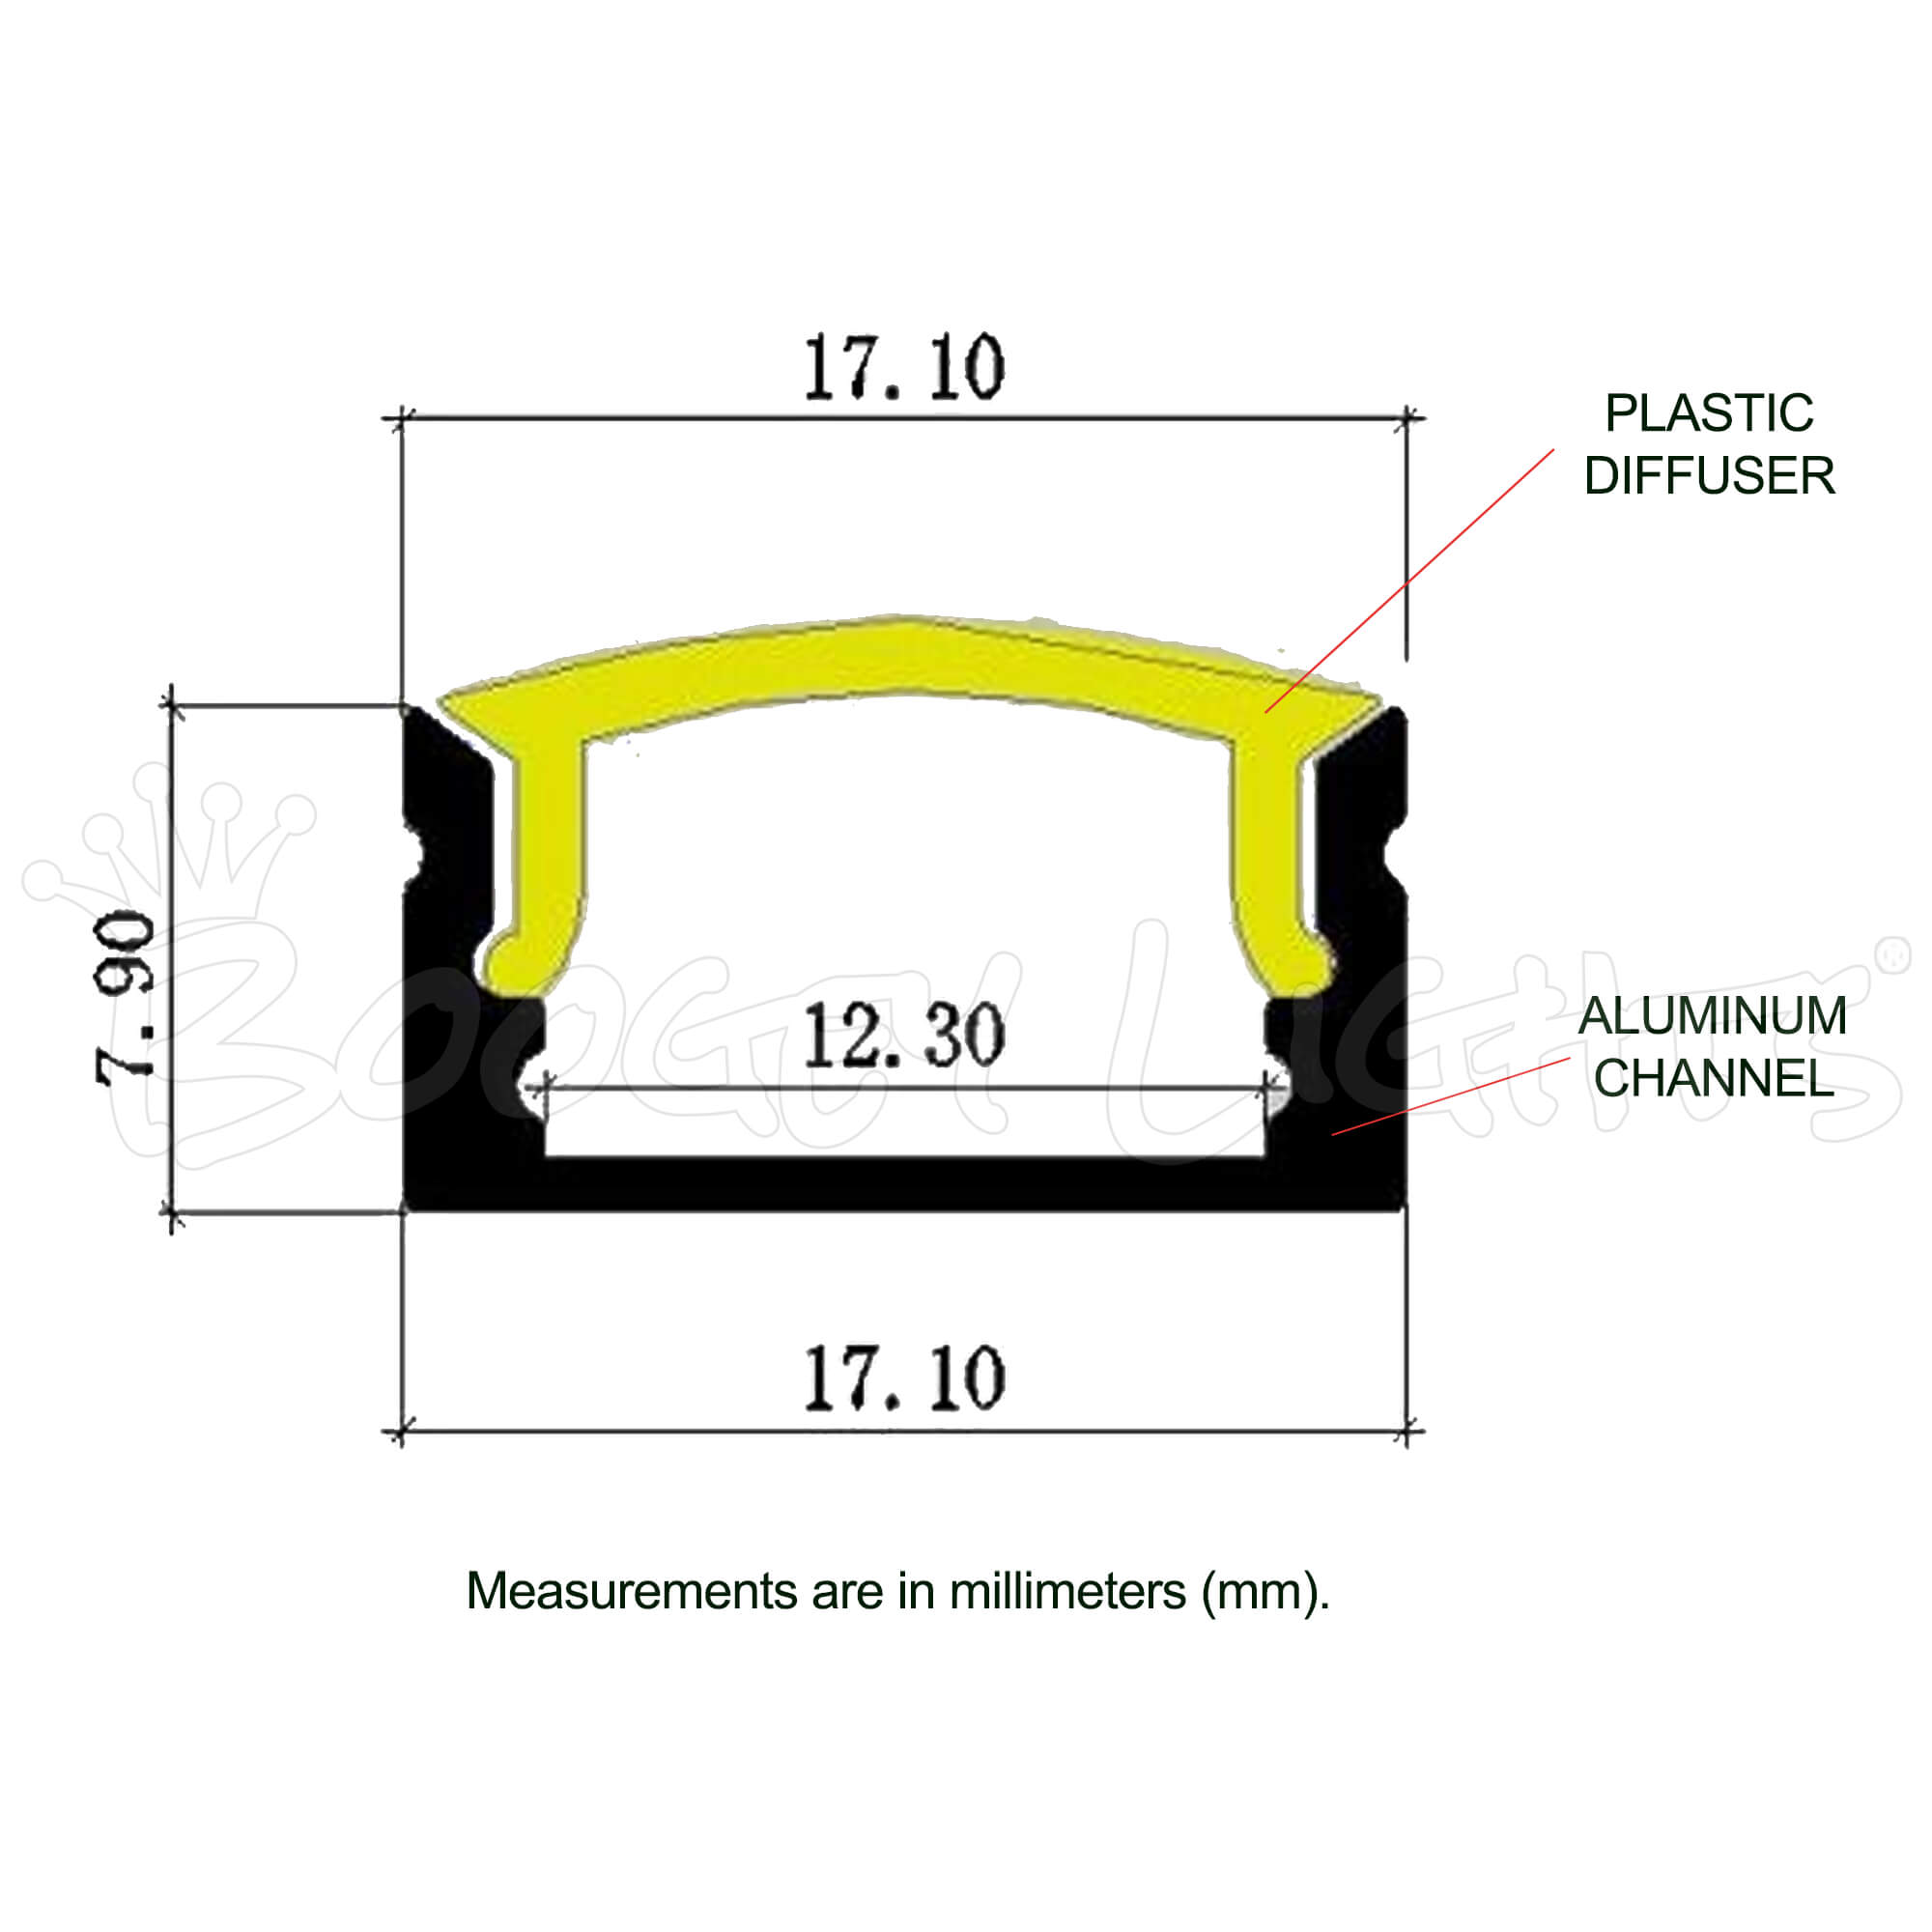
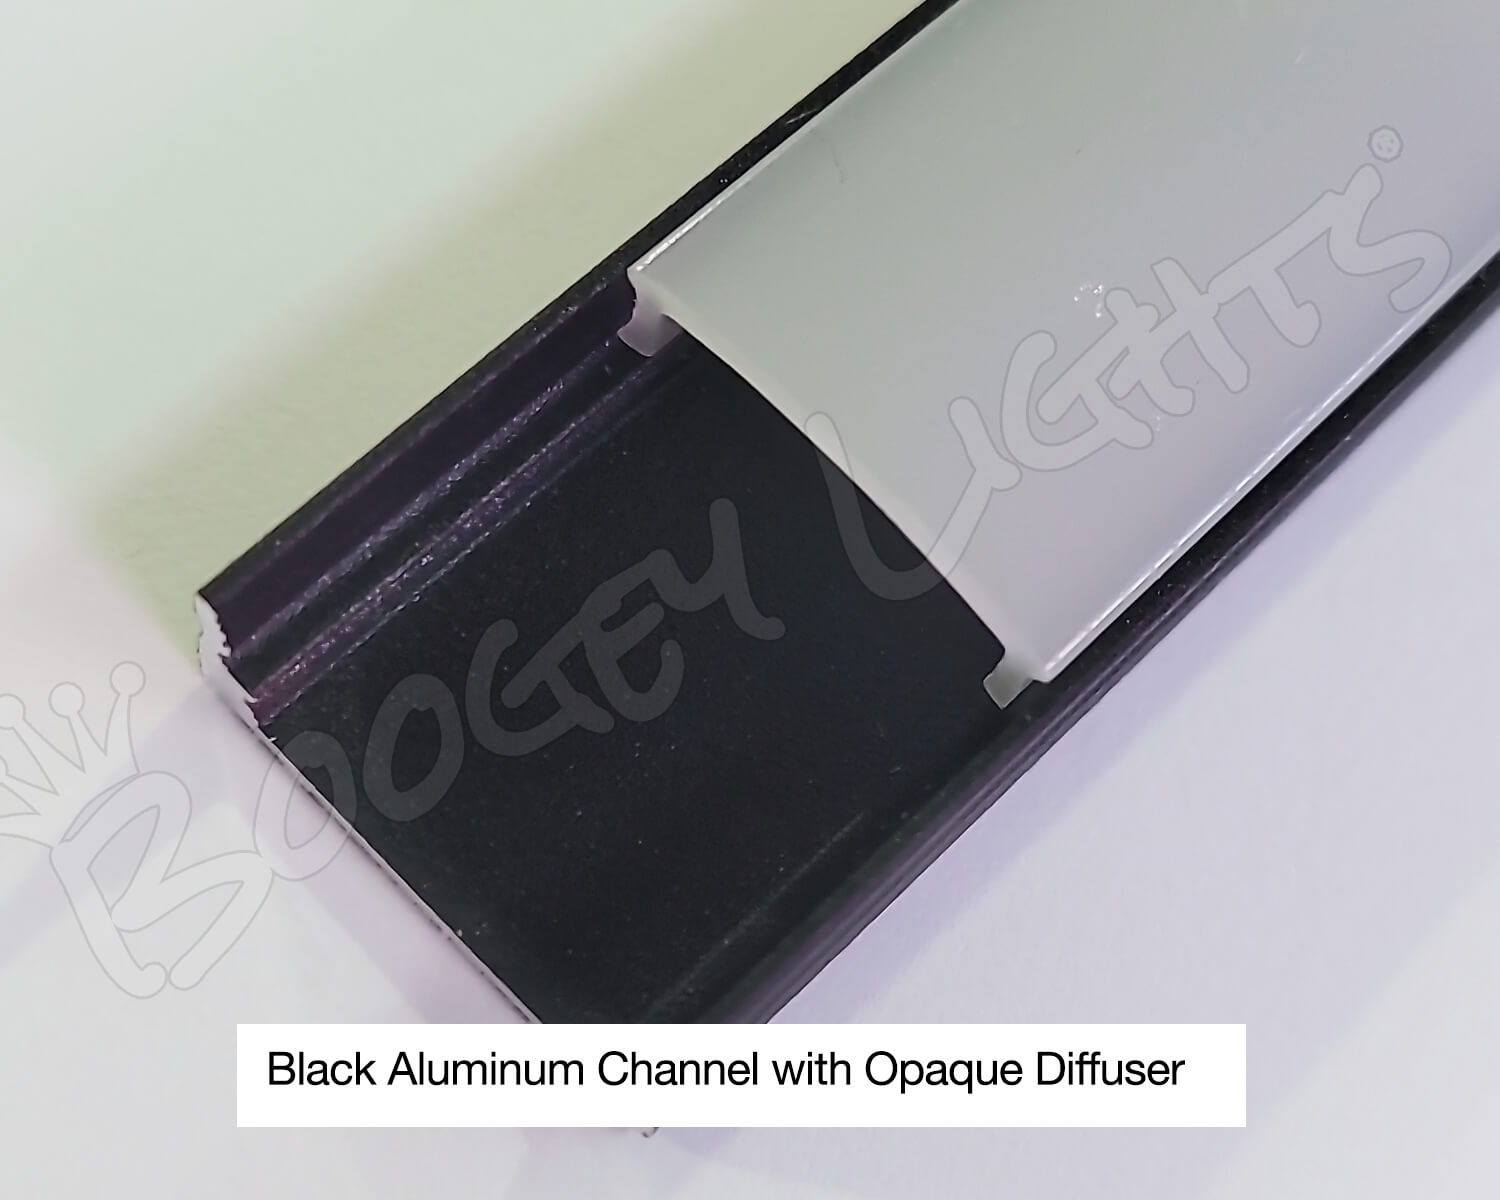
Aluminum Channel Option
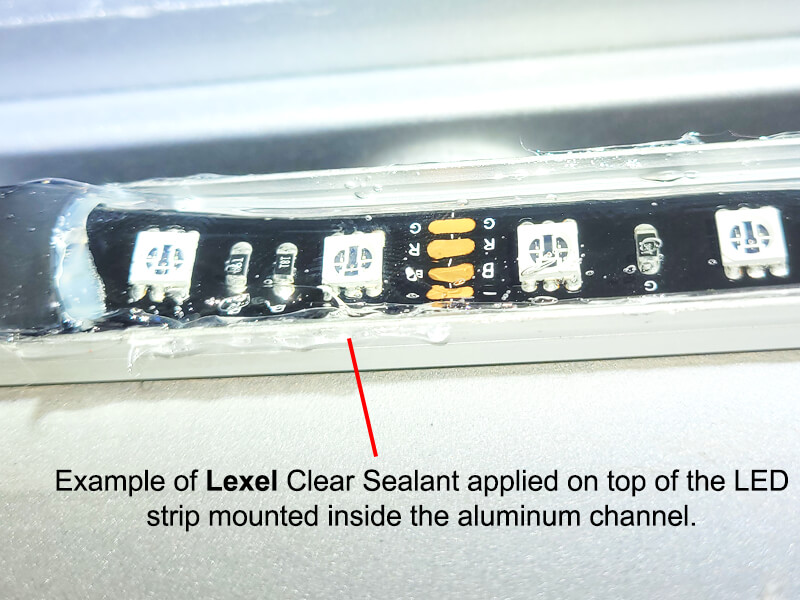
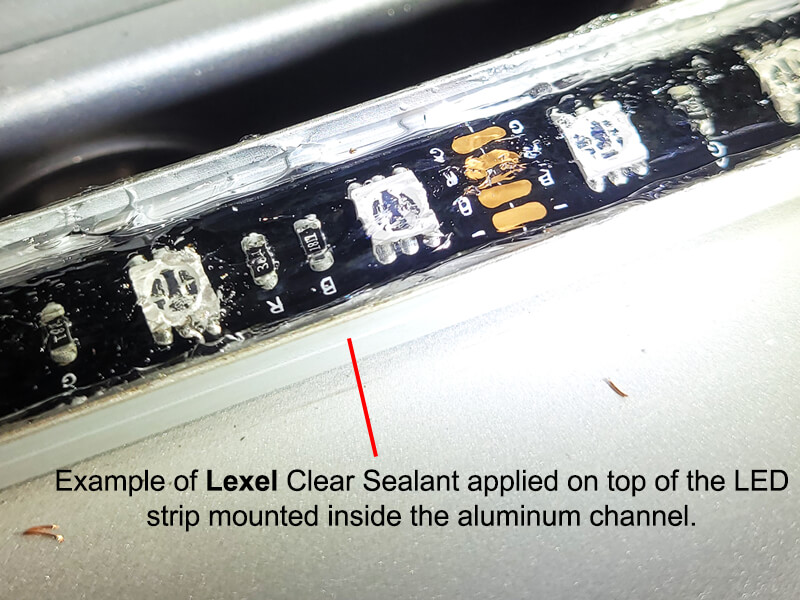
This product selection is optional but if you can afford it, we highly suggest adding it. Why? Because they provide a professional looking installation. The LOW PROFILE led strips when mounted on the back of the RV are particularly susceptible to damage as they are not as durable as our HD strips. Not only does the channel protect the LED strip from water damage, it provides a cleaner looking installation in our view. The Mini T12 Aluminum Channel is a low profile design that can be mounted just about anywhere. It has an anodized finish (electrostatic sprayed) available in traditional aluminum look at black aluminum. The channel can be mounted any number of ways including adhesive tape, rivets or screws. We prefer to use rivets where possible but you can also use 3M VHB tape + 3M Adhesion Primer. Then, the LED strips fit nicely into the channel using the 3M tape already affixed to the back of Boogey Lights LED rolls. Lexel is applied on both ends of the strip to seal them the LED strip off completely from water. The Lexel Clear Sealant is not included with this kit but it is widely available. It's well known in the RV world. It's made by a company called SASHCO. Can be purchased online or at many big box stores. Why Lexel vs some other type of sealant? It's petroleum based so it adhears better to the LED strip and it is clear (more or less). It won't impact the lighting effect of the LEDs shining through. You can purchase Lexel Clear Sealant (made by SASHCO) online or at many big box stores. You can read more about using these Aluminum Channels here.
12vdc Power Considerations
These lights are not vehicle specific. They'll work with any 12vdc vehicle that has a sufficiently sized circuit. Keep in mind that adding additional LEDs to your trailer/motorhome/tow vehicle may exceed your vehicle's rated amperage for that lighting circuit and throw an error because the lighting control module (LCM) 'thinks' there is a problem with your electrical system due to the increase in amperage draw. It's a safety feature offered in most modern vehicles manufactured today. In these cases the easiest work around is to add an independent relay (3 or 4 relays depending on how your tow vehicle/RV is setup) to the circuit to make them work. The relays draw milliamps and won't cause the LCM to error out. This problem is most likely to occur with pickup truck tow vehicles but it's possible to occur in a motor home too. If your tow vehicle is a pickup truck - particularly one built in the last 10 years - you may need to add relays to your installation circuit. Not saying you absolutely have to but it's something to be aware of. We have no way of knowing whether or not your specific tow vehicle/trailer combination will have this problem. Lots of variables play into it. Unless you know what your specfic tow vehicle's LCM amperage threshhold settings are AND you know the precise amperage draw of your trailer's light system, the only way to know if the LCM in your tow vehicle will error when you add more lights to the circuit is to try it. Click on the INSTALL INFO navigation tab of this product page for details on how to wire relays into the lighting circuit.
These LED strips are simple 12vdc lights. There is no 'intelligence' built into the strip itself. Just the LEDs in the configuration you select. How you wire them to your 12vdc power source will determine how the LEDs behave.
NOTE: If you're not familiar with how to wire relays and/or are confused with the concepts presented in this section, we strongly suggest asking someone who is to assist you with the installation on your specfic tow vehicle/trailer combination. We cannot provide long distance technical support on vehicle specific wiring issues. It requires someone on site. Installing these lights is relatively simple but it does require knowledge of 12vdc power/amperage, how to wire a 12vdc circuit and if adding a relay, how and where to wire them into the circuit.
What is RED + AMBER (REDA)?
REDA is a new type of LED strip we designed. It uses our single color RED tri-chip technology with the addition of a fourth diode that is AMBER. Designed primarily for motor vehicle tail-turn-brake applications, that fourth AMBER diode can be wired to the left and right turning indicator circuits. The remaining three RED diodes are wired such that one diode connects to the running light circuit and the remaining two diodes connects to the brake circuit.
HEADS UP! Not all trailers or motorhomes have separate turning indicator and brake light circuits mounted on the rear of the vehicle. Many (perhaps most) motorhomes/trailers are setup such that the Brake light and the Turning Indicator share the same circuit (at least on the rear of the vehicle). If you're buying the REDA version of this product thinking you'll use the Amber led for your turning indicator you may have to pull the turning indicator circuit from another location on your tow vehicle/motorhome; usually from a forward location. To be clear, it's not difficult to do. Just takes more time to complete the installation as you'll need to extend the left/right turning indicator circuit wiring from another location to the rear of your vehicle to connect the Amber diodes.
What is RED + WHITE (REDW)?
REDW is a new type of LED strip we designed. It uses our single color RED tri-chip technology with the addition of a fourth diode that is WHITE. Designed primarily for motor vehicle tail-turn-brake with reverse light applications, that fourth WHITE diode can be wired to the reverse lights. The remaining three RED diodes are wired such that one diode connects to the running light circuit, one to the turning indicator and one to the brake circuit.
Looking for Another Color?
The TAIL-TURN-BRAKE light add on LED strips offered on this product are RED (or RED+AMBER, RED+WHITE). We however offer both the Heavy Duty LED strips and Low Profile LED strips in a variety of other colors. For example, if you're looking for White, Amber or Orange LED strips, you can find them listed with our HEAVY DUTY LED STRIPS or LOW PROFILE LED STRIPS.
Short Video
Here's a short 5 second video sent to us by a customer who installed BOOGEY LIGHTS® Tail-Turn-Brake ADD ON led light strips on his toy hauler. These are our Heavy Duty strips. You can see the lights in action.
DOT Compliance
The AMBER and RED single color LED strips are DOT COMPLIANT. They conform to applicable provisions of the Federal Motor Vehicle Safety Standard 108 requirements. Click on the button below for more information on this issue.
Product Appearance Note
For the HEAVY DUTY LED Strips, the PVC molding and polyurethane coating that protects the LED strip itself may have some imperfections in the material surrounding the LED strip due to the manufacturing process. It's unavoidable. We build and warranty these products for their performance in tough, outdoor environments on all kinds of heavy duty vehicles; not for their cosmetic perfection. For most applications, these LED strips are never seen as they're usually mounted to the bottom of a vehicle out of sight. You only see the glow from the LEDs and even then, only when it's dark. For this product however, because of where they are mounted you will see the LED strips themselves; especially in day light. If you're looking for a super-bright, tough, easy to install add-on TAIL/TURN/BRAKE light, this product is ideal for your application. If however you're very particular on how something looks and/or are expecting a perfectly formed hardened plastic look when viewed up-close in the light of day, the HD product is probably not for you and instead select the LP product with aluminum channel and diffuser. Even the LP product if not used with the aluminum channel and diffuser doesn't have a 'finished' look.
Installation Video
In this video Dave from Watts on Wheels installs our REDA Tail-Turn-Brake light product to his DRV Fifth Wheel trailer. They also install awning lights too. Check it out.
INSTALLATION
These lights are not vehicle specific. They'll work with any 12vdc vehicle that has a sufficiently sized circuit. Adding additional LEDs to your trailer/motorhome/tow vehicle may exceed your vehicle's rated amperage for that lighting circuit and throw an error because the lighting control module 'thinks' there is a problem due to the increase in amperage draw. In these cases the easiest work around is to add an independent relay (3 or 4 relays depending on how your tow vehicle/RV is setup) to the circuit to make them work to the circuit to make them work. The relays draw milliamps and won't cause the lighting control module to error out. If you're not familiar with how to wire relays and/or are confused with the concepts presented in this section, we strongly suggest asking someone who is to assist you with the installation on your specfic tow vehicle/trailer combination. We cannot provide long distance technical support on vehicle specific wiring issues. It requires someone on site. Installing these lights is relatively simple but it does require knowledge of 12vdc power/amperage, how to wire a 12vdc circuit and if adding a relay, how and where to wire them into the circuit.
Installation Overview
You can download our Tail-Turn-Brake ADD-ON LED Light Installation Instructions before purchasing. If you're adding relays, you can download the Relay Wiring Diagrams as well. We suggest mounting the ADD-ON Tail-Turn-Brake light above the existing stock tail light housing where it can be easily seen from 100+' behind you. The longer the LED strip, the better the visibility. The HD LED strip has a 36" power lead and the LP LED strip has a 60" power lead so unless you want to extend that power lead length, you'll need to mount the LED strip within 30" (or 60") or less of the stock light housing. See our product photos for examples of real customer installations. The ideal mounting location is one in which you can drill a 1/4" hole in the RV to feed the power lead cable through and then drop down to splice into the back of the existing tail/turn/brake circuit. This makes for a clean installation. In some situations you may not be able to do that in which case the power lead cable may need to be run on the outside of the RV and down to the stock tail/turn/brake light housing. You'll need to take a look at your RV to see what's possible. Keep in mind that the mounting surface must be straight and flat. If you have to run the power lead wiring on the outside, we suggest using either Butyl tape or 3M VHB tape to securely fasten the power lead cable to the RV (we also suggest wrapping the power lead in split-loom). It's not ideal but it can be done so it looks good. You'll of course need to remove the existing tail light housing on both the left and right sides from the RV to gain access to the wiring. It's usually a very simple thing to do. As for making the actual wire connections, we prefer to cut the existing wires (once we've clearly identified them) and then use butt connectors (supplied in the kit) to re-connect while at the same time adding in the new Boogey Lights LED strip. Some folks prefer to use a scotch lock connector however in our experience, they're not as reliable particularly on vehicles that move, flex and vibrate. Our kit includes some butt connectors to do this.
HEAVY DUTY STRIP MOUNTING NOTE: Even though the Heavy Duty LED strips used for our Tail-Turn-Brake ADD-ON lights can be screwed to the mounting surface, the screws (if used) are designed to only hold the ends of the strip to the surface. DO NOT TORQUE them down. Why? Because the end caps are glued to the black PVC rubber that encases the LED strip itself. Torqueing them down will most likely cause the end cap to spin and pull away from the PVC rubber. This is by design so the LED strip itself isn't damaged.
ALUMINUM CHANNEL OPTION: If you purchased the LOW PROFILE LED strips with the optional Aluminum Channels, we include this document detailing the mounting of those aluminum channels and how best to seal the strips inside that channel. Refer to that document for those mounting instructions
LED Style: Heavy Duty (HD) or Low Profile (LP)
This light kit can be purchased with either our HEAVY DUTY (HD) LED light strip or our LOW PROFILE (LP) LED light strip. The installation process is essentially the same for either strip. Both strip types have 3M VHB tape on the back of the LED strip. Both strips require 3M Adhesion Primer to be used to secure them to the mounting surface. Both strip types have a power lead cable hardwired to one end of the LED strip. In terms of the installation process, the only difference in is if you purchased the optional Aluminum Channels with Diffuser offered when the Low Profile strip type is selected. If you purchased these channels, we include a separate document detailing the mounting of those aluminum channels and how best to seal the strips inside that channel. Refer to that document for those mounting instructions. Beyond that, the wiring and operation of the two strip types are identical. In fact, both LED strip types use the exact same PCB / LED structure. The only difference is the HD strips are encased in black PVC rubber for additional protection with two screw holes on each end to keep the ends from moving.
Jacket Wire Colors for each LED Style
The black wire is always ground. All other jacket colors are 12vdc +On the Heavy Duty LED strips the wire colors will be:
- RED: Black, Red, Green, Blue
- REDA: Black, Red, Green, Blue, Yellow (yellow = Amber Diodes)
- REDW Black, Red, Green, Blue, Yellow (yellow = White Diodes)
On the Low Profile LED strips, the wire colors will be:
- RED: Black, Red, Green, White
- REDA: Black, Red, Green, Blue, Brown (brown = Amber Diodes)
- REDW: Black, Red, Green, Blue, White (white = White Diodes)
If you're unsure about which wire jacket color matches the LED diode color, it's simple enough to bench test the LED strip. You'll quickly be able to determine which jacket color matches which LED diode color. If you're not sure how to bench test, download this pdf: How to Bench Test
Wiring to Existing Tail/Turn/Brake
3 Diode RED LED STRIP: For most installations, each Boogey Lights® LED contains THREE DIODES, all of which are RED. (We offer REDA and REDW LEDs which contain FOUR diodes - 3 red and 1 Amber or White diode.) The number of LEDs on a LED Strip varies based on the length of the LED strip. The longer the LED strip, the more LEDs on that strip. Each LED strip has 4 conductors: One 12vdc negative (the black wire which is the ground) and then three 12vdc positive wires (color coded red, green and blue / white). Each of those three positive wires connects to one of the diodes in each LED. This gives you three different LED Diodes you can control making it ideal for Tail, Turn, Brake light integration. Simply wire the Boogey Lights LED strip to your existing RV tail light housing as follows:
- Existing Ground -> Black wire ground on Boogey Lights LED Strip
- Existing Tail Light 12vdc+ -> Red wire on Boogey Lights LED Strip
- Existing Turn Light 12vdc+ -> Green wire on Boogey Lights LED Strip
- Existing Brake Light 12vdc+ -> Blue wire (or White for LP) on Boogey Lights LED Strip
Depending on your RV's tail light wiring, you may not have these same three 12vdc positive wires. In some RV trailers, the brake and the turn signal share the same circuit. In that case you would wire both the Green and Blue 12vdc+ wires on the Boogey Lights LED strip to the existing turn/brake light circuit on each side of the trailer. Note that some trial and error may be required to identify which wires on the existing light housing operate each of these light functions. Have a 12vdc multi-meter handy can be helpful in these cases.
If you purchased REDW (4 diodes), there will be a YELLOW wire (White wire for LP strips) on the Boogey Lights LED strip. That wire can be connected to the REVERSE circuit to light up the White diodes on the REDW strip. Follow the above for wiring the three RED diodes on the LED strip.
4 Diode REDA LED STRIP: Each REDA Boogey Lights LED contains FOUR DIODES, three of which are RED and the fourth is AMBER. Each REDA LED strip has 5 conductors: One 12vdc negative (the black wire which is the ground) and then four 12vdc positive wires (color coded red, green, blue and yellow / brown). Each of those four positive wires connects to one of the diodes in each LED. This gives you four different LED Diodes you can light up.
- Existing Ground (12vdc-) -> Black wire on Boogey Lights LED Strip (12vdc -)
- Existing Tail Light 12vdc+ -> Red wire on Boogey Lights LED Strip (12vdc+)
- Existing Brake Light 12vdc+ -> Green & Blue (White LP) wire on Boogey Lights LED Strip (12vdc+)
- Existing Turn Light 12vd+ -> Yellow (Brown LP) wire on Boogey Lights LED Strip (12vdc+)
Do you need to add relays?
The short answer is: Maybe. Truth is, we have no way of knowing whether or not your specific tow vehicle/trailer combination will require the installation of relays to stop the LCM from throwing an error. Lots of variables play into it. Unless you know what your specfic tow vehicle's LCM amperage threshhold settings are set at AND you know the precise amperage draw of your trailer's lights, the only way to know if the LCM will error or not is to try it.
In the event your tow vehicle/RV lighting control module (LCM) is throwing an error and/or the LEDs aren't working correctly (assuming they're wired properly), it's due to the increase in amperage you've added to the lighting circuit. The LCM sees the amperage increase as a potential electrical problem and shuts down the circuit (and/or throws an error code). The simple solution is to install relays. A relay will only draw milliamps which won't cause the LCM to error out. This issue is more likely to occur with pickup truck tow vehicles than it is with motor homes but can happen on both. Most any 10+ amp automotive relay found at any auto parts store will work. We offer a 30 amp heavy duty automotive relay for sale on our website. We use these relays for all of our heavy duty semi-truck tail-turn-brake lighting installations. We also offer this water proof junction box which will house 3 relays.
Here are two relay wiring diagrams for the two possible lighting circuit configurations:


3M Adhesion Primer Must be Used!
To achieve the full adhesive strength of the 3M® tape affixed to the back of the Boogey Lights® LED strips 3M® Adhesion Promoter (aka Primer) must be applied to the mounting surface first. This is an important step to ensure a secure bond. The 3M® Adhesion Promoter creates a chemical bond between the tape and the surface such that the LED strip will stay stuck (at least until you decide you want to remove it). Using any other solvent such as rubbing alcohol or acetone is not the same thing as using 3M® Adhesion Promoter. While these solvents will help clean the surface, they do not prime the surface nor can they be used instead of the 3M® Adhesion Promoter. 3M® Adhesion Promoter IS INCLUDED with this kit. If you want your strips to stay stuck it's important to follow the mounting instructions included with the kit and to use the 3M® Adhesion Promoter included.
Did we mention that using the 3M® Adhesion Promoter included in this kit is an important step in the installation process you should not skip?
Installation Video
In this video Dave from Watts on Wheels installs our REDA Tail-Turn-Brake light product to his DRV Fifth Wheel trailer. They also install awning lights too. Check it out.
Need additional assistance? Give us a call and we'll be happy to assist!