


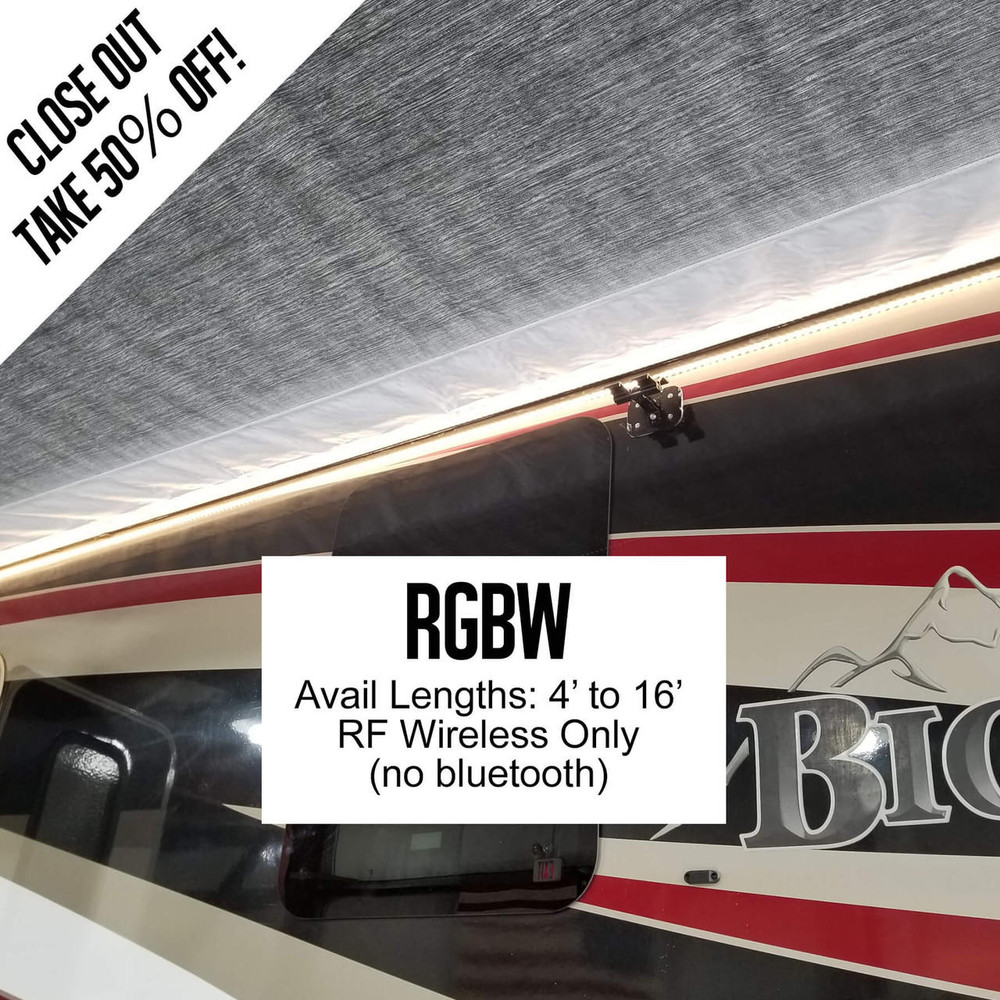


RGBW LED Awning Light Kit For RVs, Campers, & Trailers
April 1, 2024. The LED controller in this product is out of production with limited stock remaining which is why we're offering the special 50% off promotion. The RGBW LED strips in this product however are not out of production and in fact, are our fastest selling LED product right now. We are producing more RGBW as quickly as we can but quantities are limited; changes daily. If you want RGBW, we suggest purchasing our RV LED AWNING LIGHT KIT as orders for that product receive priority when stock is limited.
THIS IS A CLOSE OUT MODEL. Use promo code PUPFIVEZ189KT at checkout for a 50% discount on this product only. Why is this a close out product? Because the LED controller offered with this awning light kit is our GEN1 RGBW LED controller which is RF wireless only. It does not include Bluetooth functionality. Most consumers these days want to be able to control their awning light with their bluetooth enabled smartphone. If you don't care about bluetooth functionality, this 50% offer is an incredible bargain. Once we sell through the remaining GEN1 controllers, this offer will go away. If however you're looking for an RGBW LED awning light that has both RF + Bluetooth control, check out our RV LED AWNING LIGHT KIT here. It's our most popular RV awning light kit that offers all the latest features including bluetooth with our new GEN2 RF + Combo Bluetooth LED controller.
The Boogey Lights® RGBW LED awning light kit is designed to attach to the side of an RV, trailer or camper just beneath the awning shining outward. By installing it this way, the light can be seen regardless if the awning is in or out. Also, when the awning is extended, the light reflects off the bottom of the awning which provides a nice glow effect under the entire awning. On full power the awning light provides an incredible amount of light. In fact, in most cases you'll need to dim the light it's so bright. This awning light kit is available in a number of configurations to fit any awning. It is not specific to any one awning brand or manufacturer.
This LED Awning light strip is thicker than any other LED strip on the market. It's also wider than most (1/2" wide). It is designed to attach directly to the side of the RV just beneath the awning (or awning housing if your RV has one) shining outward. It will work on any RV or trailer this way. It is NOT designed to slide in or mount directly to a channel or other plastic housing affixed to the awning itself. Attempting to do so will likely damage the LED strip and/or cause it to fail prematurely; neither of which are covered under warranty. If you take the time to read and follow our detailed installation instructions, this LED light strip will last for many years.
WHY RGBW?
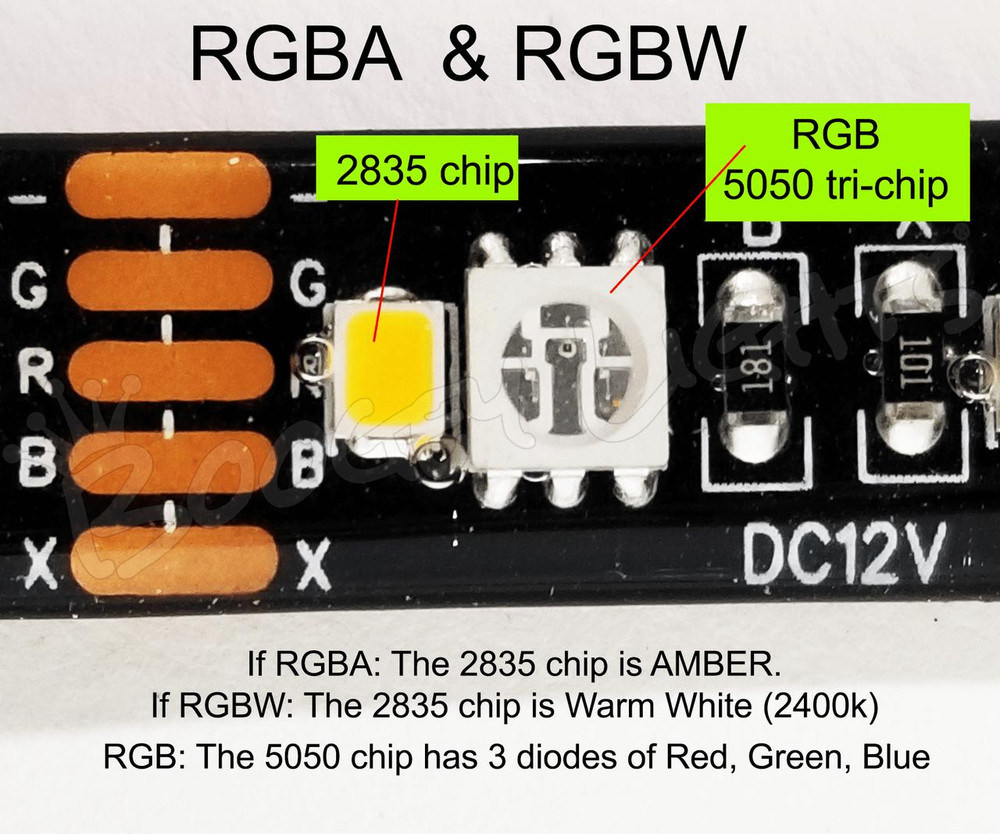
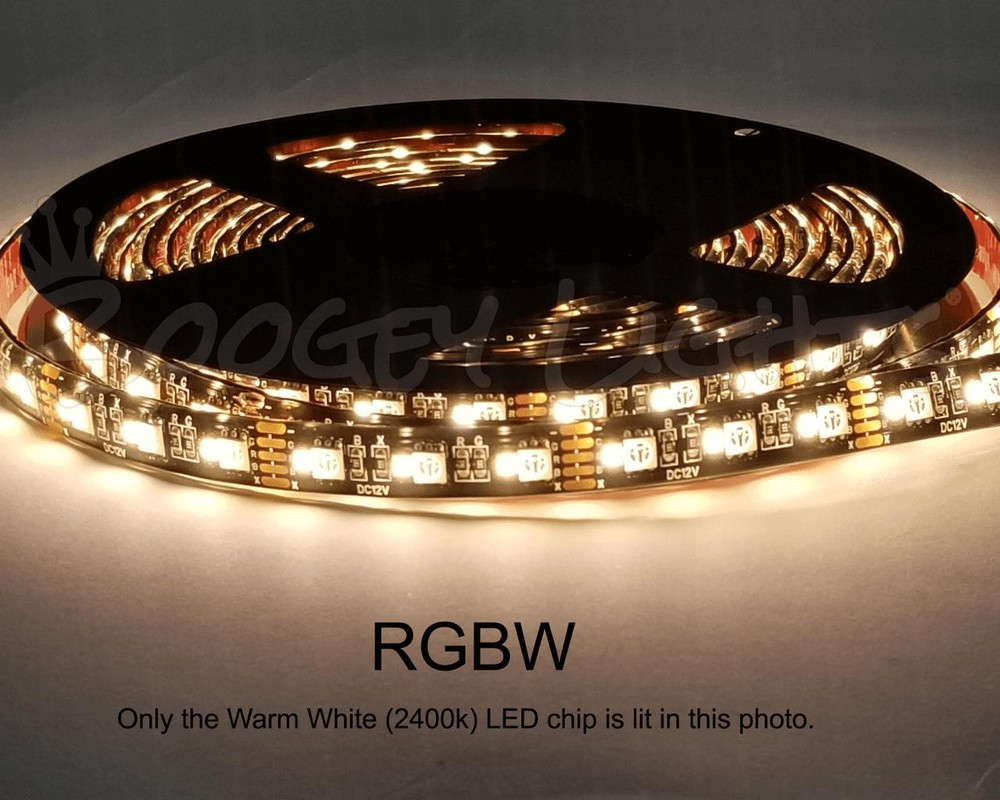
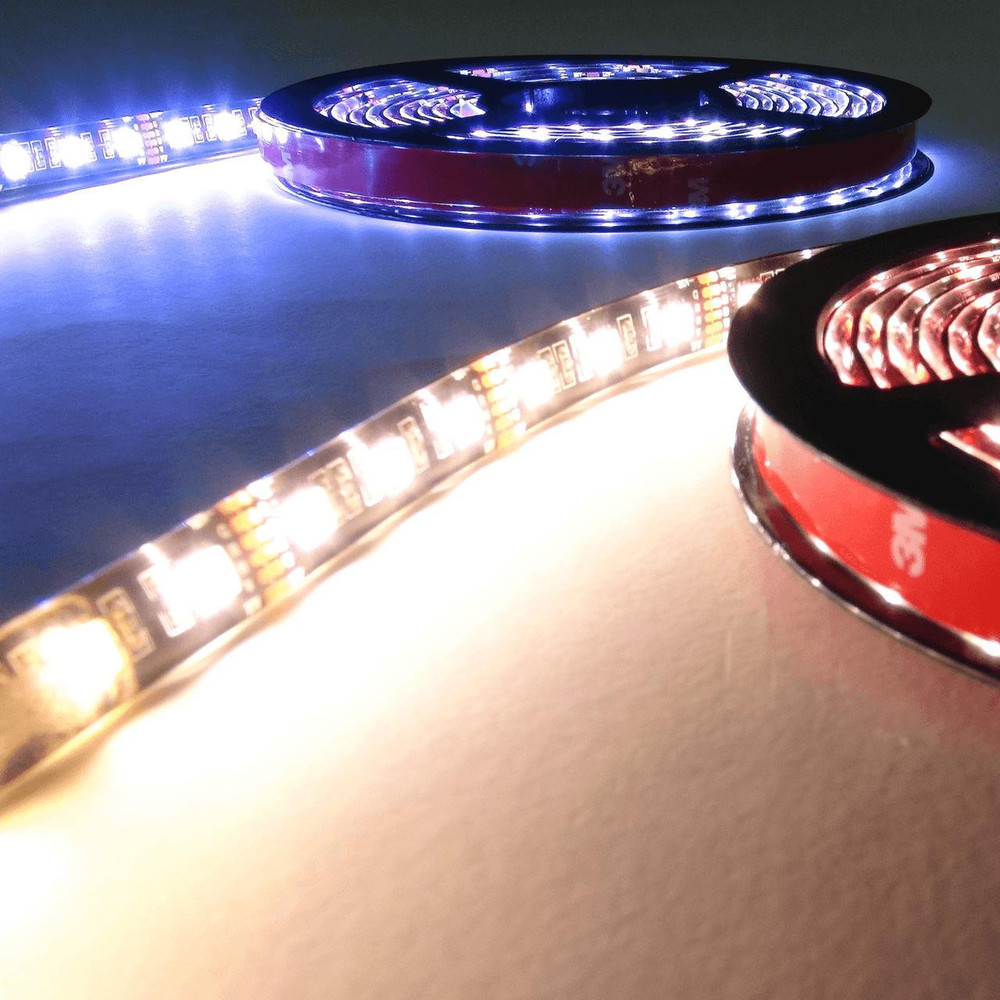
RGBW gives you two different white color temperature options on a single LED strip: Bright White (aka 'cool white' @6000k) and Warm White (aka 'candle white' @2500k) ... PLUS ... SIX additional colors with the RGB diodes. On an RGB LED strip, mixing equal parts red + green + blue = bright white. Some people call it a 'cool white' because it has a blueish tint to it and is excellent for functional lighting. That bright white color however can be a little over-powering even when dimmed when you want a more subtle, accent light. Enter RGBW. On an RGBW led light strip, in addition to RGB (which will create Bright White), you get an extra diode which is Warm White. That extra warm white diode has a Kelvin temperature of 2500 which means it has a yellowish look giving it a warmer, softer, candle like look (see photo below). That fourth diode on the RGBW led strip can be wired to an existing OEM switch allowing you to turn on just the warm white diode with the flip of a switch. Or, you can use the included RF wireless remote to control that fourth Warm White diode (along with the RGB diodes too).
FEATURES
On full power this RGBW surface mounted low profile LED light strip provides an incredible amount of light in a wide variety of colors you control with the included RF wireless remote control.
This RGBW LED Awning light kit includes our nine button GEN1 wireless RF handheld remote control. (NOTE: It does not include bluetooth control. RF wireless only.) It will power and control both the RGB and the Warm White diodes on the RGBW LED strip. The RGB diodes and the Warm White diode control operation are independent of each other. The wireless RF controller provides these capabilities:
- Wireless Control: On/Off, Dimming, Fading, Breathing and Strobbing. The speed of these features too can be adjusted faster or slower.
- Color Selections: Red, Green, Blue, Bright White, Warm White, Light Blue, Boogey Lights Green (lime green/yellow) and Hot Pink/Purple.
The Long Range M7 remote control offers nine levels lighting effects (e.g. 9 levels of dimming). The Long Range M7 RF remote uses one A27 12v alkaline battery (included with remote). Up to three Long Range M7 remotes may be paired with one controller. Two antennas are included: a 2" stubby antenna and a magnetic mount removable whip antenna with 15' cable.
The RGBW LED controller included with this awning light kit measures 4.25" x 2.25" x 7/8". Maximum capacity is 1200 LEDs. 12vdc power required. Photos of this LED controller with RF wireless remote are included in the photo carousel of this product page.
NOTE: This is an RF wireless only LED controller. It DOES NOT include Bluetooth control.
The PCB color is BLACK.
AVAILABLE OPTIONS
LED Strip Length: Select the length of the LED strip. Note that the maximum length of one LED strip is 16'. They cannot be daisy chained. You can however purchase multiple strips to give the illusion of a single LED strip. More information on the length options appears below. Also, click on the INSTALL tab of this product page for details.
Optional - Add Power Converter: Boogey Lights LED lighting systems are native 12vdc systems. As long as you have 12vdc power available, that's all you need. Some folks however prefer to use 120vac because it might be more easily accessible in their RV. If so, we offer a 5AMP, 10AMP and 20AMP AC to DC power converter. Make your selection from the drop down box.
Optional - Add Dimmer Switch: We offer a wired on/off/dimmer switch option which can be used in RGBW installations. More detail about why can be found on the CONFIG tab of this product page.
LENGTH CONSIDERATIONS
The maximum length of a single LED strip is 16 feet. One single 16' LED strip contains 300 super-bright LEDs. For shorter or longer lengths, use the KIT CONFIGURATION drop down box which offers these lengths: 14', 12', 10', 8', 6', 4', 24' (2 - 12'), 20' (2 - 10') and 18' (1-10', 1-8'). Each led strip includes a 15' power lead hard wired to one end of the LED strip. However, the kit configurations that have two (2) LED strips, each strip will include a 15' power lead however we'll include an additional 15' of power lead so you can extend one of them depending on how you mount them. There are no connectors. Connectors are the single most common point of failure in all other lighting brands. Boogey Lights LED strips all are hardwired by design. RGBW has 6 conductor power lead although on the RGB, only 5 of the 6 leads are used. The RGBW LED strip is 1/2" wide (12mm) and 1/8" high/thick.
Will Boogey Lights® Work with Other Brands?
The short answer is probably not. All Boogey Lights® RGB LED strips are COMMON CATHODE LEDS. They share a common ground and will only work with positively switched controllers. Most LED strips on the market today are COMMON ANODE because the controller technology used to power them is less expensive to manufacture. However they're not nearly as bright and are an overall inferior design when compared with COMMON CATHODE LEDs. For more information, click the button below.
A Word About 12vdc Power
All Boogey Lights® controllers and LED strips operate on 12vdc which is readily available on any RV made and offered for sale in North America. An essential skill with installation of any Boogey Lights LED products is knowing how to correctly wire the product to a 12vdc circuit. This includes understanding the importance of having a properly sized fuse at the power source, polarity, how to properly seal an electrical connection, using properly sized wire gauge for the load, measuring voltage and measuring the additional amperage draw you're adding. Be mindful of the amount of amperage you're drawing through your lighting circuit and to not exceed the circuit component limitations. The amount of power (amps) you're pulling through the circuit will vary based on a combination of three factors: 1) The number of LEDs in the circuit, 2) the amount of copper wire in the circuit and 3) the input voltage to the circuit. The amperage ratings for our switches, controllers and LEDs assume 12.5 vdc input or less. If you are uncertain or unfamiliar with any of these concepts, we urge you to ask someone who has the knowledge to assist you. Electricity is unforgiving.
OTHER ITEMS YOU MAY NEED
No two installation scenarios are the same. Not everyone shares the same installation quality goals. Some folks are OK with twisting wires together, others want to solder them. Some folks are OK with running wires where they may be seen or unprotected to save money/time, others want a tidy, clean install without any wires showing. Some folks are OK with mounting their LED strips to whatever surface they can find, others want to take the time necessary to build out appropriate mounting surfaces to provide the best lighting effect on their vehicle. The point is it's not possible to provide all the materials necessary for all installation scenarios and quality goals. Our light kits provide the essential components needed for a high-quality, functioning lighting system. Installation of our light kit to your specific vehicle may however require additional items to make it look and fit the way you want. This is particularly the case with electrical wiring and mounting of LED strips. Before proceeding with your installation we suggest you consider THESE OTHER ITEMS.
NOTE ON EXTENDED USE
The LEDs used in this product are very bright; the brightest 12vdc LED lights available. They're designed to be used for accent lighting applications where they are typically powered on for a few hours (usually on a dimmed setting) and then powered off. While they can be used in functional lighting applications (e.g. bright white to temporarily illuminate a work area), the lights should NOT be left powered on for extended periods of time (e.g. 6+ hours). If the LEDs are left powered on for long periods of time - particularly on their brightest setting - the LEDs closest to the power source will have a burned look to them over time. This is because the amount of voltage being pulled through the LEDs closest to the power source will be higher than the voltage going through the LEDs further down the strip. The end result is that those LEDs closest to the power source will be hotter thus creating the burned look. This will occur mostly when displaying the color white on a full brightness setting but can also occur with other colors. For this reason, we do NOT suggest leaving these LED lights powered up for extended periods of time particularly on their brightest setting. Burned looking LEDs is NOT covered under warranty.
THE KELVIN SCALE
INSTALLATION VIDEO
In this video Nomad Neal installs a Boogey Lights multi-color awning light kit on this DRV Mobile Suites fifth wheel trailer. Also, if you start the video at the beginning you'll see Dave from Watts on Wheels install our REDA Tail-Turn-Brake light product to his DRV Fifth Wheel trailer. Check it out.
Have a question you can't find the answer to here? Check out our FAQ's of the most commonly asked questions.
Product Configuration Options
KIT CONFIGURATION LENGTH OPTIONS
The default length is 16', which contains 300 super-bright LEDs. For shorter or longer lengths, use the KIT CONFIGURATION drop down box which offers these lengths: 14', 12', 10', 8', 6', 4', 24' (2 - 12'), 20' (2 - 10') and 18' (1-10', 1-8'). Regardless of the length, each led strip includes a 15' power lead hard wired to one end of the LED strip. There are no connectors. Single color LED strips have 2 conductor power lead. RGB has 4 conductor power leads. RGBW and RGBWW both have 6 conductor power lead although on the RGBW, only 5 of the 6 leads are used. Single Color and RGB led strips are 3/8" wide (10mm). RGBW and RGBWW are 1/2" wide (12mm). All are 1/8" high/thick.
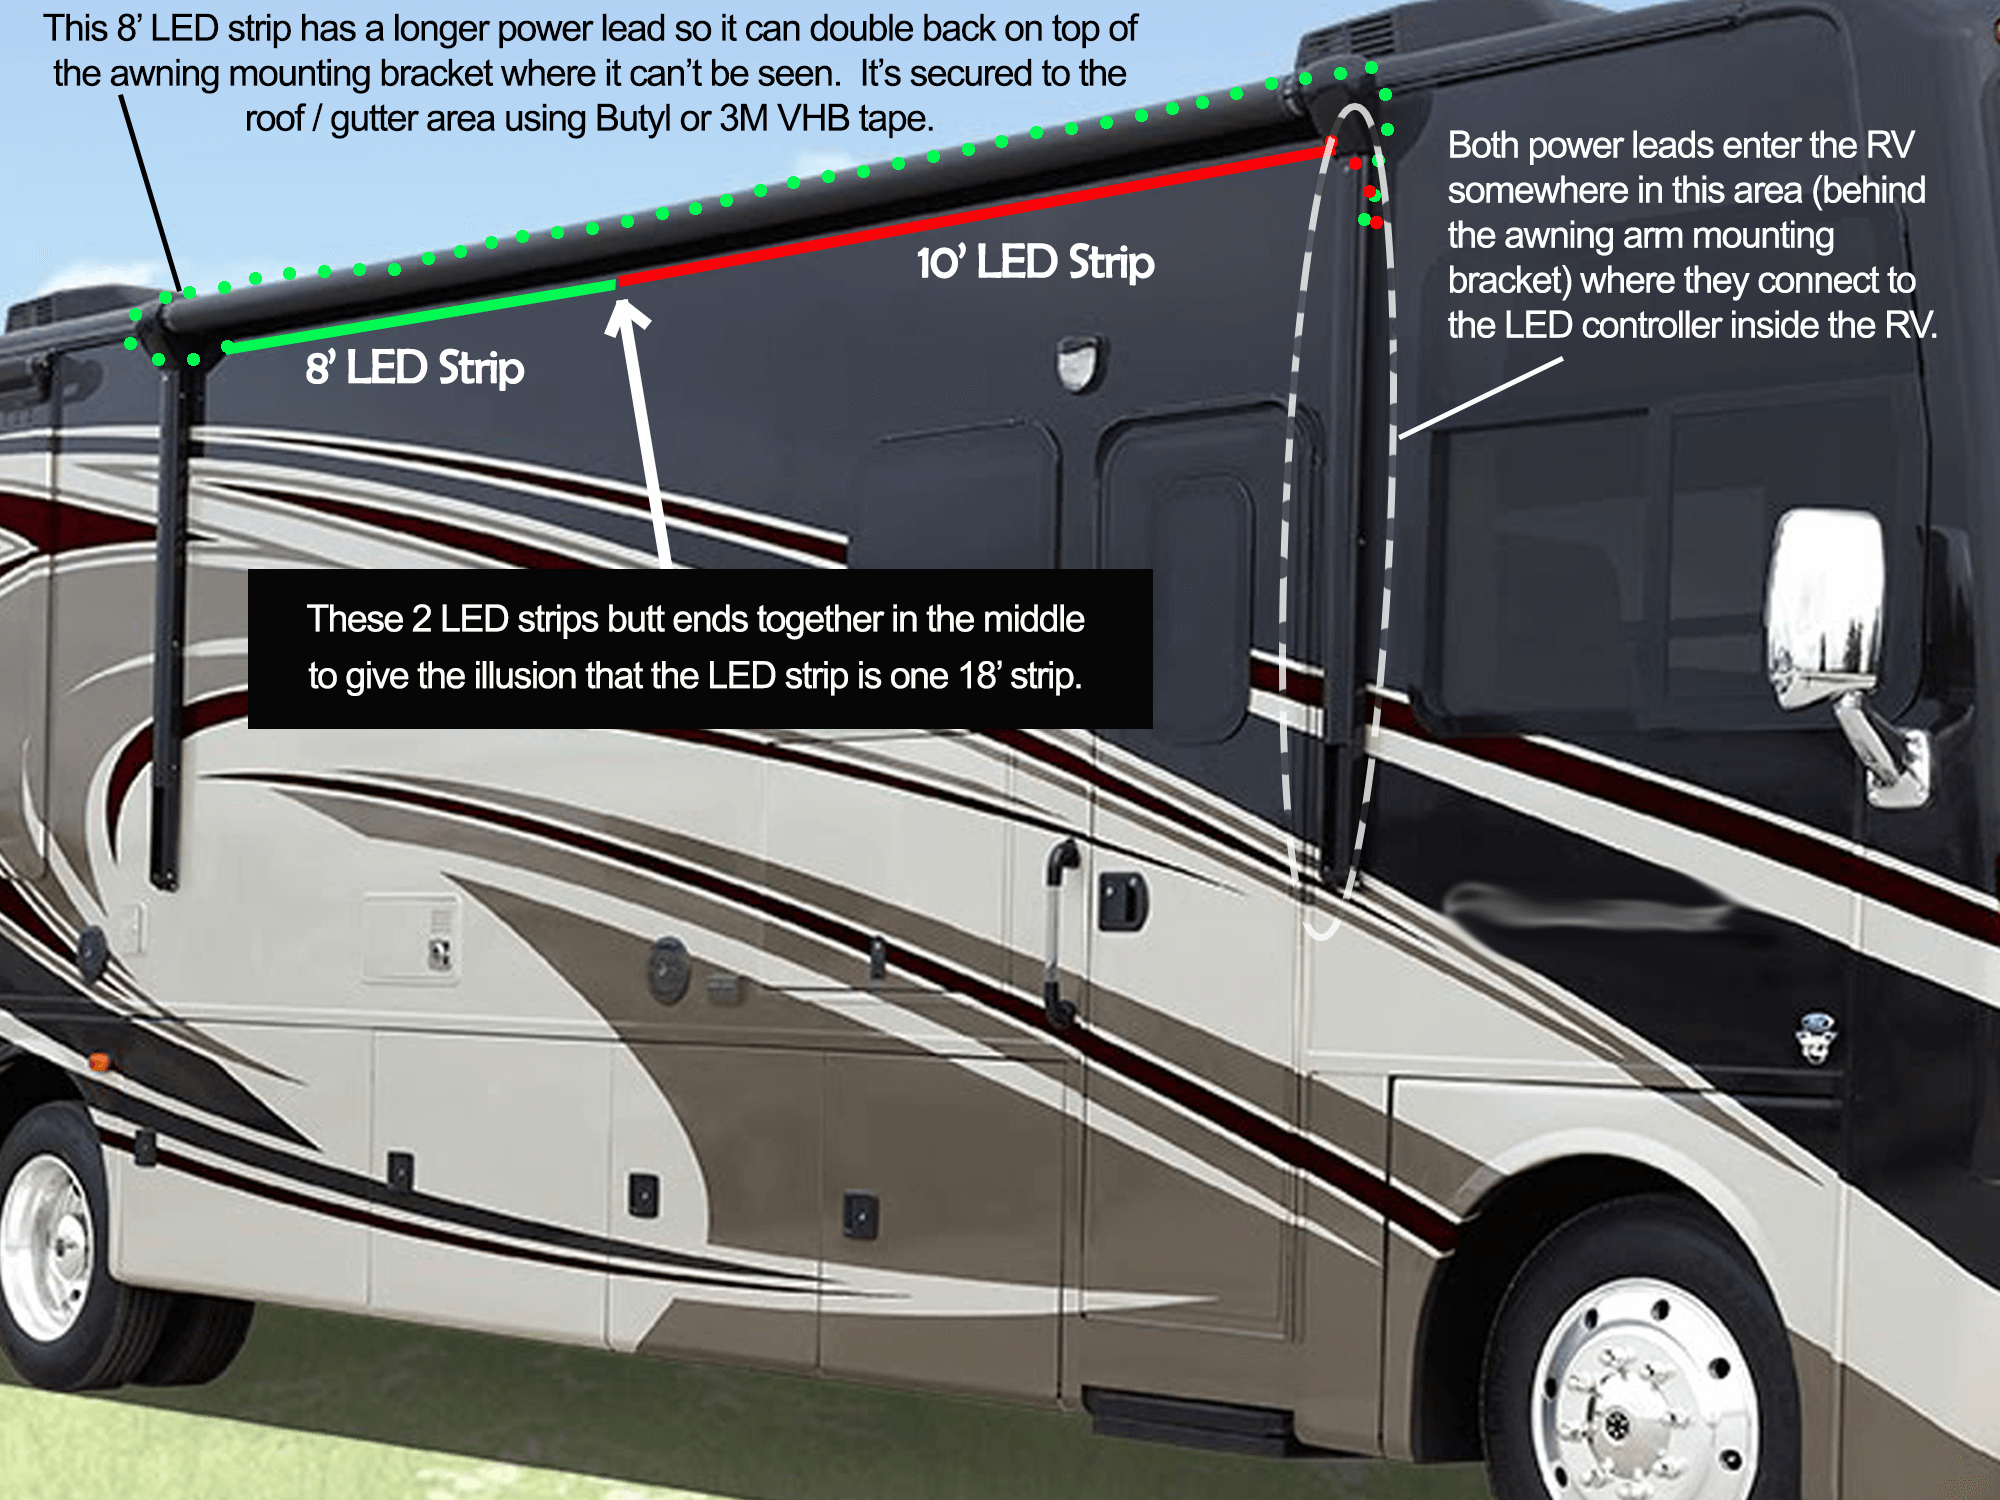
The maximum length of a single LED strip is 16'. They cannot be daisy chained together. The laws of electricity won't allow it to go longer with today's commericially available technology using 12vdc power and super bright 5050 led chips. If you have an awning that is longer than 16' (e.g. 20'), you have two options. One is to simply center the 16' LED strip in that 20' space. Boogey Lights are already very bright so for most folks, having enough light is never a concern. This is what most people do. That said, some prefer to have full coverage of the entire 20' area. In that case it's possible to cover that entire 20' span using two LED strips. In the case of a 20' span you can order two - 10' LED strips using the KIT CONFIGURATION drop down selection above. You'll notice we offer the option of 2 - 10' LED strips (20' total coverage) as well as 2 - 12' LED strips (24' total coverage). Regardless of how you break up the 20' span, the two LED strips (totalling 20') are installed such that the two LED strips butt together; end to end, which gives the illusion of a single 20' long LED strip. We have a diagram of how this is accomplished on the INSTALL tab. If ordering multiple strips from the Kit Configuration drop down (2 - 10' or 2- 12' LED strips), one of the LED strips will have a longer power lead on it to allow for the power lead to double back over. See the diagram on the Installation tab.
DIMMER SWITCH OPTION
We offer dimmer switch options as a convenience to customers. These same dimmer switches are OEM switches used by many RV manufacturers. More details on the optional DIMMER switch offered with this kit can be found on this dimmer switch product page.
The dimmer switch is most often used in the following situations:
1. Single Color awning light installation. In this scenario there usually isn't an existing on/off switch already installed so the customer needs a means by which to turn the awning lights on, off and of course, dim.
2. RGBW (or RGBA) awning light installation. In this scenario the customer wants to operate just the Warm White diode (or the Amber) using a hard wired switch instead of the wireless remote control. The RGB diodes will be controlled by the LED controller.
Optional: Add Power Converter
Boogey Lights® light systems are native 12vdc devices. They're designed to work on motor vehicles sold in North America which are also 12vdc. We always recommend connecting directly to 12vdc. There's no reason to use a power converter in the vast majority of installation scenarios. If however you don't have 12vdc power readily available, you can purchase a 120vac to 12vdc power converter for those situations. We offer 5amp and 10amp 120vac to 12vdc power converters. View Wiring Info
Extra 3M Adhesion Primer
3M Promoter is a powerful adhesion primer. It's an essential step in the installation process but you don't need much of it to make it work. A simple single swipe on the surface you're mounting the light strip to is all you need. Our lighting kits include enough 3M Adhesion Primer to mount the strips in the kit for most installations. Some customers however feel better if they "paint" the mounting surface completely with it -- which is fine if you want to but not necessary. The problem is that 3M Adhesion Primer isn't readily available everywhere; particularly weekends, holidays and evenings. If you use all of the primer that's included with the kit but run out before you're finished, you'll have to wait to finish the job until you get more adhesion primer. If you're one of those people who would prefer to have a little adhesion primer left-over just in case, we offer the option of adding an additional bottle to your order.
Direct Replacement Options
SINGLE COLOR
Many new RVs today that come equipped with an awning will also have an awning light strip installed from the factory. That LED light strip will almost always be a single color LED light with a simple on/off switch installed usually near the entrance door of the RV. Boogey Lights® single color LED light strips can be a direct replacement for many factory installed LED awning lights. There are however some things to consider based on personal preference.
Without Wireless Remote Control:
If purchased without the remote control, the Boogey Lights® single color LED light strip can be used as a direct OEM replacement for most existing awning light strips installed by RV manufacturers. The Boogey Lights® single color LED strip has a two conductor positive and a negative wire that connect to 12vdc power. In most cases you can use the existing awning light wiring (and wall switch) already in place. The one caveat is that the existing wiring and circuit rating can support the amperage of the new Boogey Lights LED strip compared to the original OEM light. Generally, if the length of the led strip you're adding is the same length or less than what was there originally, you will probably be OK. When in doubt, examine the gauge of the power lead wire feeding the existing OEM light and compare it to the wire gauge of the new Boogey Lights LED strip. It should be as thick or thicker. You might also want to do some amperage calculations using the SPECS data found on this product page. That amperage draw data will give you a good idea of total amperage of the new Boogey Lights LED strip you're adding. Remove the old LED strip, install the Boogey Lights® strip where the old LED strip used to be and connect the power lead coming from the Boogey Lights strip to the existing 12vdc power leads that were used for the old LED light strip. The existing wall switch will turn on/off the LED light. Note that in this scenario the LED light cannot be dimmed (unless of course the existing OEM switch has a built in dimmer). The light is either on or off. If you want a dimmer switch, you could also replace your existing OEM on/off switch with a hard wired dimmer switch. They're offered on this product as an option.
PROS: Faster, easier to install. As close to plug-n-play as you'll find short of ordering the exact same LED light that came with your RV from the factory (if available).
CONS: The light cannot be dimmed. It's either on or off (unless of course you add a dimmer switch or your OEM switch has a dimmer built in). There are no wireless remote control capabilities.
With Wireless Remote Control:
If you wish to use the wireless remote control (there are distinct advantages to doing so) you can still use the Boogey Lights® LED strip as a direct replacement however you'll need to find a location to mount the LED control box where it will be protected from the elements. In this scenario the controller power (12vdc) is connected to the existing awning light power lead coming from the inside wall switch. The LED controller is inline between the wall switch power and the LED light strip. When the wall switch is on, 12vdc power is provided to the LED controller. At that point you can use the wireless RF remote control to operate the awning light (on/off, dimming, flashing and speed control). Of course anytime you turn off the wall switch power, doing so will also turn off the awning light.
PROS: The light can be remote controlled using the included RF wireless remote which offers dimming, flashing, speed control and on/off capabilities.
CONS: Takes longer to install because the LED controller needs to be mounted in the circuit. Not all installation scenarios will have room for the LED controller to be conveniently mounted.
Regardless of which option you choose, the vast majority of single color LED light strips installed on RV's today are 10mm wide. So the Boogey Lights® single color LED strip will usually fit where the old LED strip used to be width wise. Because the Boogey Lights® LED strip is thicker than standard LED strips, if the existing LED strip is enclosed in a channel of some type you will need to verify how much room you have height wise. Boogey Lights® LED strip is 3mm (1/8") high. As for the length, the Boogey Lights® LED strip is 16' long which is typical of most every 12vdc LED light strip available today. It can be cut if your awning is shorter. If your awning is longer, most customers will simply center the 16' LED strip. Note: Do not attempt to slide the Boogey Lights led strip into the same channel where the OEM factory LED light strip was. Boogey Lights LED ligths are designed to attach to the side of an RV, trailer or camper just beneath the awning shining outward. By installing it this way, the light can be seen regardless if the awning is in or out. Also, when the awning is extended, the light reflects off the bottom of the awning which provides a nice glow effect under the entire awning.
Mounting On The Awning Roller
Boogey Lights® LED strips are designed to be mounted immediately underneath the awning, affixed to the side of the RV or on the awning housing which is attached to the side of the RV. Some older awning styles have the LED strip mounted at the end of the awning on the awning roller. We do not recommend using Boogey Lights® for this type of installation as doing so will create a power lead fail-point as they roll and unroll for each use. The copper wire will eventually break and/or the stress placed at the point where the power lead attaches to the LED strip will force a failure of the LED strip. Mounting the LED light strip directly on the awning roller also means the light can only be used when the awning is fully extended. While we know some customers have used Boogey Lights® this way, our warranty does not cover this type of installation.
MULTI-COLOR RGB, RGBW and RGBA
Boogey Lights® MULTI-COLOR RGB, RGBW and RGBA LED awning light kits aren't in most cases a direct replacement for a factory installed LED awning light. The reason is because most factory installed LED awning lights are single color - not multi-color. A multi-color RGB/RGBW/RGBA awning light requires an LED controller (the "brains") to operate the LED strip, create/mix the various colors and wirelessly control the available lighting features. Whereas a single color LED light only needs 12vdc power (12v+, 12v-) to turn it on or off. So if you're looking for a direct replacement for a single color factory installed awning light and you only want to display one color, select our SINGLE COLOR light strip option. That said, if you want to upgrade your existing single color awning light strip with a multi-color light, there are some options to incorporate your existing single color factory installed on/off wall switch to control your multi-color LED awning light. Read on if you're interested in learning more ...
Installing a Multi-Color RGB/RGBW/RGBA LED Awning Light Strip Using Existing Factory Installed Single Color Wiring and Wall Switch
If you've looked at or downloaded our installation instructions for this product you probably noticed we recommend wiring the LED controller directly a fused, 12vdc power source either inside the RV or to the house batteries. For 5th wheel and travel trailers its often easier to wire directly to the house batteries. With motorhomes it's often easier to connect to a 12vdc power source inside the RV itself. If inside the RV, the LED controller is typcially mounted in a cabinet, closet or other hidden area. In this scenario the existing factory installed awning light power cable and wall switch typically aren't used, but it doesn't have to be that way. There are a number of options to incorporate the existing factory installed switch with your Boogey Lights RGB or RGBW Awning Light.
OPTION 1: The first option is to use the existing factory installed on/off wall switch to toggle power on/off to the Boogey Lights LED controller. In this scenario the LED controller power (12vdc) is connected to the existing awning light power lead coming from the factory installed wall switch. The LED controller is inline between the wall switch power and the LED light strip which is mounted on the RV under the awning. When the wall switch is on, 12vdc power is provided to the Boogey Lights LED control box. At that point you can use the Boogey Lights wireless RF remote control (or bluetooth smartphone APP) to operate the awning light (on/off, dimming, flashing, speed control, change colors, etc). Of course anytime you turn off the wall switch power, doing so will also turn off the awning light. So to turn on the LED controller, you first have to turn on the wall switch and then use your wireless remote (RF or Bluetooth) to operate the Boogey Lights RGB awning light. This configuration also assumes the 12vdc circuit the factory installed switch is connected is sufficiently sized to handle the amperage of the Boogey Lights awning light strip you're installing. In our view, while this configuration will usually work, it's clumsy. Not ideal. We believe there's a better option to incorporate the existing factory installed wall switch with RGB lights which brings us to the second option.
OPTION 2: There are three variations here depending upon the temperature of 'white' light you want your wall switch to display when it's turned on.
a. RGB / Cool White (6000k temp)
b. RGBW / Warm White (2400k temp) (or RGBA)
(see photo below representing the different color temperatures available for white)
RGB / Cool White (6000k temp)
This variation uses the existing factory installed wall switch to turn on/off a COOL WHITE light using the Boogey Lights RGB LED strip -- just like the factory installed awning light used to do. Then, using the Boogey Lights wireless remote (RF or Bluetooth) you can access all of the other colors and features (e.g. dimming, flashing, color rotation, speed control, programming mode, etc.). In our view if you want a COOL WHITE light, this is the best of both worlds. You can keep the functionality of the existing factory installed wall switch to turn on/off a cool white light under the awning while also having the functionality and advanced features of a multi-color awning light complete with wireless RF and bluetooth control. If you're interested in configuring your Boogey Lights RGB awning light this way, we offer this WIRING DIAGRAM AND VIDEO showing how to do it. It requires a little more time to do the installation but we believe it's worth it.
RGBW / Warm White (2400k temp) [Also applies to RGBA]
This variation uses the existing factory installed wall switch to turn on/off a WARM WHITE light using the Boogey Lights RGBW LED strip -- just like the factory installed awning light used to do. Then, using the Boogey Lights wireless remote (RF or Bluetooth) you can access all of the other colors and features (e.g. dimming, flashing, color rotation, speed control, programming mode, etc.). In our view if you want a WARM WHITE light, this is the best of both worlds. You can keep the functionality of the existing factory installed wall switch to turn on/off a cool white light under the awning while also having the functionality and advanced features of a multi-color awning light complete with wireless RF and bluetooth control.

Mounting On The Awning Roller
Boogey Lights® LED strips are designed to be mounted immediately underneath the awning, affixed to the side of the RV or on the awning housing which is attached to the side of the RV with the LED light shining outward. Some older awning styles have the LED strip mounted at the end of the awning on the awning roller. We do not recommend using Boogey Lights® for this type of installation as doing so will create a power lead fail-point as they roll and unroll for each use. The copper wire will eventually break and/or the stress placed at the point where the power lead attaches to the LED strip will force a failure of the LED strip. Mounting the LED light strip directly on the awning roller also means the light can only be used when the awning is fully extended. While we know some customers have used Boogey Lights® this way, our warranty does not cover this type of installation.
Installation Tips
Installing the Boogey Lights® LED awning kit is relatively simple. Typical installation time is about 90 minutes. Some things to keep in mind before you start.
- WE STRONGLY SUGGEST BENCH TESTING YOUR LIGHTS AND CONTROLLER BEFORE MOUNTING! We cannot emphasize this enough. Probably 95% of all calls we receive from customers are about problems or issues that could have easily been avoided had the customer taken the extra 15 minutes to bench test their lighting setup before installation. Not only does bench testing give you an opportunity to understand the configuration, it also will flush out any problems or misunderstanding about the product and use before mounting.
- Make sure you know where your electrical connection will be. Most RVs (motorhome, travel trailer or fifth wheel) have an electrical access panel somewhere on the side of the RV where 12vdc power is available.
- Decide how you are going to connect the power lead coming from your LED light strip to the power source. Many RV awnings (particularly motorized awnings) have a mounting bar that is already affixed to the side of the RV. If so, you can usually run the power lead cable coming from the LED light strip inside that mounting bar. If not, you can use some flexible Wire Trak™ raceway to hide the power lead cable. The Wire Trak™ raceway uses the same 3M tape technology our Boogey Lights do so it's easy to affix the raceway to the side of your RV.
- The only way to ensure the LED light strip stays stuck to the side of your RV is to make sure you prepare the surface in accordance with the directions. Every LED light kit we sell includes 3M promoter (aka "primer"). It's absolutely critical the surface be prepared using this special 3M promoter and that you follow the directions provided with every light kit.
- If you need to cut the LED strip, make sure you do it before affixing to your RV. Our LED strips can be cut every 3 LEDs and are clearly marked.
- We have had customers install the awning light to the end of the awning on the roller instead of to the side of the RV/Camper. The challenge with this installation scenario is running the power lead back to the RV. There are a couple of options, one of which is to use one of our quick-disconnect connectors but of course you have to disconnect/reconnect the power cord every-time you want to use it. The other is to snake the power lead wire through the seam on the side of the awning material.
- 3M Adhesion Primer. We provide small bottles of 3M Adhesion Promoter for our products. All you need is a shop rag, sponge or towel of some kind to apply the promoter to the surface. Once you paint on the promoter you have at least an hour to mount the light strip although we recommend proceeding immediately after painting the surface with the 3M Promoter.
- When in doubt, call our technical support team! We've done this thousands of times. We know what works.
Want to install both an Awning Light and Under-Glow Light system on the same LED Controller?
Yes, it can be done although the installation is more challenging. Why? Because the power lead wire that operates the Awning Light LED strip has to be routed down to the LED Controller that powers the Under-Glow system which if you're following our installation instructions will be installed in the RV's house battery bay. Finding that route can be challenging. Not impossible -- we've done it many times -- but it does add time (1-3 hours) and complexity to the installation. A lot depends on the construction of your RV and where the Awning Light is located in relation to where the LED CONTROLLER is mounted. For those that want this option, you'll see we offer our DUAL ZONE LED CONTROLLER on this product. Zone 1 can be wired to the Awning Light. Zone 2 can be wired to the Under-Glow System. While this configuration can also be done with a single zone LED controller, we don't recommend it because there will be times when you don't want both of these lighting systems on at the same time (or displaying the same color). Having the abiilty to operate the Awning Light and the Under-Glow Light independently is an important requirement in our view. It's a suggestion only.
The other issue to be mindful of is power consumption. A typical awning light will draw no more than 3.5 amps (often less depending on the color being displayed). A typical under-glow system will draw upwards of 18 amps -- sometimes more. As such, you have to use a HEAVY DUTY LED CONTROLLER which is capable of supporting that kind of amperage draw. A larger controller capacity means the controller itself is physically larger. And, it should only be mounted within 12" to 36" of the power source (house batteries) due to the higher amperage draw. For these reasons, a lot of customers find it easier to mount a small LED controller with relatively low amperage draw near the awning light itself that is dedicated to operating the awning light only versus trying to merge the two lighting systems together on the same controller. Our products will support both options. Ultimately it's up to the customer to decide what works best for them.
In this video Nomad Neal installs a Boogey Lights multi-color awning light kit on this DRV Mobile Suites fifth wheel trailer. Also, if you start the video at the beginning you'll see Dave from Watts on Wheels install our REDA Tail-Turn-Brake light product to his DRV Fifth Wheel trailer. Check it out.
Have An Existing Wall Switch You Want to Use with your Multi-Color LED Strip?
You have three options depending upon the temperature of 'white' light you want your wall switch to display when it's turned on. Here are the three options based on the type of multi-color LED strip purchased:
a. RGB / Cool White (6000k temp)
b. RGBW / Warm White (2400k temp) [Also applies to RGBA]
c. RGBWW /Warm White (2400k) and/or Cool White (6000k)
(see photo below representing the different color temperatures available for white)
RGB / Cool White (6000k temp)
This variation uses the existing factory installed wall switch to turn on/off a COOL WHITE light using the Boogey Lights RGB LED strip -- just like the factory installed awning light used to do. Then, using the Boogey Lights wireless remote (RF or Bluetooth) you can access all of the other colors and features (e.g. dimming, flashing, color rotation, speed control, programming mode, etc.). In our view if you want a COOL WHITE light, this is the best of both worlds. You can keep the functionality of the existing factory installed wall switch to turn on/off a cool white light under the awning while also having the functionality and advanced features of a multi-color awning light complete with wireless RF and bluetooth control. If you're interested in configuring your Boogey Lights RGB awning light this way, we offer this WIRING DIAGRAM AND VIDEO showing how to do it. It requires a little more time to do the installation but we believe it's worth it.
RGBW / Warm White (2400k temp) [Also applies to RGBA]
This variation uses the existing factory installed wall switch to turn on/off a WARM WHITE light using the Boogey Lights RGBW LED strip -- just like the factory installed awning light used to do. Then, using the Boogey Lights wireless remote (RF or Bluetooth) you can access all of the other colors and features (e.g. dimming, flashing, color rotation, speed control, programming mode, etc.). In our view if you want a WARM WHITE light and you want to be able to control it using the existing OEM switch, this is the best of both worlds. You can keep the functionality of the existing factory installed wall switch to turn on/off a cool white light under the awning while also having the functionality and advanced features of a multi-color awning light complete with wireless RF and bluetooth control.
AWNING LONGER THAN 16'?
Is your awning longer than 16' and your want full coverage? Here's a diagram of how to accomplish that using two LED strips
Did we mention that using the 3M® Adhesion Promoter included in this kit is an important step in the installation process you should not skip?